JNizzle
Member
Hey guys!
Recently I managed to pick up a Macintosh Classic in very good nick, however, it wasn't working.
The previous owner told be that he was using it one day, and the Mac made a bang and stopped working. He said that the fuse had gone, and that I would simply have to plug in a new fuse.
I took it home and tried to power it up again just to see if I was lucky, but sure enough, it was broken. I didn't hear a hard drive spin, no beep, no CRT noises, nothing.
I cracked it open and sure enough, the fuse was missing. I bought an equivalent fuse and plugged it in, I powered it up, but still, nothing happened. Just silence.
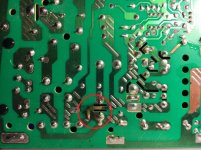
There had to be a deeper issue. I completely disassembled the Mac, and took a look at the analogue board and found the true culprit. It seemed a track had completely blown off the board.

I tested some of the components, mainly the MOSFET and the capacitors to see if they were failing. I noticed some leaky residue underneath the capacitors, so I began re-capping the board. I also noticed a dead-short across the MOSFET, so I scoured digi-key for a replacement. Here's a list of what I replaced:
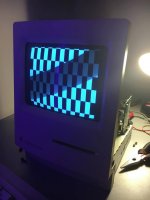
When I plugged it all back in and tried it again, I was greeted with some jittery checkerboarding. At least it was actually turning on now. But, the CRT was the only thing working at this point, still no beep, still no hard drive noises.
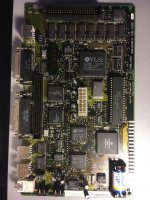
I washed all the sticky capacitor residue off with some isopropyl alcohol and a toothbrush, replaced that battery in the motherboard (I replaced the 3.5v battery with a 3.6v of the same type, does this matter?), and replaced all the capacitors. As my local electronics store didn't stock SMD capacitors, I used through-hole ones that I just soldered to the board.

However, when I started the Mac, I still had checkerboarding. I noticed that when the RAM module was removed, the checkerboarding turned to straight vertical stripes. Does anyone know what the problem might be?

Recently I managed to pick up a Macintosh Classic in very good nick, however, it wasn't working.
The previous owner told be that he was using it one day, and the Mac made a bang and stopped working. He said that the fuse had gone, and that I would simply have to plug in a new fuse.
I took it home and tried to power it up again just to see if I was lucky, but sure enough, it was broken. I didn't hear a hard drive spin, no beep, no CRT noises, nothing.
I cracked it open and sure enough, the fuse was missing. I bought an equivalent fuse and plugged it in, I powered it up, but still, nothing happened. Just silence.
There had to be a deeper issue. I completely disassembled the Mac, and took a look at the analogue board and found the true culprit. It seemed a track had completely blown off the board.

I tested some of the components, mainly the MOSFET and the capacitors to see if they were failing. I noticed some leaky residue underneath the capacitors, so I began re-capping the board. I also noticed a dead-short across the MOSFET, so I scoured digi-key for a replacement. Here's a list of what I replaced:
- ALL capacitors on the board (I had to buy from two separate brands, Nichon and Saturn)
- TDA4605 - replaced with TDA4605-3
- IRFBC40 - replaced with IRFBC40L
- CNY75GB - replaced with CNY75B
When I plugged it all back in and tried it again, I was greeted with some jittery checkerboarding. At least it was actually turning on now. But, the CRT was the only thing working at this point, still no beep, still no hard drive noises.
I washed all the sticky capacitor residue off with some isopropyl alcohol and a toothbrush, replaced that battery in the motherboard (I replaced the 3.5v battery with a 3.6v of the same type, does this matter?), and replaced all the capacitors. As my local electronics store didn't stock SMD capacitors, I used through-hole ones that I just soldered to the board.

However, when I started the Mac, I still had checkerboarding. I noticed that when the RAM module was removed, the checkerboarding turned to straight vertical stripes. Does anyone know what the problem might be?

