• Updated 2023-07-12: Hello, Guest! Welcome back, and be sure to check out this follow-up post about our outage a week or so ago.

Q950 Power Supply repair attempts, plus one electric shock.

BadGoldEagle

Well-known member
Hi all,

I had just about the time to install 8.1 on this machine before its power supply died. I had received the new capacitors from Arrows a couple of days prior, so I set out replacing them all. The thing is, it's a really difficult PSU to work on. It's got two main PCBs, and a daughterboard that's soldered onto one of those main PCBs so I had to manually desolder it before changing the caps (I didn't take the desoldering gun with me when I moved. I still have it, but it's 400 miles away from where I am). There is approx. 10+ pins on this daughterboard and I ended up lifting one pad. I tested it for continuity, it was still good but I didn't feel particularly comfortable putting it back in this condition. I have dupont wires, but they are way too thin for this application (I use it for small trace repairs, but this one is about 3x as thick as your standard trace...). So I did nothing and put it back together.

Before I tackled this repair, the relay in the PSU would click, but that was about it. No fan or LED.

When I powered it on after the repair, it came back to life, and worked great for about an hour, before the PSU started resetting itself every 2 seconds or so. The power LED is now off, the fan works.

I've tried powering it back up after letting it cool for two hours but the clicking's still here. 

I haven't taken it apart again since then because it has some monstrous caps, and I already shocked myself once the day before yesterday. I'll leave it unpowered for two days, just to be safe.

So my question to you guys is the following: In order to repair a trace that's about half a centimetre (or .2 inch) thick, what sort of gauge wire should I get? 

The pins on the daughterboard this trace/pad connects to is relatively small, about the half the thickness of a standard 3.5mm headphone jack, or about the same size as the pins that connect to the PCB of a Nubus card. It's small but not flimsy. 

I hadn't finished recapping the power supply entirely before putting it back in the Mac. I tried replacing the big caps that are of the snap in type, but couldn't get them to fit as they should. So I kinda stopped and forgot about the 3 or 4 'standard' ones left. But the fact it worked great for an hour and suddenly stopped leads me to think something died because of heat. I'd say that trace is toast. I tried touching up the pad that got lifted before the initial smoke test and only made it worse. It was completely off and hanging about 1mm off. But continuity was still good. 

Looking forward to your comments on this... I guess I could always perform the ATX mod but I don't particularly feel inclined to do it. 

Thanks!


LaPorta

Well-known member
Here is a possibly unique solution: I'd love to see a picture, but I think I know what you are talking about. Since working on my SE logic board escapade, I came across coper adhesive tape. It is conductive, and the best part is you can trim it to whatever size you need. The adhesive does not stand up to 700 degree heating for no-lead soldering, but you can trim it to size to simply jump a trace. This way, you can trim it to the same width as the original trace and adhere it to both sides. Better yet: tin the ends of the trace, lay the copper, and then heat. Although the adhesive won't last, the solder will tack it down and it will work well. That's a possible solution at least for the trace.


BadGoldEagle

Well-known member
Enough time has passed so I'll take it apart today. This is only the 4th time I open it up... sigh. 

Thanks for letting me know about this adhesive. I'll keep that in mind next time I have a trace to fix. This seems to be the ideal solution. But I managed to find some scrap cable laying around. I think it's about 14 or 16 AWG so that should be plenty enough for this application.

While I'm at it I'll also finish replacing the small standard caps. The massive ones are from the Nippon Chemical-Con corporation. I didn't put two and two together and didn't notice these were in fact Nichicons... So I won't be replacing those after all. The small ones are TAICONs. No idea how good they used to be and what's their situation right now but the new Nichicons will certainly be better. 

Pictures will follow.

Edit: Wait, Nichicon isn't actually the same company as the Nippon Chemical-Con Company. Weird. They do sound similar...

Should I replace them? The thing is, they have snap in connectors and I'm not sure my iron is powerful enough to solder them on properly...

 
Last edited by a moderator:

BadGoldEagle

Well-known member
This thing is A REAL PAIN to work on. The good thing is that I apparently fixed it. I really hope I haven't jinxed it by saying that. It's running as I'm writing this and so far so good. 

I ended up fixing that trace the best I could (not my finest work though), and replacing the rest of the caps. The latter is certainly what fixed it. You'll see why in a minute. 

There are only 4 original capacitors left, two 1500uFs and two 1000uFs that are too big to be replaced without special tools.

And now, as promised, some pictures. 

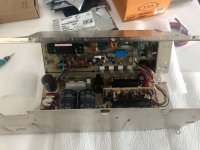
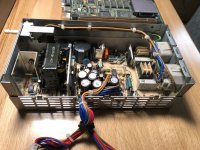
The two halves mostly unfolded (the shoe box is where I store the soldering gear):

IMG_5870.jpeg

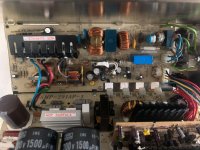
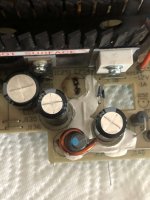
The first board (mains input). All the caps are new on this picture. You can start to see the daughterboard on the second board...

IMG_5871.jpeg

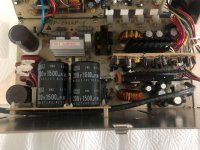
The second board. The daughterboard is not socketed and it's held on by some sort of glue/epoxy that was damn near impossible to remove. 

IMG_5872.jpeg

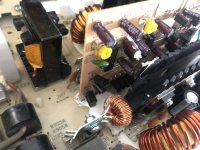
Close up of the white epoxy. This was all over the board. You can't remove the caps on the daughterboard without removing it entirely. And that's how the pad got damaged.

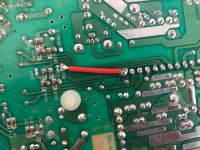
I used the spare wire I had to fix that.

IMG_5873.jpeg

Speaking of which, here it is... Looks horrid, but it's functional.

IMG_5877.jpeg

AND...

Last but not least, here's a reminder that even though that PSU was SUPPOSEDLY bulletproof, the caps do go bad on these.

The four caps in that area all had some goo/gunk under them and must have been the cause of the latest power issues.

 IMG_5881.jpeg

That's about it folks. The Quadra has been running for more than an hour and a half now and it's still working.

Last time I did this quick 'endurance' test it died within the first hour.

My theory is that with new caps, it must have put too much stress on the rest of them, which eventually let go quickly afterwards.

Last picture of the day, the 950, ready for its test drive  :cool:  and its little brother the Mac Pro in the background

View attachment 29166

Yeah, 17Kgs was too much to lug around all day. Sosumi. 


ArmorAlley

Well-known member
I cleaned the PSU out earlier last year with an air compressor. It was quite dusty, if I remember correctly. It was powered on many times since that but I never had it on as long as an hour and a half. I found it too loud.


BadGoldEagle

Well-known member
I expected to see more dust than there actually was. That explains it. Thanks!

Some components still had a thick layer of dust that was caked on there. But that’s to be expected after 27 years and air can’t get everything out.

That fan is indeed tough to live with. I have bought a Noctua Industrial with a static pressure of 4mmH2O and all the right adapters to plug it into the existing socket but I don’t want to try installing it before I’m sure the PSU is okay. Someone here (I think?) killed their PSU by changing the fan.... I don’t want to risk it right now.


BadGoldEagle

Well-known member
I AM SICK OF THIS PSU. IT'S BROKEN AGAIN.

Same behaviour as last time, no LED, and the PSU keeps resetting itself. It worked great for more than an hour and a half and I tested it again before going to sleep yesterday evening. EVERYTHING was fine!

And now we're back to square one again. Could it be capacitor related? I left the 4 big original ones in there... 

What else could damage itself overnight if not capacitors?

I'll open it up again in two days and finish recapping it the best I can. I'll probably bend the legs of the snap on caps to allow them to be soldered on correctly. 

Man is this frustrating! I'm contemplating ditching it and going for an ATX PSU at this point. 


LaPorta

Well-known member
The snap on could be it for sure. Do you have an ESR meter to test the big ones? It would definitely help a lot I think.

any possibility of an intermittent short or cold solder joint?


BadGoldEagle

Well-known member
I don't have an ESR meter, perhaps I should...

cold solder joint?
That's another possibility. I'll redo all of the ones I did. 

One thing I forgot to mention earlier. The first time I started it up today, I used the keyboard, and the 3 LEDs lit up and the system LED was on for a moment. The clicking and resetting only happened 5 seconds after power up. The second time I powered it up (10 seconds after the initial switch off) again, from the keyboard, no LEDs would lit up, and now it won't start from the keyboard at all. 

This does look like a cap issue to me...


BadGoldEagle

Well-known member
Still haven't restarted it. Will do tomorrow. 

In the meantime, since this appears to be a more complex issue than I initially thought, could one of the Admins/Mods  ( @Gorgonops @Bunsen @Cory5412 @wthww ?) move this thread to Mac II, Quadra & Centris? Thanks in advance!


BadGoldEagle

Well-known member
Thanks Gorgonops!

Sit rep: Finishing the recap and redoing/cleaning all the solder joints didn't fix it. It's arcing now (for a brisk moment when it gets connected to mains power), so I'm nervous every time I'm near it when it's plugged in. This cannot go on, I've invested too much time on this PSU. So I've decided to tackle this repair by swapping the innards with that of an ATX power supply using @GeekDot's guide

That way it'll never break down again.

I have a couple of questions before I 'pull the plug' on this PSU. Perhaps @GeekDot is better placed to answer these?

- Is the key mechanism fully working with your small Soft Power circuit? (i.e. 'off' is off, 'on' is soft power and 'locked' is auto power on with the keyboard/mouse input disabled)

- Did you have time to create a molex adapter board? I honestly can live without them (SCSI2SD is bus powered), but it'd be nice to have a fully working PSU. In case you haven't, I'll start working on one after it the Quadra gets fixed. 

I'm thinking about getting a Corsair VX450, but it only has 3 Molex plugs. Are there any modern PSUs with 4?

Thanks in advance for your help!

 
Last edited by a moderator:

0xABE

Active member
Sounds like you’ve been through the wringer with your power supply. I am getting ready to recap the power supply in my Quadra 660AV. No problems with it so far but I’d like to keep it that way. It looks daunting with so many caps so close together. Any tips? (I’m also going to do the motherboard but that doesn’t look as daunting).

B4E859BD-1BE2-4408-92B9-74E321864F91.jpeg


LaPorta

Well-known member
The part that makes the re-cap or PSUs like that so challenging is that the caps you order really need to be the same size. Getting squat, fat caps in there obviously won't work, so the diameter is crucial. Take the diameter of them before ordering. Otherwise, it's not hard. Just do one at a time and before you know it, you are finished.


BadGoldEagle

Well-known member
What LaPorta said, plus the following:

- Have a high wattage iron on hand (50W+). Optional but very desirable (Oh I wish I had brought mine with me!): Desoldering Station.

- It's particularly difficult to remove the big snap on capacitors. There's apparently only two on the 660. The 900/950 have four. 

- Be patient. Cold joints can happen very easily. 

- Have the correct solder type. All my joints look frosted. They're functional but it's never too good. I don't know what the blend was in the 90s. I think I have 60/40 and that wasn't it.

- Don't rely on preexisting lists (I learned that the hard way when I ordered caps for Armoralley's TDK LC PSUs). Have a pen, paper and ruler ready and make your own list. 

- Good luck. Don't feel scared of breaking it. The Delta PSU in the 900/950 is really a pain to work on (soldered on daughterboard and epoxyed on caps.) I've never seen anything like it.

Back the the current matter: I have no idea how the original Soft Power circuitry works. Is it on the power supply or is it on the logic board? I'd say the latter so theoretically the key mechanism is handled by the LB, right? So the signal goes from the key to the LB and the white wire just carries the information given by the logic board to the PSU? The transistor added for the ATX mod is only there to 'convert' the signal (i.e. ground it) for the ATX PSU to interpret it correctly, right?


LaPorta

Well-known member
Yes, your own list is huge. I keep a notebook with everything I do. Very helpful to have your own reference!


GeekDot

Well-known member
I have a couple of questions before I 'pull the plug' on this PSU. Perhaps @GeekDot is better placed to answer these?

- Is the key mechanism fully working with your small Soft Power circuit? (i.e. 'off' is off, 'on' is soft power and 'locked' is auto power on with the keyboard/mouse input disabled)

- Did you have time to create a molex adapter board? I honestly can live without them (SCSI2SD is bus powered), but it'd be nice to have a fully working PSU. In case you haven't, I'll start working on one after it the Quadra gets fixed. 

I'm thinking about getting a Corsair VX450, but it only has 3 Molex plugs. Are there any modern PSUs with 4?
Sorry for my ignorance... I'm (still) so deep in that damn challenging SE/30 vs. Carrera040 thing that I hardly look left and right  :blink:

Yes, the power-button works like it does with the original PSU - but I can't guarantee that for the 'locked state' as I don't have a key for the lock :-/

And no, I haven't had the time (yet) to start to design something nice... so feel free to go ahead ;)  

PS: I have a spare Q950 board - after doing a closer inspection I saw that the "L6" inductor next to the CPU oscillator (66.6MHz) went "poof". Anyone here with an LCR-meter able to tell me it's Henry value? The other inductors used with oscillators all over on the board are 3.5uH (+/- 0.2)...

 
Top