• Updated 2023-07-12: Hello, Guest! Welcome back, and be sure to check out this follow-up post about our outage a week or so ago.

mAcTX - ATX to Classic Macs

jessenator

Well-known member
Yeah, looks like the failure point in a few of those is the PCIe power. That and the extra 4/8 ATX power pins aren't being used in this board adapter design anyway. 


Trash80toHP_Mini

NIGHT STALKER
I wonder if technical drawings of that Newegg PSU's case are available anywhere? A cardboard mockup I can afford ATM, not the PSU. :-/


trag

Well-known member
Modern supplies may be a little short on 5V current, but they usually have more than extra 12V capacity available.    One could probably just use one or two of the affordable DC-DC switching "buck" converters available on Ebay to convert one of the 12V rails to 5V.

The really cheap (~$1) ones only have a few amperes capacity, so carefully checking the conversion capacity of any DC-DC converter is important.


Compgeke

Well-known member
To be honest the main design goal isn't so much for the extreme 3 Radius Rockets + Thunder IV GX 1600 extra power consumption boxes but more for the regular 'old systems. Think a IIci with a random nubus video card and maybe ethernet. You can get picoatx PSUs with 8-10A 5V rails which'll cover that use case no problem, especially if you have a SCSI2SD rather than spinning rust. 

For more power you're best off going with a flex atx PSU which'll have significantly beefier rails, at the expense of being more difficult to mount inside the case without either drilling some holes in the back or hacking up a bracket. Said brackets wouldn't be particularly cheap on a small scale budget, whether 3D printed or bent metal or whatnot. I don't own a sheet metal brake or a 3D printer anyway.


Trash80toHP_Mini

NIGHT STALKER
@trag THX, forgot all about those things, Got a little one to go from 5V or 12V to 3.3V a few years ago.

Took some measurements for the max size spec. of a drop-in ATX replacement for a IIcx form factor PSU:  150mm W,  140mm D,  86.5mm H

A hair less might be better for Width and Depth in order to do a two sided mounting flange wrap. For that configuration, the fan needs to be on the top. Part out the original PSU, nibble a big hole for the fan on the bottom and your three sided, flanged wrap is ready made. with a notch on the corner of the hole, both mounting ears are retained for the power connector. I'd be tempted to nibble a hole in the exit grating on the back of the ATX PSU to match up with the louvered opening at the rear of the case to free up some airflow. Maybe not, the PSU will be idling at something like 20% to 40% max just to run anything with a PSU in that form factor.


Trash80toHP_Mini

NIGHT STALKER
Gotta say I LOVE your work here. :approve: I jumped into the thread late, I'd love to snag a couple of your boards too.

Hey all, just wanted to gauge community interest to see if anyone would be interested in an ATX to Mac 10-pin adapter board. I've got a IIsi with a dead power supply (surface mount caps got REALLY bad inside)  .  .  .

Right now I've got a batch of prototype boards being made to test out in my IIsi. Once we get that up and running, I'll start offering boards for sale if anyone's interested. Probably going to be sold as PCB only, kit, and fully assembled options.


For the IIsi specifically, I've had the bare bones of a power adapter board and setup worked out that makes use of the stock ass end components of the IIsi PSU and possibly some bits from its PCB? Dunno, I've been kicking it around for the longest time, I think I have better drawings somewhere in the files if you're interested?

iisiatxsketch1.jpg.e53d74e6d3cb662093a6935f72b8ae4e.jpg


Drawing shows backplate laid flat. It plugs onto headers on adapter as in stock PSU and retains fuse protection for the AC bits in and monitor passthru connector on the new PCB which resides in the white section underneath connectors and behind the  FlexATX bits in the mockup below:

iisiatxhack001.jpg.ade31ce93a60f699a0319bc7dfadf144.jpg


FlexATX is inverted and I've reversed the orientation/airflow of the FlexATX PSU to vent it and the rest of the IIsi case's exit air out a 120mm fan equipped ducted vent/hole routed out from under under the FDD and fitted into that cavernous empty cubic. Airflow from the stock fan is reversed and vane directed at the Radius Rocket and Savvio server drive of the SuperIIsi™ with all heated air from the inside case blown out the through that 120mm hole in the bottom, reminiscent of the Q605/LC cooling setup.
 

Airflow cooling  of the IIsi PSU is very different and yet the same as the Q605/LC, so you shouldn't need need to do anything even close to that crazy. In the stock PSU, air is drawn in from the top vents and moseys out the perforations on both sides of the can in a far more direct manner than the pizza boxen. The exhaust fan at the back does all the work. Depending upon the config of the components inside your PSU of choice a few options are open, so to speak.

Ducting the exhaust air from FlexATX might be done via the air inlet atop the IIsi's stock PSU. Flip the PSU in the mockup above so the PCB is on the bottom and the white area defines empty cubic to be used as a ducted airway vent. There might be so little heat generated at IIsi output to simply blow it out the front to head on out the back as is the heat from the stock PSU.

Airflow for FlexATX is VERY dependent on a front to back (or back to front) direction for properly cooling the components inside and across the heatsinks of the worst offenders. Worst case scenario has a FlexATX can overlapping the front third of the IIsi can's slots on top. That's no biggie as the remaining area probably exceeds that of the slots on the passive end of the FlexATX can.

Whatever, just thought I'd add some ancient IIsi info to go with the IIcx form factor stuff.


superjer2000

Well-known member
I have put a number of the modular seasonic into various machines (se/30, IIci, IIsi) and plan to do a Mac II at some point.  I find the hardest part is figuring out how to mount the PSU into the doner case. I have all of the molex connectors and the pin removal tool that makes this fairly straight.  For soft power, I just build little inverter boards that are added inline with the PSU cable.  See this thread for more information:


Trash80toHP_Mini

NIGHT STALKER
I'm really liking what I see in that SeaSonic PSU! What are the dimensions of the PCB?

Seasonic-PSU-02.jpg

It looks much shorter and easier to use than the one I have in hand. I'd still mount it in the IIsi can backwards from the way you have it set up. Possibly doing it upside down from the case bottom with standoffs or suspend it from the lid, depending on component heights at front and back. Love the cabling connector, so easy! That would be at the rear hooked via adapter board to the stock IIsi connector assembly.

Fan and plug would be removed at the front end with something like a 50mm x 50mm x 10mm fan, though it wouldn't quite cover the entire grating. I'd also have to put a pair of vents in either top or bottom of the IIsi can with a hole saw to match SeaSonic airflow requirements as below.

17-151-211-Z03.jpg.e14a7d528257521f47e72c4808e4d387.jpg


JDW

Well-known member
That SEASONIC is small enough to fit even inside the PSU metal case used in an SE or SE/30, as shown in my video here:


But bear in mind the SEASONIC has a fan.  The stock SONY and ASTEC PSUs had no fan, so when the SEASONIC fan kicks in, you will hear it, especially if you have a SCSI2SD instead of a spinning platter HDD, and even more so if you have replaced the SE/30 fan for a quieter one.  It's not loud by any means, but it may be a new sound that annoys some people.


blusnowkitty

Well-known member
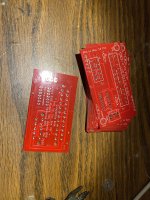
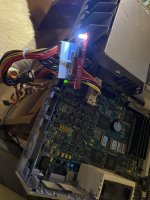
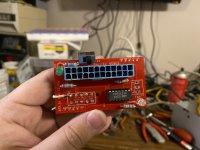
Getting back on-topic here, good news - the Rev1 boards arrived today! Unfortunately we already have a Rev2 in the works to address some problems we noticed in the Rev1 design (after I had already ordered those, naturally). But anyway, after a couple bodge wires they do work! We'll get the Rev2 boards finalized and ordered soon enough; I'm sending a couple of the Rev1 boards over to @Compgeke for testing and then we'll go from there!

IMG_3983.JPG

IMG_3985.JPG

IMG_3984.JPG


Compgeke

Well-known member
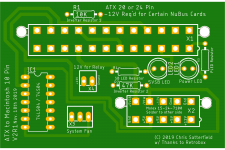
Bugs in order of importance: 

1.) The 7404 was connected to 5V and not 5VSB. Does not work as-is, needed a rework wire to connect it to 5VSB.

2.) The 10 pin connector is on the wrong side to correctly fit into a IIsi when using a soldered-to-board connector, instead you'd have to use something like the original wiring from the factory PSU. Not ideal.

3.) Fan connector is the wrong item, it's a size too big. 

Here's the 2nd Revision. Main concern here is the standby LED resistor is very close to the 5VSB LED, however moving it over isn't ideal since there's a bottom trace right below it. It'll still do.

NotFuckedTop.png


Trash80toHP_Mini

NIGHT STALKER
Fabulous work! Bodge wires are definitely a requirement. If you get it right the first time it's not a prototype, it's a fluke.

Getting back on-topic here, good news - the Rev1 boards arrived today!
Sorry if I got too far off topic with the PSU info and suggestions for IIcx and IIsi form factors? You mentioned the IIsi in the IP, so I jumped in with thatinfo.

What are the measurements of your board?


superjer2000

Well-known member
How would you envision this being used?  Specifically where and how would the board and an ATX PSU be mounted, say in a IIci? The board and attendant wires seems too bulky to be practical to me other than for bench testing but I might be missing something. 


blusnowkitty

Well-known member
Sorry if I got too far off topic with the PSU info and suggestions for IIcx and IIsi form factors? You mentioned the IIsi in the IP, so I jumped in with thatinfo.
You're fine, I meant more for how this thread became a Mac SE/30 PSU thread for a moment.

How would you envision this being used?  Specifically where and how would the board and an ATX PSU be mounted, say in a IIci? The board and attendant wires seems too bulky to be practical to me other than for bench testing but I might be missing something. 
What you see in the pictures is just me making do with scavenged parts. The final board will have a Mac II plug mounted directly to the board. We were considering using a picoPSU off this board so we could ATX reliability in a tiny package.


Trash80toHP_Mini

NIGHT STALKER
Had a thought, might a  female  male connector be soldered to the underside of your board in a Rev.3 variant? It would plug directly onto the connector on the SeaSonic FlexATX PSU that's so popular. Eliminating the cable interface mess between your board and a PSU Wire harness would simplify things greatly. Mac power Connector could be hardwired or the connector flipped topside in that configuration. You'd probably want to provide some version of a 12V/5V Molex harness for powering internal peripherals exceeding the Logic Board's power budget. That could be done with connector or hardwired.

If you added thruholes for the IIsi PSU connector, the stock part would be retained, A/C connector on the input/fan end would be removed and hardwired to the adapter board making for a very slick adaptation for your IIsi project. In the IIsi, heat from the PSU exits through the can's perforations to be drawn out the main exhaust fan. So the stock, temperature controlled SeaSonic fan would stay in place and the vacated opening for the A/C connector would be plugged/taped over to preserve airflow design.

View attachment 30265

View attachment 30264

With any luck in terms of component sizes we'd be using the stock IIsi can with a little sheet metal modification.

View attachment 30232

I've been playing with my PSU in the IIsi can and realized why I'd set it up for inverted installation on the lid. that way the excised power connector clears alignment column and front clip to avoid modification of anything but the PSU can itself. Installing the PCB close to the top at the back end, angled close to the close to the bottom at the front end provide clearances for all manner of things that will require an AI session to explain.

edit: glad to hear my comments about IIcx and IIsi form factors haven't been too much of an annoyance. Also got the mating connection wrong at the top.

 
Last edited by a moderator:

JDW

Well-known member
You're fine, I meant more for how this thread became a Mac SE/30 PSU thread for a moment.
You mean, "why did two people dare to briefly mention the SE/30 in this thread"?   :)   The answer to that is: "because people were talking about the Physical Size of the SEASONIC."  Superjer2000, who was one of the people who inspired me to do my own SE/30 PSU mode with the SEASONIC, merely mentioned that he used it in his other mods which included the SE/30, and I followed up with a comment to show just how small it is, which is seen in my video.  In other words, we established how small the SEASONIC is -- the size of which is relevant to modding any other PSU.  Now that has been established, there need be no further discussion on compact Macs, seeing this thread is indeed about the "Mac IIcx/IIci/IIsi/IIvx/IIvi, Quadra 650/700/800, Performa 600, PM 7100" exclusively.

 
Top