PotatoFi
Well-known member
In May of 2020, a friend messaged me saying that he had some Mac stuff for me that he had picked up at his parents house. Needless to say, I was thrilled! Here's what everything looked like when I brought it home (but there are more details in this thread).

Among the collection of stuff was a Macintosh IIsi, which is what we'll be focusing on in this restoration log. Let's take a closer look!

I think there's a pretty nice machine hiding under all of that dirt and grime! There was some weird orange stuff on the front, which looks a bit like sticker or tape residue. It also looks like water got splashed on the front at some point.

The top reveals something a bit hilarious. At some point, someone cut a hole in the top to pass a SCSI cable through! If I had to guess, I'd say that this was someone's way of achieving a CD-ROM drive upgrade. In fact, there was a CD-ROM drive in the pile that I'll bet went with this IIsi!

Here's the back of the machine. There's one thing that I noticed right away: a twisted-pair Ethernet adapter! That alone makes this product a huge success, as that Ethernet card should also work an SE/30. More on that in a bit!

Let's pop the cover off and see what is going on inside, and get this thing ready for cleaning and Retrobrite. But first, note the hilariously long SCSI cable!

The first thing I decided to do was pop out that PDS card to see what we have. Sure enough, it's a Mac Con for IIsi and SE/30! To me, this is the equivalent of buying a Nintendo GameCube at a garage sale for $20 (yeah right, those days are long gone) and finding a $100 bill shoved under the expansion cover underneath. Whether this card stays in the IIsi or not... it will be super, super useful.

With the Ethernet card removed, I pulled the hard drive and floppy. Next, I decided to remove the power supply. There are two tabs along the back to press...

And then a tab on the front to pull back slightly, which allows the power supply to lift out.

On the IIsi, the power connector is underneath the PSU, and connects directly to the logic board. Note the yellow/green tint on anything: cap juice. Cap juice everywhere. I'll bet that there are a bunch of leaky capacitors in this power supply that we'll have to deal with.

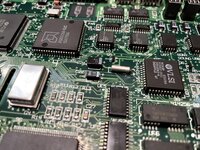
With the power supply out of the way, we can get a good look at the logic board!
Wait a second. Where are all of the electrolytic caps?! Confession time: back in the middle of the winter, I took a few minutes to "decap" this machine. I twisted all of the caps off using the "twist and push" method, and scrubbed the whole board down in the kitchen sink with Dawn dishwasher detergent and water. Then, I took it out to the garage and blasted all of the water off of it with the air compressor. That way, it could safely wait for me to recap it without risking any more damage to the logic board.

Next, the fan. This is by far the most stubborn part to remove on a IIsi. I used a screwdriver to work it free from the clips that hold it in.

After much wiggling and prying, I was finally able to break it free without breaking anything.

Now to remove the logic board. The way the IIsi retains it is brilliant, but I was a bit worried about breaking the plastic clips, so I asked my wife for some help. She held the tabs out on each side, while I wiggled the board forward. When it was free from the tabs, I lifted it out.

Finally, I popped the speaker out, for which the contacts were previously trapped under the logic board.

At that point, the case was empty, but there were a couple of quick things to do before cleaning.
One thing I considered was removing the metal shield from the back. Retrobrite can cause rust and corrosion on metal parts, but I decided that this was going to be too fidgety to remove and reinstall. There are a bunch of melted standoffs holding it into place, and I didn't feel like cutting them all off. I decided to go for a "fast" Retrobrite - in other words, get it done quick before corrosion can occur.

One last thing to do before Retrobrite: pop out the Apple logo! The heat and sun can bleach the red and/or yellow out of the logo, which is very sad. I don't have any spare badges on hand, so I don't want to take any chances.

I hope somebody makes reproduction badges, someday. These things are neat.

Among the collection of stuff was a Macintosh IIsi, which is what we'll be focusing on in this restoration log. Let's take a closer look!
I think there's a pretty nice machine hiding under all of that dirt and grime! There was some weird orange stuff on the front, which looks a bit like sticker or tape residue. It also looks like water got splashed on the front at some point.
The top reveals something a bit hilarious. At some point, someone cut a hole in the top to pass a SCSI cable through! If I had to guess, I'd say that this was someone's way of achieving a CD-ROM drive upgrade. In fact, there was a CD-ROM drive in the pile that I'll bet went with this IIsi!
Here's the back of the machine. There's one thing that I noticed right away: a twisted-pair Ethernet adapter! That alone makes this product a huge success, as that Ethernet card should also work an SE/30. More on that in a bit!
Let's pop the cover off and see what is going on inside, and get this thing ready for cleaning and Retrobrite. But first, note the hilariously long SCSI cable!
The first thing I decided to do was pop out that PDS card to see what we have. Sure enough, it's a Mac Con for IIsi and SE/30! To me, this is the equivalent of buying a Nintendo GameCube at a garage sale for $20 (yeah right, those days are long gone) and finding a $100 bill shoved under the expansion cover underneath. Whether this card stays in the IIsi or not... it will be super, super useful.
With the Ethernet card removed, I pulled the hard drive and floppy. Next, I decided to remove the power supply. There are two tabs along the back to press...
And then a tab on the front to pull back slightly, which allows the power supply to lift out.
On the IIsi, the power connector is underneath the PSU, and connects directly to the logic board. Note the yellow/green tint on anything: cap juice. Cap juice everywhere. I'll bet that there are a bunch of leaky capacitors in this power supply that we'll have to deal with.
With the power supply out of the way, we can get a good look at the logic board!
Wait a second. Where are all of the electrolytic caps?! Confession time: back in the middle of the winter, I took a few minutes to "decap" this machine. I twisted all of the caps off using the "twist and push" method, and scrubbed the whole board down in the kitchen sink with Dawn dishwasher detergent and water. Then, I took it out to the garage and blasted all of the water off of it with the air compressor. That way, it could safely wait for me to recap it without risking any more damage to the logic board.
Next, the fan. This is by far the most stubborn part to remove on a IIsi. I used a screwdriver to work it free from the clips that hold it in.
After much wiggling and prying, I was finally able to break it free without breaking anything.
Now to remove the logic board. The way the IIsi retains it is brilliant, but I was a bit worried about breaking the plastic clips, so I asked my wife for some help. She held the tabs out on each side, while I wiggled the board forward. When it was free from the tabs, I lifted it out.
Finally, I popped the speaker out, for which the contacts were previously trapped under the logic board.
At that point, the case was empty, but there were a couple of quick things to do before cleaning.
One thing I considered was removing the metal shield from the back. Retrobrite can cause rust and corrosion on metal parts, but I decided that this was going to be too fidgety to remove and reinstall. There are a bunch of melted standoffs holding it into place, and I didn't feel like cutting them all off. I decided to go for a "fast" Retrobrite - in other words, get it done quick before corrosion can occur.
One last thing to do before Retrobrite: pop out the Apple logo! The heat and sun can bleach the red and/or yellow out of the logo, which is very sad. I don't have any spare badges on hand, so I don't want to take any chances.
I hope somebody makes reproduction badges, someday. These things are neat.


") I wish I had the patience and drive to document my restorations.
I wish I had the patience and drive to document my restorations.


