• Updated 2023-07-12: Hello, Guest! Welcome back, and be sure to check out this follow-up post about our outage a week or so ago.

Image washed out after Mac Plus analog board recap

Hey y’all,
I’ve just finished recapping a Mac Plus’ analog board and, after putting the machine back together, I was delighted to hear a chime as well as see the screen light up and show a picture.

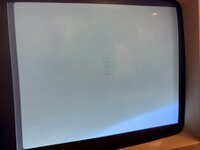
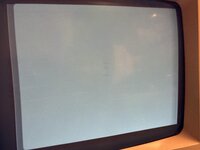
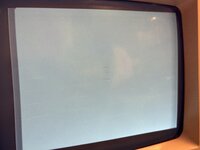
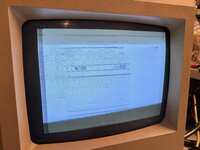
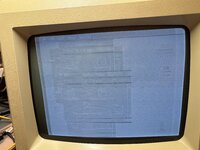
It appears that the computer is functional, but the image on the screen appears somewhat fuzzy and washed out. I’ve attached an image detailing this on the boot screen.

Has anyone seen something like this before? I’ve tried adjusting the height/width/cutoff/focus/voltage knobs to no avail as well as adjusting the horizontal and vertical position sliders on the neck. I’m thinking that I might reflow all of the new joints for a start, but I was wondering if there might be some other things to check as well.

Thanks so much!
 

Attachments

  • IMG_0603.jpeg
    IMG_0603.jpeg
    2 MB · Views: 24
  • IMG_0602.jpeg
    IMG_0602.jpeg
    2.4 MB · Views: 14
  • IMG_0601.jpeg
    IMG_0601.jpeg
    2.3 MB · Views: 24
  • IMG_0605.jpeg
    IMG_0605.jpeg
    2.7 MB · Views: 26
  • IMG_0604.jpeg
    IMG_0604.jpeg
    2.7 MB · Views: 34

JC8080

Well-known member
Have you checked the Dead Mac Scrolls to see if it addresses this symptom? You can find it with a Google search, make sure to find an OCR version that is text searchable.
 

bibilit

Well-known member
Use a wood stick and touch the Analog Board here and there in order to see any improvement.

I will sure enough reflow any joint, have not seen any Analog Board without bad ones.
 

68kPlus

Well-known member
Use a wood stick and touch the Analog Board here and there in order to see any improvement.

I will sure enough reflow any joint, have not seen any Analog Board without bad ones.
Mine is good and the only work I've done is a RIFA replacement. Mine is from 1990
 
Hey y’all,
I really appreciate the advice!

So I dug through the Dead Mac Scrolls and wasn’t able to find anything that matched this particular problem. I’ve also dug through a set of schematics for the board to see if I can make heads or tails of what’s cookin.

I went ahead and reflowed the entire board, and this seems to have made something of an improvement in the video quality. However, it looks like the video is inverted and that there are two screens sort of out of phase with one another.

I’ve attached photos of the new behavior as well as the reflow job. I also poked around with a chopstick for a while but wasn’t able to see any difference unfortunately.

I’m beginning to think that there may be an issue with something on the digital side of things, considering that we get a picture and that the seems stable after a one hour test.

Any thoughts as to what might be going on with this bad boy?
 

Attachments

  • IMG_0619.jpeg
    4.6 MB · Views: 3
  • IMG_0617.jpeg
    IMG_0617.jpeg
    2.9 MB · Views: 18
  • IMG_0615.jpeg
    IMG_0615.jpeg
    877.6 KB · Views: 17

Callan

Well-known member
First up. Was it all good before you capped it? If so then as bibilit said I would check for for any caps that weren't put in correctly and solder bridges. There is only one non polarized cap in that kit (the polyprop at c15). The only other thing I would suggest is to make sure you haven't mixed up any values too. A lower than required capacitance can also cause issues, bleeding, shadows, etc.
 
All good points here, thanks y’all!

So, the image was all good before I capped the board, and this afternoon I double-checked and ensured that all the cap polarities were lined up correctly. I also redid all the solder joints on the board to ensure that there were no bridged joints and, well, I had to get my money’s worth from this new desoldering gun, haha. Every joint is now quite shiny and decidedly free of grossness.

I additionally replaced U1 with a fresh LM324N, as some of the schematics I found noted that it was in charge of signal inversion.

Finally, I checked the capacitances of all replaced caps and found that they were correct. Alas, no change in video quality, so I think we might just be looking at a bad cap or two somewhere. I’d ordered a recap kit off eBay, which was probably my first mistake…

I think my next step will be to rig up a proper Mouser order this afternoon and buy a fresh set of caps straight from the source. If nothing else, this project has given me some more reps in the soldering department, never a bad thing.
 

JC8080

Well-known member
All good points here, thanks y’all!

So, the image was all good before I capped the board, and this afternoon I double-checked and ensured that all the cap polarities were lined up correctly. I also redid all the solder joints on the board to ensure that there were no bridged joints and, well, I had to get my money’s worth from this new desoldering gun, haha. Every joint is now quite shiny and decidedly free of grossness.

I additionally replaced U1 with a fresh LM324N, as some of the schematics I found noted that it was in charge of signal inversion.

Finally, I checked the capacitances of all replaced caps and found that they were correct. Alas, no change in video quality, so I think we might just be looking at a bad cap or two somewhere. I’d ordered a recap kit off eBay, which was probably my first mistake…

I think my next step will be to rig up a proper Mouser order this afternoon and buy a fresh set of caps straight from the source. If nothing else, this project has given me some more reps in the soldering department, never a bad thing.
If you are only ordering caps, I would recommend Console 5. They have cap kits ready to go, all quality caps, and for similar prices to Mouser. If I'm putting in a larger order I'll buy caps from Mouser, but if I'm only getting caps I would rather save the trouble of picking parts and just order a kit.
 

Phipli

Well-known member
I think my next step will be to rig up a proper Mouser order this afternoon and buy a fresh set of caps straight from the source. If nothing else, this project has given me some more reps in the soldering department, never a bad thing.
I don't think you should do this. It is cheaper to buy a cap tester and replace any that are bad, but truth is, the issue is far more likely to be something other than a faulty new part.
 

Callan

Well-known member
Grasping here, but another thing you can check... Make sure you haven't fractured any pads from their traces. Verify continuity from your solder pads to the trace going to them (either scratch off a little mask, or trace back to the next pad/part). Ive seen micro fractures that isolate the pads from the circuit. I haven't done many analog boards (yet), so I don't know if this is an issue with them. Saying that... it's possible on any board depending on how aggressive the cap removal was.
 

Callan

Well-known member
Thumbs up for console5. I've bought a number of kits from him. If your doing a one shot cap kit that's the way to go. Mouser wanted more for the main filter cap then what he sold his whole Sony p/s kit for (I did have to drill the pcb to get his to fit though... =) ). Mouser, however, is great for bulk purchases.
 
Y’all continue to be the best and I really appreciate this advice. I just wanted to call that out as I don’t know too many places on the Internet where the vibes are as awesome as they are here thanks to your kindness.

I think my next step will be to measure the ESR of the caps in the board as well as to check for pad continuity issues and y’all blew my mind with this Console5 site, where has this been all my life?!
 
Ahhhh success!!! As I was doing a bit more reflowing, I discovered that one of the legs of L4 had broken off, though part of it was still soldered in, so it looked like it was still connected.

Once I rectified this situation, the screen came up looking nice and crisp, and I think we can now call it a successful recap.

Thanks so much for all of your help, whooo!!!
 

joshc

Well-known member
Glad you found the issue. Always worth checking your work several times over and especially looking for disconnected, damaged or corroded legs. Sometimes boards are picky about the spec of capacitor used (e.g using low ESR) and sometimes a recap can surface other issues, it’s always possible that other components are marginal or faulty.
 
Top