• Updated 2023-07-12: Hello, Guest! Welcome back, and be sure to check out this follow-up post about our outage a week or so ago.

Anyone able to fix/replace a RAM socket?

Some_Person

Active member
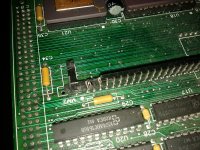
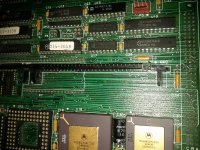
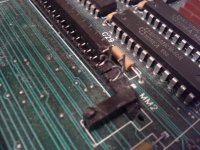
I acquired a 68030 accelerator for a Macintosh SE years ago, and stupidly broke one of the 30-pin RAM sockets shortly after I got it. I do not have soldering skills, nor do I know anyone I would trust with something like this. Does anyone know how I might be able to get this fixed? I'm also considering giving it away to someone who can fix it.

Pictures of the damage are attached.

IMG_20120717_011332.jpg

IMG_20120717_011356.jpg

IMG_20120717_011429.jpg


Trash80toHP_Mini

NIGHT STALKER
Several of the comrades should be able to fix this board for you, so don't be so quick to give it away. What accelerator is it, BTW?


trag

Well-known member
Several of the comrades should be able to fix this board for you, so don't be so quick to give it away. What accelerator is it, BTW?
The tricky part is going to be finding the replacement socket. It looks like a single, angled, 30 pin SIMM. We've found double, angled. And we've found double straight, which look like they could be cut into singles. But I don't think we've found single angled yet. And is the angle on that one the same as on the SE or Plus? It almost looks like the SIMM is meant to lay parallel to the board.


nvdeynde

Well-known member
The problem is that the pins on sockets for Mac logic boards are straight while on the accelerator board they are angled 90°.

I have a MicroMac board like this that has 4x expansion sockets on it: 2x at the front of the PCB and 2x at the back.

The sockets we have seen at Dontronicss or Jameco will never fit on this board, even if you cut hem in half.

With the accelerator board fitted on top of the SE logic board, there's hardly spacing between the top of the board and the chassis.

I can confirm that the sockets are not the same is used on Mac SE/Plus logic boards. There the pins are straight and the socket is angled, here it's the opposite way: it's a straight socket but the pins are angled 90°.

Perhaps this one will fit, but they are out of stock for months now and the photo is so small you can't see how the socket looks like.

http://amigakit.leamancomputing.com/catalog/product_info.php?products_id=848


Some_Person

Active member
Several of the comrades should be able to fix this board for you, so don't be so quick to give it away. What accelerator is it, BTW?
It is a Total Systems 020/030 accelerator, with an SE PDS connector. It can also be attached to older Macs by using a killy clip (which I don't have). I forget the exact name of this accelerator, but it says PCB #80042 on it. I'll see if I can find the box and manual later (I know I have them somewhere).

The tricky part is going to be finding the replacement socket. It looks like a single, angled, 30 pin SIMM. We've found double, angled. And we've found double straight, which look like they could be cut into singles. But I don't think we've found single angled yet. And is the angle on that one the same as on the SE or Plus? It almost looks like the SIMM is meant to lay parallel to the board.
The angle is 90 degrees, with the RAM parallel to the accelerator board.


Trash80toHP_Mini

NIGHT STALKER
desolder the borked socket

solder wires to the SIMM

solder them into the thru holes in the PCB

hold in place with hot glue

reverse kluge-fix-hack if/when new socket becomes available.

run board and call me in the morning. ;)


Some_Person

Active member
desolder the borked socketsolder wires to the SIMM

solder them into the thru holes in the PCB

hold in place with hot glue

reverse kluge-fix-hack if/when new socket becomes available.

run board and call me in the morning. ;)
I spent about an hour today trying to find somebody who carries right-angle 30-pin SIMM sockets, and it seems that nobody at all sells them. It would therefore seem that I'm restricted to kludgy hacks. The SIMM is still held in place by the broken socket, so glue may not be necessary. Also, I may be wrong since I know practically nothing about hardware on this level, but the metal bits of the socket for pins 1 and 3 appear to be intact despite being exposed and bent, so it may be possible to just solder them to the SIMM. The only trouble then would be pin 2, which would probably need to be replaced with a wire. Is anyone here willing to take this on?


Trash80toHP_Mini

NIGHT STALKER
I doubt that the one unbroken end of your SIMM socket would do the job, so you're better doing it the ugly, but simple way. For a memory hack, this isn't even all that much of a kluge. What Capacity 30 pin SIMMs are you using? If they're 4MB, don't worry too much about it and give it a shot yourself, if larger, maybe it's better to ask for some help.

Removing the socket will be very simple, you can use desoldering braid and a standard soldering iron. A bulb type solder-sucker is a very small investment to make as well. Wick or suck the majority of the solder from all the socket's thru-hole connections. It may even come off without a struggle. If not, once the individual pins are pretty much loose, it's no big deal to use a pair of diagonal cutters or nippers to destroy the plastic socket in order to deal with each pin individually. At this point you should be able to get clean thru-holes for each of the 30 connections very easily.

Then it's just a question of soldering the wires onto a SIMM, practice on some keychain fobs: 256k SIMMs were > a dime a dozen and even 1MB SIMMs are nearly worthless today.

When you're confident, solder the wires to your larger SIMM, it's not like you can burn a leg off an IC in this process, edge connectors on PCBs are robust by comparison and the wide spacing almost ensures that you won't have any shorts. Test for them anyway.

Thread all thirty (two inch)wires through the matching holes in the PCB and then hot-glue the SIMM into the correct position. Soldering the wires to the underside of the Accelerator PCB will be a piece of cake, test for shorts and then nip the generous excess wire off after you're done.

You were ready to give this thing away, remember? You're VERY unlikely to do any real harm to the accelerator during this process, static is probably the only bugaboo, but that's universal.

Give this a try as your first hack. You'll feel awesome when it works and if it doesn't, then ship it to somebody for a fixer-upper. You've got nothing to lose but something you were ready to give away and a nice bit of experience to gain . . .

. . . along with a lot of confidence in yourself to boot! :approve:
 

trag

Well-known member
Are you certain that the damaged end is at pins 1, 2, and 3? I ask, because pins 28 & 29 are parity pins and not used in the Mac. Leaving just pin 30 which is a 5V pin and sort of redundant with the one at pin 1, although probably not a good idea to dispense with.


Some_Person

Active member
I doubt that the one unbroken end of your SIMM socket would do the job, so you're better doing it the ugly, but simple way.
The peg that goes through the hole on the broken end is still mostly intact, so the SIMM seems to be secure in the socket. However, I'm not sure if the wires can easily be soldered to the pins on the underside of the SIMM while it is in the socket.

For a memory hack, this isn't even all that much of a kluge. What Capacity 30 pin SIMMs are you using? If they're 4MB, don't worry too much about it and give it a shot yourself, if larger, maybe it's better to ask for some help.
The SIMM is 1MB.

Removing the socket will be very simple, you can use desoldering braid and a standard soldering iron. A bulb type solder-sucker is a very small investment to make as well. Wick or suck the majority of the solder from all the socket's thru-hole connections. It may even come off without a struggle. If not, once the individual pins are pretty much loose, it's no big deal to use a pair of diagonal cutters or nippers to destroy the plastic socket in order to deal with each pin individually. At this point you should be able to get clean thru-holes for each of the 30 connections very easily.
Then it's just a question of soldering the wires onto a SIMM, practice on some keychain fobs: 256k SIMMs were > a dime a dozen and even 1MB SIMMs are nearly worthless today.

When you're confident, solder the wires to your larger SIMM, it's not like you can burn a leg off an IC in this process, edge connectors on PCBs are robust by comparison and the wide spacing almost ensures that you won't have any shorts. Test for them anyway.

Thread all thirty (two inch)wires through the matching holes in the PCB and then hot-glue the SIMM into the correct position. Soldering the wires to the underside of the Accelerator PCB will be a piece of cake, test for shorts and then nip the generous excess wire off after you're done.
I have never soldered anything before in my life, and I do not even own any of the tools I would need to do this. Do you really think this would be simple enough for someone with absolutely no experience like me? I recently watched thetechknight's videos where he repairs several SE/30 boards that someone severely failed to recap. What would prevent me from making these kinds of catastrophic errors?

Give this a try as your first hack. You'll feel awesome when it works and if it doesn't, then ship it to somebody for a fixer-upper. You've got nothing to lose but something you were ready to give away and a nice bit of experience to gain . . .

. . . along with a lot of confidence in yourself to boot! :approve:
Doing it myself isn't completely out of the question. I would like to eventually learn how to solder, but at this point, I don't even know what kind of iron or anything I would need to buy.

Are you certain that the damaged end is at pins 1, 2, and 3? I ask, because pins 28 & 29 are parity pins and not used in the Mac. Leaving just pin 30 which is a 5V pin and sort of redundant with the one at pin 1, although probably not a good idea to dispense with.
Yes, the damage is at pins 1, 2, and 3. The SIMM has pins 1 and 30 clearly labeled, and if I try the card as-is with the on-accelerator RAM enabled, I get a Sad Mac. The card does work with only the motherboard RAM, but it is considerably slower this way.

 
Top