• Updated 2023-07-12: Hello, Guest! Welcome back, and be sure to check out this follow-up post about our outage a week or so ago.

jmacz journey

jmacz

Well-known member
Next thing I’m going to do is to just assemble the second pack with the second cell pack I ordered and see what happens. Perhaps by some dark magic it was the battery pack all along and not the EMM, although I couldn’t imagine why. I’m just grasping at straws now.

Sounds good. Let me know.
 

jmacz

Well-known member
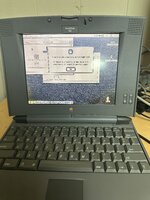
Wow.. I was successfully running the batteries down on my 540c by playing Tetris Max and mid game got the 10 second warning of going to sleep due to lack of remaining power, so I quit Tetris Max and was going to plug the charger in, but I was too slow and the system went to sleep. I then plugged in the power and hit the power button and expected it to be hung as usual. Nope. Came out of sleep and it's fine. Umm... very inconsistent.
 

jmacz

Well-known member
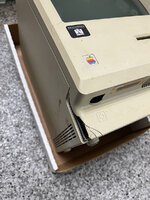
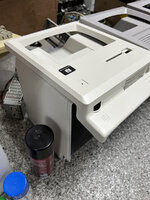
Some progress on the 512K case damage (before vs current):

IMG_6279.JPG IMG_6574.JPG

Not perfect by any means. Could have spent more time filling/sanding after getting the overall structure in place, but there isn't much space for the new material to attach to the existing case so it's not as strong as I would have liked and thus abandoned sanding it any more. But I will try again in the future. Once I get the 512K working, I will share some more pictures of the case repair including what it looked like before sanding down.
 

jmacz

Well-known member
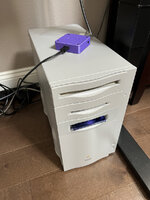
The Quadra 800 is finally finished (documented here). More pictures of the custom MO drive bezel (the one with the blue disc sticking out) inside the linked thread.

IMG_6576.JPG

The purple thing on top of the Quadra 800 is a BMOW Wombat from @bigmessowires inside an enclosure. I've got it hooked up (along with my IIfx) to a KVM switch so I can use my HHKB keyboard and mouse to control not only those two vintage macs but my modern ones.
 

obsolete

Well-known member
Some progress on the 512K case damage (before vs current):

View attachment 67606 View attachment 67607

Not perfect by any means. Could have spent more time filling/sanding after getting the overall structure in place, but there isn't much space for the new material to attach to the existing case so it's not as strong as I would have liked and thus abandoned sanding it any more. But I will try again in the future. Once I get the 512K working, I will share some more pictures of the case repair including what it looked like before sanding down.
Not perfect, but a lot better! Which paint are you using?
 

demik

Well-known member
Some progress on the 512K case damage (before vs current):

View attachment 67606 View attachment 67607

Not perfect by any means. Could have spent more time filling/sanding after getting the overall structure in place, but there isn't much space for the new material to attach to the existing case so it's not as strong as I would have liked and thus abandoned sanding it any more. But I will try again in the future. Once I get the 512K working, I will share some more pictures of the case repair including what it looked like before sanding down.

That does look good to be fair. What material did you use ?
 

3lectr1cPPC

Well-known member
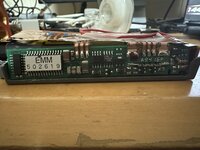
When I measure between Battery + and the two middle contacts (emm connections) i get back voltage readings slightly below the battery voltage, which seems off. I'd expect them to have a much lower voltage, right? Can you test on your working battery?

Battery + and Battery - reads 9.89v
Battery + and the contact direct to the left of it: 9.31v
Battery + and the contact two spaces to the left of it: 9.85v

This seems...off to me.
Also, the smart probe in EMMpathy doesn't see anything, just tells me to insert a battery like all the other utils.
 

jmacz

Well-known member
Is this with the battery plugged in and the laptop on? Or is this with the battery outside of the laptop?

Let me know and I will test tomorrow.

The battery +/- should be around 10v like you mentioned.

But the two middle pads shouldn't be anywhere near that... I believe... if I remember correctly, those should be down near 5v max. Sounds like you might have a short somewhere on the board but let me test mine tomorrow.
 

jmacz

Well-known member
Battery #1 (2000mAH) which is fully charged
  • + vs ground = 11V
  • one to the left of + vs ground = 5V
  • two to the left of + vs ground = 0V
Battery #2 (2100mAH) which is fully charged
  • + vs ground = 11V
  • one to the left of + vs ground = 5V
  • two to the left of + vs ground = 0V
From your description, were you testing + vs those two other pads? You should be testing them vs ground otherwise you're getting the voltage differential between those pins and +... in which case your readings for those two other pads is probably closer to 0. When tested against ground, if you're getting near 0V for those two inner pads, that probably means your EMM isn't active for some reason.
 

3lectr1cPPC

Well-known member
Ok, got it. I don't get any voltage when touching battery negative and the two inner pins, so I suppose that would be my problem. Question is, what on the EMM board generates 5V, and how come both my boards won't do it?
 

jmacz

Well-known member
Hmm, the ribbon layout on yours is very different from all 3 batteries I have worked on. Doesn't matter, but interesting how many revisions they've done on these batteries.

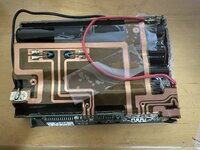
If I remember correctly, the component between the ATMEL 93C66 and the ground ribbon is a voltage regulator. The component on the other side of the ribbons might also be one. You could check what voltage you're seeing across those. On the battery that failed for me, one of the two transistors below the A9416P on your board failed. You can check what voltage is passing through those as well. The zener diodes on the right side of your board look weird, almost like it was modified. The three boards I have worked on had those neatly vertical or horizontal. I haven't seen them back to back mounted at an angle like that yet.
 

3lectr1cPPC

Well-known member
My second battery rebuilt is showing 5V on one of the middle pins. This is the first board I tried that also didn’t work. We’ll see, PowerBook is booting now.
These came out of a rather rare grayscale 540, was discontinued only a few months into the 500 series lifetime. They’re likely first revision batteries, yours appear to be the second simplified revision.
 

jmacz

Well-known member
Weekend Update

Friend's SE/30


Spent yesterday recapping the analog board and PSU on an SE/30 for a friend. The recapping was a success but the machine had some speaker issues before the recap and it persisted after the recap. After working through some troubleshooting, found a faulty solder joint on the connector going between the analog board and the motherboard. It was the -12V line. Fixed that and the sound was working again. Success.

My SE/30 and SE

Spent today recapping the analog board and PSU on a second SE/30 and also the SE that I procured recently. Both of those recap jobs were also successes. The SE is working well although I still need to debug the accelerator card. The SE/30 however was known to have issues and I'm still working through those.

Problem #1: random crashes on boot - turned out to be a bad RAM stick. Resolved.

Problem #2: stuck on gray screen on power up with no chime - reseated the ROM. Resolved.

Problem #3: chime on start up is staticky, low volume, and cuts off - haven't debugged yet but I know it's not the speaker as it tested fine using a few other boards.

Problem #4: hang on startup - booting using System 7.5.5, after the Welcome to Macintosh screen it shows the Mac face screen, and then before it gets to showing any CDEV icons on the startup, system hangs. It just gets stuck. Haven't debugged yet.

This SE/30 had its main board recapped by someone else. It has tantalums on it. I do see some capacitor gunk on some of the chips near where the old capacitors were so there could be some damage.

Floppies

Decided to recap my floppies. Got 3 of them done today (Q700, Q800, IIfx). A bunch more to go. Probably a placebo effect but feels like the eject got stronger after recap. Probably just imagining it.
 

jmacz

Well-known member
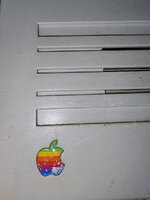
The recent Macintosh SE I received had an Apple logo with scratches on it.
s-l1600.jpg

I had tried numerous things in the past including hand painting one using acrylic, but none came out the way I wanted. This time around, I decided to try a color water slide decal instead.

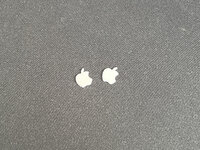
Step one was to remove the old Apple badge and sand away the scratches. I then primed it in white. There's two pictured below as I was also working with a damaged one from a IIci.
IMG_6592.JPG

I then used a photo inkjet printer to print a rainbow colored decal. It took some time to get this right as I don't have a good understanding of color profiles and after spending an hour or so trying to calibrate my monitor and printer, I gave up and just tweaked the colors until the printed result matched what I wanted.
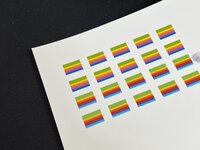
IMG_6593.JPG

The first two rows above were a failed attempt at color matching. The last two rows on this sheet I was satisfied with. Note that I put 3 coats of acrylic gloss clear on top of the decal to ensure the ink didn't wash away in water during the transfer step. Next step after that was to transfer the decal onto the badges. I used painters tape to hold the badges in place.
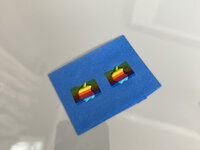
IMG_6594.JPG

I used a hair dryer to heat up the badges which allowed the decals to dry and kinda form onto the edges of the badge. After cooling, I used an xacto knife to cut away the left overs.
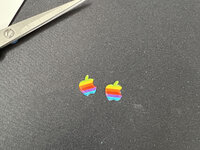
IMG_6595.jpg

Yes, the cutting isn't exact but I didn't want to get super close to the badge as it might tear off the decal from the badge itself. When mounting, I knew I could tuck away the remaining decal edges.

And the final result back onto the same Macintosh SE from where it came.
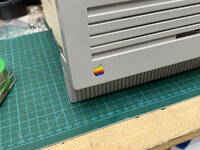
IMG_6596.jpg

I cleaned up the edges a bit more after taking the above picture but as of right now, it looks really clean. Colors are pretty close. Unfortunately, sharing the decal picture isn't going to help anyone as it was colored to match the output of my Canon photo printer.
 
Top