Apple Color Display M1212 - No picture after recap

Hi,

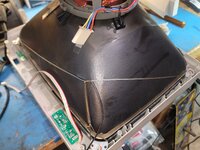
A while ago I acquired a Color Display M1212 in pretty decent cosmetic condition. Unfortunately, the display's image was not always very sharp and would occasionally flicker or turn on and off by itself. The degaussing was also very loud when powering on the monitor. Since I have some experience reparing vintage power supplies and have successfully recapped all my vintage macs before, I decided I would try to recap the CRT control board in an attempt to fix the issue.

After replacing all electrolytic capacitors with high quality Nichicon and Rubicon replacements from Mouser, I am unable to see any picture showing up on the CRT. The CRT does turn on (LED goes green), but I see no picture and also no static on the screen and no visible glow from the "neck" of the CRT tube.

After doing some serious ChatGPT-ing, I was able to isolate the problem to faulty or missing Horizontal output. According to sources in the web, the monitor will refuse to turn on if it doesn't receive any Horizontal output signal. I am not a CRT expert and cannot be sure that this is accurate, so after days of getting nowhere I am requesting the support from the community to try and solve the issue.

What I have verified so far:

- All capacitors are of right value and have been placed in the right orientation
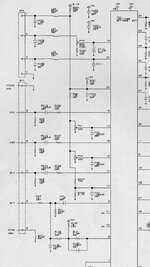
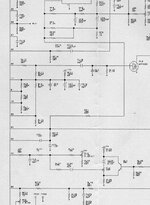
- I checked the soldering joints are solid by verifying continuity (I used this schematics: https://usermanual.wiki/Document/AppleM1212MonitorSchematic.2035905086/view)
- I checked voltage at the H.O.T and got 118V at the Colector and 0V at the Base (according to sources, Base should not be 0V)
- I am hooking up the monitor to a known good machine

Also, I found that there is a 4.7KOhm resistor soldered to PIN 39 of the Jungle IC and leading up to jumper (see picture below). I have another one of these monitors, which I opened up and oddly I don't see it on the other monitor. Im not sure this is stock and was probably added during some repair work in the past?

Any help saving this monitor or a tip that could lead me in the right direction would be very much appreciated.

IMG_2992.jpeg
IMG_3032.jpeg

Capacitor list: https://tinkerdifferent.com/resources/macintosh-color-display-m1212-capacitor-list-1-645-346-13.25/
Schematics: https://usermanual.wiki/Document/AppleM1212MonitorSchematic.2035905086/view

IMG_2993.jpeg

IMG_2913.jpeg
 
I can see something strange near RV33, in the bottom of the board, probably a ripped solder joint (solder tip is missing, you can see the board underneath) (new cap fitted ?) and maybe a broken solder as well.
 
I can see something strange near RV33, in the bottom of the board, probably a ripped solder joint (solder tip is missing, you can see the board underneath) (new cap fitted ?) and maybe a broken solder as well.
Can’t see what you’re referring to, please could you indicate it on the photo?

Edit: oh yes. I assume OP has scraped back a bit of the trace and soldered the lead to it?

IMG_9588.jpeg
 
Can’t see what you’re referring to, please could you indicate it on the photo?

Edit: oh yes. I assume OP has scraped back a bit of the trace and soldered the lead to it?

View attachment 96403
Hi,

Thanks so much for looking into this, and yes you are correct. This contact was already broken when I opened up the monitor and despite me being very careful, it came completely lose during the recap. I did scrape a bit of the trace and soldered one leg of the new capacitor to it. I have payed careful attention to test the joint here and I get a very strong reaction when testing continuity from this point to the next component it traces into. Yesterday, I redid this a little bit and got even a better bond in order to prevent it from coming lose in the future. Nevertheless, I still get the black screen.
 
Something to watch for when you rebuilding / capping this monitor. There are 4 compression leafs (2 at the top, and 2 at the bottom). Their function is to tie the tube to the chassis ground to discharge the static from the tube. The leafs in the one I rebuilt were all broken due to metal fatigue. This needs to be fixed if yours has done the same. You can run a ground braid from the top left (or right) corner to the opposite bottom side. Then 'pull' the braid to the opposite bottom side (see pic). I used a spring to pull it across (pull it taught against the tube), but another piece of wire or a tie wrap will work. Tie a ground wire to the braid and use that as your ground point.
As for your picture issue. This monitor will not produce any high voltage without a video signal. Everything i'm recommending to check is based on the fact you stated it worked before you capped it. First thing I'd do is go through everything that was capped and check for broken traces at the pad. Depending on how you desoldered them it's easy to break the trace from the pad and not be able to see it. I'd also check for any possible solder shorts. It's easy for solder to be 'flicked' off of the tip. Just give it a good once over to be sure. I would also pay close attention to everything on the input side of 1y1. Also make sure you dont have any issues at connector 9v1 (your video input connector).
I did a compete cap list when I rebuilt my monitor. It's on my garage comp, so don't have it handy. I'll post it a little later if you want to compare it to the others
 

Attachments

  • 20260207_175030.jpg
    20260207_175030.jpg
    1.3 MB · Views: 4
  • Screenshot_20260307_142757_Chrome.jpg
    Screenshot_20260307_142757_Chrome.jpg
    288.6 KB · Views: 3
Last edited:
Not sure if you noted the cap specs in your monitor as you removed the old ones or whether you just used the list from TinkerDifferent. I found that list from TD had an error in it. I noted it here. You might want to check.

Post in thread 'Wanted: Cap list for M1212 Macintosh Color Display'
https://68kmla.org/bb/threads/wanted-cap-list-for-m1212-macintosh-color-display.40953/post-499900
This is an interesting point and I did make the mistake of blindly following this cap list (https://caps.wiki/wiki/Macintosh_Color_Display_(M1212)). After assembling everything and finding out there was no image, I went back to check everything and even found your post, which led me to the Tinker Different list and the realisation that I had a couple of wrong caps. I did write down the values of each capacitor I removed. I even went as far as keeping them for checking purposes in case the recap didn't work. I could't find any .47uF 100V as your post suggested. In my monitor CL11 was definitely 1uF 50V.
 
Something to watch for when you rebuilding / capping this monitor. There are 4 compression leafs (2 at the top, and 2 at the bottom). Their function is to tie the tube to the chassis ground to discharge the static from the tube. The leafs in the one I rebuilt were all broken due to metal fatigue. This needs to be fixed if yours has done the same. You can run a ground braid from the top left (or right) corner to the opposite bottom side. Then 'pull' the braid to the opposite bottom side (see pic). I used a spring to pull it across (pull it taught against the tube), but another piece of wire or a tie wrap will work. Tie a ground wire to the braid and use that as your ground point.
As for your picture issue. This monitor will not produce any high voltage without a video signal. Everything i'm recommending to check is based on the fact you stated it worked before you capped it. First thing I'd do is go through everything that was capped and check for broken traces at the pad. Depending on how you desoldered them it's easy to break the trace from the pad and not be able to see it. I'd also check for any possible solder shorts. It's easy for solder to be 'flicked' off of the tip. Just give it a good once over to be sure. I would also pay close attention to everything on the input side of 1y1. Also make sure you dont have any issues at connector 9v1 (your video input connector).
I did a compete cap list when I rebuilt my monitor. It's on my garage comp, so don't have it handy. I'll post it a little later if you want to compare it to the others
Hi. Thanks a lot for the reply. A few things to comment here:

- I believe the grounding if fine on mine. I reconnected everything as I found it and there were no broken metal clips like in yours.
- I do believe my problem is the video signal and will eventually be explained by either a faulty solder or a broken pad. Especially the broken pad part. The pads on my board are extremely brittle and come off easily from the pad. On two instances I had to scrape off some and solder directly to the trace. I have limited tools (only a multimeter) to check continuity. I've done so and everything is "beeping" as it should. Do you have any ideas on how I can make sure that Im not getting any false positives?
- The point about 9V1 is also interesting. In an attempt to not overly complicated my thread, I left out that one of the pins in the female JST-Connector, which connects the video cable to the board snapped during reassembly. I bought a new JST-Pin which closely matched the original one and soldered the original wire to it. To make sure it was working, I check continuity between the 15-Pin video cable and the solder of the connector on the board. Also, I used attached a know good video cable from another monitor and that didn't produce an image either. Your point does make me wonder if new JST-Female-Pin which I purchased could have somehow slightly sunk male the pin off the board slightly. As I said, the solder pads are completely "rotten" with age on this board. For reference, I drew a red arrow to the pin, where the video cable wire snapped.


IMG_3049.jpeg
 
(Please don't do this if you don't know the safety concerns of working on crts - this test requires the monitor powered up).
Make sure Iv1 has its required working voltages (pin 29, 7). If you haven't downloaded the schematics they're available on internet archive. You want to make sure the smps is working correctly before proceeding (check tp1, tp2, and tp3).
It looks like pin 32 of iv1 (the dip package in the video input section) drives a mosfet (dl2). That mosfet allows the horizontal section to power up. If you don't have anything going to the mosfet, you can isolate your issue to the input side of the circuit. If you do, it will most likely be a horizontal circuit issue. I'd review the board for any cracked solder joints and broken traces first paying close attention to anywhere you did any work.
Just for reference (in case you have access to one) - The analog board in the audiovision 14 is exactly the same as the one in the m1212 (visually - haven't checked if yoke Impedence is the same yet). You could use it for reference readings of test points if you have a working one (or another m1212).
 

Attachments

  • Screenshot_20260308_122813_Chrome.jpg
    Screenshot_20260308_122813_Chrome.jpg
    223.6 KB · Views: 2
Back
Top