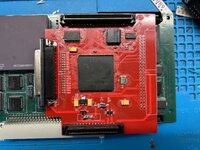
joethezombie Posted September 24, 2016 Report Share Posted September 24, 2016 (edited) I've been working on a universal mount for v6 and v5 SCSI2SDs that will easily install in most classic Macs and most likely other computers, too. It looks like this: The notch provides relief for the rather large plastic clips which hold the molex connector to the v5 boards. The raised mounts keep the solder side pins off the surface. You can use self tapping screws with your chosen pitch to thread the holes, then use nice screws to mount it. Be very careful with the v6 board, as the traces are very close to the holes. Use small head screws, consider a washer, and be very careful. Here it is with the v6 card, on one of the aftermarket "slide" style HDD platforms that bolt above the floppy cage (there are holes on the bottom for surface mount applications): Here it is with the v5 card in a standard drive cage: It also fits in my IIsi, IIfx, and Q700 cages. I haven't tested it in a 500 series, but I'm 99.82% sure it will not line up with the edge connector. The mount didn't work with one of my SE/30s, with the upside-down drive orientation (the holes didn't line up), so I created a new revision that I will try to print tomorrow at the library if I can fit in. If everything looks good, then I will attach the files here so you can print them out. If you have access to a 3D printer at your library, it's pretty cheap. I uploaded a version to Shapeways and it was about $17 including shipping, so that's pretty expensive for what could also be achieved with some cardboard. But it is a neat permanent solution. Edited September 24, 2016 by joethezombie Quote Link to post Share on other sites
aperezbios Posted September 24, 2016 Report Share Posted September 24, 2016 Very cool, looking forward to the STL file so I can have a go at printing it here at home with my 3D printer. Quote Link to post Share on other sites
olePigeon Posted September 25, 2016 Report Share Posted September 25, 2016 If you want to reduce print times and the mount of plastic needed, just get rid of the crossmembers and make them two brackets; one for left side and one for right side. Quote Link to post Share on other sites
aperezbios Posted September 28, 2016 Report Share Posted September 28, 2016 (edited) ETA? Edited September 29, 2016 by Bunsen https://wiki.68kmla.org/index.php/68kMLA:Forum_Rules#No_excessive_quoting Quote Link to post Share on other sites
joethezombie Posted September 29, 2016 Author Report Share Posted September 29, 2016 Sorry for the delay. It's hard to get print time with all the kids at the library queuing up Minecraft models. Sheesh! Anyway, here is the latest revision of the mount. The new hole positions work in all my classic Macs, even the upside-down mount SE/30 guy. Tested in: SE bottom mount slide tray SE/30 upside-down cage IIsi bottom mount clip cage IIfx drive cage Q700 bottom mount clip cage Good luck! Let me know how yours turn out! SCSI2SD Univeral Mount.zip Quote Link to post Share on other sites
anthon Posted September 29, 2016 Report Share Posted September 29, 2016 Thanks for sharing this! I'll make one of these when I finally get around to buying a SCSI2SD. Quote Link to post Share on other sites
carguyty Posted October 1, 2016 Report Share Posted October 1, 2016 (edited) Super sick Joe! Shapeways wants to know if this is in mm, cm, or inches. Which should I say? Also, was this intended to be printed in PLA or something else? Edited October 1, 2016 by carguyty Quote Link to post Share on other sites
joethezombie Posted October 1, 2016 Author Report Share Posted October 1, 2016 Well, I'm not a shapeways guy, but I did load it up and just left it at mm. The size should report as: Cm:10.082 x / 9.882 y / 1.226 z In:3.969 x / 3.891 y / 0.483 z As far as material, I don't know. I'm not even sure what the library printed mine as. It's just a black hard plastic. But I did have to run a drill bit through the holes to clean them out, then thread them with a self tapping screw. I'm a bit of an amateur at 3D printing, so I'm not the best for advice. Good luck! Quote Link to post Share on other sites
carguyty Posted October 2, 2016 Report Share Posted October 2, 2016 Still amazing work! Thank you for the gift to the community. Quote Link to post Share on other sites
K55 Posted November 9, 2016 Report Share Posted November 9, 2016 Printed in about an hour. Screw holes were a tad too small for the standard Macintosh hdd screws, so I got a bit of fracturing on the part, but nothing major, perhaps make them a touch biggger. Other than that works fine. Quote Link to post Share on other sites
CC_333 Posted November 9, 2016 Report Share Posted November 9, 2016 Are the threads printed in? I'm thinking if not, you could always drill the holes slightly larger. c Quote Link to post Share on other sites
joethezombie Posted November 9, 2016 Author Report Share Posted November 9, 2016 Ah nice! Some feedback! Since I ran a bit and tapping screw through the holes, I didn't have that issue with the holes too small. That's why I recommended doing the same. But I can make the holes slightly bigger. Quote Link to post Share on other sites
anthon Posted November 11, 2016 Report Share Posted November 11, 2016 Are the holes sized to be tapped for a standard 3.5" hdd screw (#6-32)? Or a different size? Quote Link to post Share on other sites
joethezombie Posted November 12, 2016 Author Report Share Posted November 12, 2016 Well because the library printer isn't that good, the holes are often not regular shaped and sometimes have some plastic left inside of them. So, I made the holes a bit smaller than #6 to act more like a pilot hole. I think I sized them .09". This way, I could run a 7/64" bit through the holes to clean them out, and get a uniform shape and size. Then a #6 will self tap without fracturing. I guess if you have a high quality printer that can make perfect holes, you will still need to drill them out to the proper size. Quote Link to post Share on other sites
olePigeon Posted November 29, 2016 Report Share Posted November 29, 2016 Filament printers aren't good enough to make threaded holes that small. You just have to use smaller holes and thread them yourself. That's what I did on my adapter. Quote Link to post Share on other sites
just.in.time Posted February 14, 2017 Report Share Posted February 14, 2017 Just used the design to order 2 of these mounting adapters Thank you! Quote Link to post Share on other sites
Trash80toHP_Mini Posted May 7, 2017 Report Share Posted May 7, 2017 (edited) Here it is with the v6 card, on one of the aftermarket "slide" style HDD platforms that bolt above the floppy cage (there are holes on the bottom for surface mount applications) Aftermarket platforms? Got pics? Fabulous work! Investing in real taps for a few sizes of machine screws spays off big time. You can get standard taper taps/matching drill bit pairs for a few bucks at Lowe's. I keep these pairs with the screw assortments so I don't have to dig out one of my three dedicated assortment and full sets of taps and dies. That way the "computer taps" are handy with the matching hardware assortments and the full sets stay full. No dies required for this stuff unless you need to dress up the threads on something like long 4/40 threaded rod standoff studs. I picked up a full set of taps (Taper, Plug and Bottom types) for 4/40 machine screws to do clear plexi case parts. They look better if you bottom out holes drilled to the correct depth. edit: 4/40 and 3mm are almost the same, but not identical. Edited May 7, 2017 by Trash80toHP_Mini Quote Link to post Share on other sites
ants Posted August 28, 2017 Report Share Posted August 28, 2017 (edited) Thanks so much for designing this and freely sharing your work - it's very skillfully done. Using your model I ordered from Shapeways - it was a breeze to order and incredibly good value at $17.43 including UPS shipping to Australia! The package arrived today and I replaced my quality "sticky tape and paper" installation with your Universal Mount: I used 9mm 4G self-tapping screws which I already had in my shed. They needed a bit of pressure to screw in, but overall they worked really well and everything is now very sturdy. I'm really happy with the result so thanks again for sharing your expertise. Edited August 28, 2017 by ants Quote Link to post Share on other sites
Trash80toHP_Mini Posted August 28, 2017 Report Share Posted August 28, 2017 (edited) Nice! Great shots, ants. Looking at that pic I can't help but think of printing an SE/SE/30 specific version that would bolt directly down through the slots at the rear of the FDD cage. A version with clips to engage the slots when inserted and pushed forward using the standard mounting screws through a flange dropping down at the rear would be oh so very, very cool. Looks like there's cubic that's close to an inch deep above the FDD cage to be harvested in that manner. There would be enough vertical clearance there for a card in the second passthru connector of the TriSlot PowerCache Adapter we're developing for the SE/30. ]'> You've inspired me to fab an aluminum plate to do just that for installing one of the little Savvio server drives in my /30. Direct adaptation is a lot more elegant than an adapter kluge for doing the same thing. edit: forgot to add a plug for matched drill/tap sets for this kind of thing. All but a zero risk of cracking a print when using the proper tools. They say "many hands make light work," which may be true for the most simple of tasks. But the right tool in the hands of the village idiot who knows how to use it trumps 'em all. ]'> Edited August 28, 2017 by Trash80toHP_Mini Quote Link to post Share on other sites
ants Posted August 28, 2017 Report Share Posted August 28, 2017 Trash80toHP_Mini - designing a mount that doesn't require disassembling most of the SE/30 to remove the drive would be great. I'm just waiting for the day that I break something or fry a board due to my stupidity. And yeah in hindsight I probably should have drilled larger pilot holes for the screws I was using - as there was a risk I could have broken the mount with the pressure I was applying. Alternatively, getting shorter screws would have been safer - perhaps around 5mm. Quote Link to post Share on other sites
reallyrandy Posted October 5, 2017 Report Share Posted October 5, 2017 (edited) Printing one now, Thanks Joe! Edited October 5, 2017 by reallyrandy Quote Link to post Share on other sites
CharlieFrown Posted October 12, 2017 Report Share Posted October 12, 2017 wow looks great,,, any chance for SCS2SD v4 mount? Quote Link to post Share on other sites
aperezbios Posted November 5, 2017 Report Share Posted November 5, 2017 wow looks great,,, any chance for SCS2SD v4 mount? That seems very unlikely, unless you do it yourself, as V4 boards have not been manufactured in nearly three years. The percentage of all SCSI2SD devices out there which are V4 is _very_ small, I'd wager less than 1%, at this point. Quote Link to post Share on other sites
CC_333 Posted November 7, 2017 Report Share Posted November 7, 2017 Then I must be very unique, since I have several V3 boards sitting in my closet. I remember when V1 came out, it wasn't that long ago. 2014? 2015??? Somewhere in that range, I think. c Quote Link to post Share on other sites
Byrd Posted April 1, 2018 Report Share Posted April 1, 2018 Hi Joe, Just a quick note to say thanks for making up this mount - I've just printed it out for a Quadra drive sled, using a SCSI2SD v6. It fits and works perfectly. JB Quote Link to post Share on other sites
Recommended Posts
Join the conversation
You can post now and register later. If you have an account, sign in now to post with your account.