
Hello everyone, this is my first time buying a 100 series PowerBook and I bought a 145 for around 20 dollars. I got it and plugged into a OEM PSU and the thing didn’t turn on. But it got oddly hot around the charging port. I took it apart and on the back side of the motherboard I think I see something melted on d16? Any help is appreciated
-
 Hello Guest! We're hosting a challenge to welcome vintage Intel macs to the MLA during the month of July! See this thread for more information.
 -
We've made some quality of life improvements to the Trading Post. More info here.
You are using an out of date browser. It may not display this or other websites correctly.
You should upgrade or use an alternative browser.
You should upgrade or use an alternative browser.
PowerBook 145 Troubles
- Thread starter Cheeseburgerfreedomman
- Start date
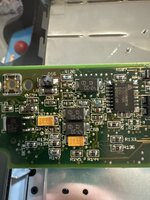
Common failure. To my knowledge the diode is there for reverse polarity protection; you can remove it and still run the machine without it. HOWEVER you'll want to verify there's no short between 5V and GND before doing that, and check the fuse at F1 (found topside over by the batter terminals). Something caused that diode to fail, just want to make sure that condition doesn't still exist before running the machine.
New replacements in the same package are hard to find, but a smaller version can be made to fit: https://www.digikey.ca/en/products/detail/diodes-incorporated/DDZ13B-7/700105
New replacements in the same package are hard to find, but a smaller version can be made to fit: https://www.digikey.ca/en/products/detail/diodes-incorporated/DDZ13B-7/700105
I just want to say for the record that I have not tested this power supply. Could it be the issue?
I didn’t get the machine with the PSU but it is the apple low power charger
yeah that's probably fine, although the power out might be out of spec now that the caps are likely leaking.
but that wouldn't cause your diode issue.
do what @desertrout suggested
but that wouldn't cause your diode issue.
do what @desertrout suggested
So the F1 fuse looks fine but I’ll have to go find my multimeter. But I’ll still get that diode just to be safe.

The chargers with the Low Power label are more reliable than earlier 2A supplies without it. I believe they were introduced either when the 3A chargers for the color models were released or with the 150, unsure on that. In any case as others have said it isn’t likely to be the cause of the problem.
Unlikely - when these fail their either die or go over spec, but that would blow the fuse first and not the diode. But always good to test it. Should be reading between 7.5 to 7.9V.I just want to say for the record that I have not tested this power supply. Could it be the issue?
So I am a noob when it comes to both soldering and testing with a multimeter what points am i looking for when you are talking about 5v and gnd
Once you remove the diode, you can check to see if a short still exists by testing for continuity between the two battery charger 'strips'.
(correction for what I said above - not testing for a short between 5V and GND... it's between the charger voltage and GND).
(correction for what I said above - not testing for a short between 5V and GND... it's between the charger voltage and GND).

My apologies - I was referring to the connector where the battery mates with the logic board:

That connector has the two 'strips' I was mentioning
That connector has the two 'strips' I was mentioning
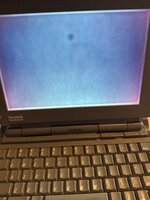
Where can I find capacitors for the screen at?
digi-key and mouser got you covered. pick your poison.
also make sure to use higher voltage replacements if you're replacing with tantalum or ceramic.
i used:
1 x https://www.digikey.ca/en/products/detail/kyocera-avx/APA0606220M035R/15195396
1 x https://www.digikey.ca/en/products/detail/würth-elektronik/875105142005/5147558
9 x https://www.digikey.ca/en/products/detail/kyocera-avx/12101C335K4T2A/9374707
So I’m going to be completely honest here. I have never soldered anything in my life. Is this going to be easy or should I find someone who is good at soldering?
Practice on something you don’t care about first. I recapped a 145 LCD as about the first recapping I’d ever done - it’s not too bad AS LONG as you know what you’re doing and have had a bit of practice.
Depends on what you want. Some of us are in this hobby in part to do the repair / restoration work, some of us just want something that works without having to fuss. If you're the latter, then it's probably best to find someone to do the work for you. Someone like @Amiga of Rochester for instance.So I’m going to be completely honest here. I have never soldered anything in my life. Is this going to be easy or should I find someone who is good at soldering?
But If you are the former - someone wanting to get into the repair side of this hobby - then @3lectr1cPPC is absolutely correct: work your way up to comfortably working with surface-mount components like these caps, and practicing on something you don't care about is a good place to start. There are lots of online resources that show good techniques, including a few that show the process of recapping 1xx series PowerBook displays (like https://mac84.net/web/macintosh-powerbook-160-lcd-display-recapping-guide/). They should give you a good idea of the kinds of tools / materials you should have on hand to do the job, as well as to do the necessary cleaning.

The screen looks to have track ball damage. That will always be there now. Recapping isnt bad. Make sure you clean cap goo off with isopropyl 99% before new caps
Similar threads
- Replies
- 0
- Views
- 202