Twentieth Anniversary Macintosh Logic Board Recap Guide

jajan547

Well-known member
Hey everyone I thought this guide I made might come in handy for anyone recapping their TAM logic board. Mine was experiencing a strange issue with the screen being glitchy and inconsistent and a logic board recap fixed it for me. I would like to leave a tip to anyone pursuing this recap, if you are going to do this make sure you get smaller capacitors for the areas near the plastics as it is extremely cramped and you risk melting plastic. These specific areas in question are for the following locations; C133, C134, C135, C137, and C125.
 

Attachments

  • Macintosh Twentieth Anniversary Logic Board Recap Guide.pdf
    24.4 KB · Views: 33

Joopmac

Well-known member
WOW this is awesome timing =) Thanks so much!!!!
I was on the verge of making a similar list, maybe I make it for the power/bose board when i get to it!
 

jajan547

Well-known member
WOW this is awesome timing =) Thanks so much!!!!
I was on the verge of making a similar list, maybe I make it for the power/bose board when i get to it!
Absolutely, I have my list started for the power unit but haven’t finished it and double checked it yet. Best of luck with your recap!
 

Byrd

Well-known member
Appreciate it, I'm working on doing a power supply one as well.

Great when you do can you please put up some tips on how to crack open the TAM sub? will need to do one day but don’t want to be destructive.
 

cheesestraws

Well-known member
Absolutely, heck even opening the main machine is scary.

TAM trauma group meeting in this thread. I had to replace just the CD drive door on mine and it nearly broke me and @joshc (and the TAM). It's the combination of the overly complicated 'wut' of it all, the easily-broken plastics, the fear of not being able to get it to go back together, and the strange empathy with the engineers who feel like they might have been going slightly mad. Nietzsche's abyss is real and it lurks in the depths of the TAM.
 

iiiDIY

Member
Great when you do can you please put up some tips on how to crack open the TAM sub? will need to do one day but don’t want to be destructive.
Hey, I know you were asking someone else, but I've been into my sub a couple times. It's pretty straightforward... You can see the basics in this video I made here (link jumps directly to the time):

Some tips:
- When removing the smaller "hat" circle, be sure to lift STRAIGHT UP, as the posts are very thin and deep. Very prone to breaking
- When removing the soft rubber "sleeve" on the top for the first time, you'll want something very thin and long to get up in there and break the tape seal. I don't think you need a heat gun for this, but wouldn't do it in a cold shed. You can see the enormous amount of tape they used once removed... it's a lot to fight against

I'm firmly in the TAM PTSD camp. I love that computer but my goodness... it's held together by literally tape and hopes and dreams! Never want to go in there again.
 

Byrd

Well-known member
@iiiDIY thanks for the info and great video - so the “top cap” is just pressure fitted in by the three legs, no screws? Would you recommend squirting some lubricant inside around the legs to ease them up a little before pulling up?
 

iiiDIY

Member
@iiiDIY thanks for the info and great video - so the “top cap” is just pressure fitted in by the three legs, no screws? Would you recommend squirting some lubricant inside around the legs to ease them up a little before pulling up?
Yes, it's pressure fit, no screws. I suspect the posts and receivers are shrinking at different rates, because the one remaining on my unit is very tight, and are often completely snapped. Too much tension on such a tiny piece.

It's worth seeing if you can get some lubricant in there, but I'm not sure the angle will work, given the large overhang... but totally worth a shot!

Also, I just remembered this excellent guide!! https://www.mac27.net/tam-disassembly You can click-through on the photos to get higher resolution.
 

Byrd

Well-known member
Amazing, never seen that guide before! Thanks for the tips. I'm not there yet - my TAM sub/PSU is a little battle weary but no buzz or obvious issues at this time but good to know.
 

joshc

Well-known member
Amazing, never seen that guide before! Thanks for the tips. I'm not there yet - my TAM sub/PSU is a little battle weary but no buzz or obvious issues at this time but good to know.
When I helped @cheesestraws recap his TAM a few weeks ago, I did notice some bulging SMT caps on the board that sits behind the CD drive (cannot remember what it's called), there was small amounts of leakage present, but nothing that couldn't be cleaned up. The caps seemed to just be mostly dry more than anything, but I would say now is the time to recap these. The screw standoffs are extremely fragile, a few were destroyed in the process, as well as the tabs holding the front bezel on (but there's also screws, so who needs tabs?).
 

cheesestraws

Well-known member
Yes, the I/O board thingy has capacitors on it too that also in my case were looking somewhat worse for wear. @joshc, do you still have the photos? I can't find my copy.
 

joshc

Well-known member
I don't seem to have any of the TAM boards, I think I only took photos of the Genesis MP logicboard.

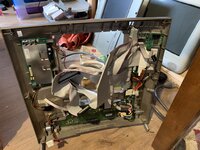
The only photo I have from our 'journey' is this which is probably enough to put the fear into anybody, and it does show the I/O board at the bottom.

E8EA9A30-601F-491F-80CA-A993FC61C9AA_1_105_c.jpeg

The guide here https://www.mac27.net/tam-disassembly has a photo of it - we did not remove it for recapping, just layed the TAM on a towel because of the stand and it seemed like more effort than it was worth to remove the board when I could reach the caps anyway. This photo here looks to me like they had already recapped this board.

View attachment 1734146161902.png
 
Top