A while ago I picked up this Macintosh 128K (Original repair thread above), and it turned out to be a HyperDrive 20 equipped system with a 512Ke board. After repairs the board was functional, but mine was missing both the hard drive and the power supply, and trying to find an original compatible drive was incredibly difficult. I instead decided to get this working with an MFM emulator, and it works brilliantly. I wanted to post this here, so if anyone else in the future has a need for a replacement drive (or even power supply) they can use this 
Firstly, the power supply: I replaced this with a bog standard AC to 4 pin molex adapter wired into the same AC spots the original supply were. There's nothing really special about the original GCC one, and I'm assuming it was incredibly noisy as the kit included a number of ferrite chokes. The HyperDrive board itself expects 5V from an external power supply, and ground - the 12V side is not connected as far as I know. It will not work without this connected, or even be detected by the software. The fan inside can be hooked straight up to 12V from the power supply, nothing special about it either. If you still have your original power supply, you can of course just use it to power the SSD.
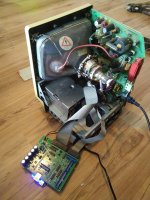
For the drive emulator, I used one of these: https://www.pdp8.net/mfm/mfm.shtml - it's a little board that slots into a BeagleBone and allows it to emulate up to two MFM drives, and even read from real MFM drives (So you could clone your existing hard drive onto it). I got the DIY version and soldered it up myself with the super capacitor option. Hardware was super simple - to test it I had it sitting outside the Mac:

Then I SSH'ed into the BeagleBone and started up the emulator software. You can get a premade image from the same site, or compile it yourself from GitHub of course. The command I used for my drive was:
./mfm_emu --drive 1 --file ../emufile_a --initialize --cylinders 615 --heads 4
This matches the cylinders + heads from the MiniScribe 8425 that would have been in my system. Once I started this, I could watch the log output on my laptop and see what the Mac was trying to read and write to. From here, it was just simply launching the HyperDrive software. I used the HyperDrive V3R1 disks from Macintosh Garden, and launched Manager, which then prompted me to initialise the drive. After starting that, I could see all the writes working correctly on the BeagleBone logs. It took a few minutes, and afterwards I was ready to start. I created a new drawer as HFS in Manager, and called it Startup, then quit back to the desktop.
Then back on the desktop, I could see the Startup drawer, so I copied System + Finder onto the drawer, then restarted the Mac.

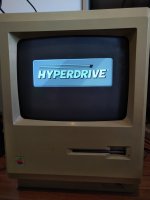
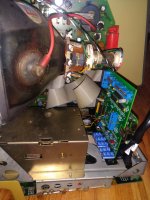
It fired right up, and booted faster than any other compact Mac I own (And even my 2019 Mac ). The only thing left was to tidy up the cabling a bit, and 3D print a little bracket to hold the board in place:

To make sure the software always launches at boot on the BeagleBone, the emu service should be enabled:
systemctl enable mfm_emu.service
The nice thing about the software on there is that it detects the power being shut off. Since there's super capacitors on the board, it'll keep the board running long enough to save the virtual drive file and power off gracefully.
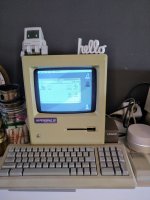
All back together, and with a reproduction of the original sticker:

It works fantastic - from cold start to desktop is under 10 seconds every time, and is faster than my SE/30 with a SCSI2SD. Really stoked to have this thing running. Hope this mini guide helps someone get their's working too
Firstly, the power supply: I replaced this with a bog standard AC to 4 pin molex adapter wired into the same AC spots the original supply were. There's nothing really special about the original GCC one, and I'm assuming it was incredibly noisy as the kit included a number of ferrite chokes. The HyperDrive board itself expects 5V from an external power supply, and ground - the 12V side is not connected as far as I know. It will not work without this connected, or even be detected by the software. The fan inside can be hooked straight up to 12V from the power supply, nothing special about it either. If you still have your original power supply, you can of course just use it to power the SSD.
For the drive emulator, I used one of these: https://www.pdp8.net/mfm/mfm.shtml - it's a little board that slots into a BeagleBone and allows it to emulate up to two MFM drives, and even read from real MFM drives (So you could clone your existing hard drive onto it). I got the DIY version and soldered it up myself with the super capacitor option. Hardware was super simple - to test it I had it sitting outside the Mac:

Then I SSH'ed into the BeagleBone and started up the emulator software. You can get a premade image from the same site, or compile it yourself from GitHub of course. The command I used for my drive was:
./mfm_emu --drive 1 --file ../emufile_a --initialize --cylinders 615 --heads 4
This matches the cylinders + heads from the MiniScribe 8425 that would have been in my system. Once I started this, I could watch the log output on my laptop and see what the Mac was trying to read and write to. From here, it was just simply launching the HyperDrive software. I used the HyperDrive V3R1 disks from Macintosh Garden, and launched Manager, which then prompted me to initialise the drive. After starting that, I could see all the writes working correctly on the BeagleBone logs. It took a few minutes, and afterwards I was ready to start. I created a new drawer as HFS in Manager, and called it Startup, then quit back to the desktop.
Then back on the desktop, I could see the Startup drawer, so I copied System + Finder onto the drawer, then restarted the Mac.

It fired right up, and booted faster than any other compact Mac I own (And even my 2019 Mac

To make sure the software always launches at boot on the BeagleBone, the emu service should be enabled:
systemctl enable mfm_emu.service
The nice thing about the software on there is that it detects the power being shut off. Since there's super capacitors on the board, it'll keep the board running long enough to save the virtual drive file and power off gracefully.
All back together, and with a reproduction of the original sticker:

It works fantastic - from cold start to desktop is under 10 seconds every time, and is faster than my SE/30 with a SCSI2SD. Really stoked to have this thing running. Hope this mini guide helps someone get their's working too
