It's alive!!!
")
I finally replaced the backlight on my iBook Clamshell with an LED module. This upgrade makes a massive difference in overall usability for me, as I no longer need to strain my eyes to read what is onscreen. Now, everything is crisp, sharp, and bright. The LEDs are evenly mounted, and the light they provide is perfectly even across the LCD (i.e. there are no hot spots of light). This mod really makes the display feel brand new!
This display works perfectly
with the exception of brightness control. As it stands, the maximum brightness setting on the computer inversely makes the screen its darkest (which is a brightness level that I would normally call maximum brightness on other computers), and the minimum brightness setting makes the screen retina-searingly bright. The darkest setting is about as bright as I would ever want to use the computer anyway, so this is where I am keeping it for now.
The problem is that sometimes, I
want to make the screen much dimmer, such as late at night, and that this modification just doesn't support dimming yet. In OS9, sleep works perfectly, but in OSX, sleep mode keeps the backlight on and just makes the screen black. I'm still trying to rebuild my clamshell's battery, but I can't imagine that this quirk would have a positive impact on battery life.
I think somehow, there must be a way to invert the signals, but I don't know how to modify (what I think is a PWM signal) on the fly. I think I can invert the backlight enable signal with a transistor, but I don't know if this is the right solution. I would also like to figure out a way to set the maximum brightness much lower and allow for darker minimum brightness levels.
I really could use an electronics expert's guidance in figuring out how to properly deal with the backlight control signals. Is there a way to "map" the PWM brightness control signal to another voltage range?
I would really like to hear other people's thoughts and ideas about this, as I am sure there are lots of ways to make it better.
To perform the upgrade, I followed the guides that I linked in my post above, although my LCD panel (and iBook) were slightly different from the ones in the guides, so I had to come up with my own steps where they were left out. I hope to write some more usable/comprehensive documentation for this project in the future. Until then...
Here is a brief summary of the steps involved (to be used in conjunction with the other guides I linked above):
1. Remove iBook's display bezel, and separate the LCD panel from the iBook
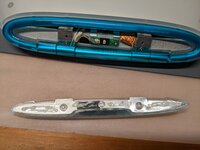
2. Carefully remove the metal protective frame from the LCD panel --this makes it really easy to accidentally shatter the glass LCD panel
3.
Incredibly carefully remove the CFL from the channel where it sits inside the LCD (I think this glass tube will leak toxic mercury gas if it is cracked.)
4. Take LED strip, and it to fit in the CFL's channel, cutting it as long as possible (using a multiple of three LEDs)
5. Place spacers between the back of the channel and the LED strips to ensure that they are secure and shine perpendicularly towards the LCD panel (I used three wooden toothpicks, wedged directly into the gap that was left between the edge of the CFL channel and the LED strips.)
6. Reassemble LCD panel
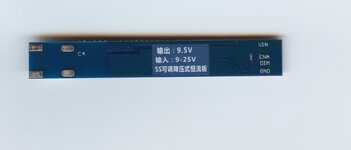
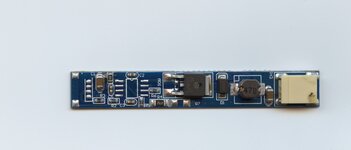
7. Disconnect the inverter control wires from the CFL inverter, and solder them to the power board that came with the LED strip. One of the pages I linked above, contains a wiring diagram.
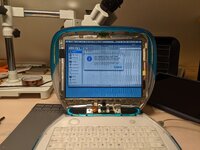
8. Insulate and mount the LED control board inside the iBook LCD chassis, wrangle all of the cables, and reassemble the computer
Photos:
Clamshell CFL backlight brightness "before":

The LCD panel after it was removed from the iBook chassis:

The LED strip is mounted in the CFL channel, shimmed by toothpicks:

The first test of the LED strip:

Everything is mounted inside of the iBook with Kapton tape for now (the CFL inverter board is no longer used, and it could be removed):

The brightness of the LCD after the LED backlight is installed (with the same camera settings as the "before" picture:

 )
)