• Updated 2023-07-12: Hello, Guest! Welcome back, and be sure to check out this follow-up post about our outage a week or so ago.

jmacz journey

bigmessowires

Well-known member
I'm curious to see how it looks in the flesh... maybe as an experiment I'll try this on a computer I don't care too much about. How do you make the water transfer decals? After it's applied can you still tell that it's a decal?
 

jmacz

Well-known member
I'm curious to see how it looks in the flesh... maybe as an experiment I'll try this on a computer I don't care too much about. How do you make the water transfer decals? After it's applied can you still tell that it's a decal?

You can buy special water slide decal paper on Amazon. They make them for inkjet or laser (two different kinds). You then print it and once dry, you cut it out and transfer using warm water like other decals. You can tell it’s a decal, depending on how close to the print you cut.

Once I find some time, I was going to work on a mechanism to allow me to use dye sublimation instead which would be just like the stock logo.
 

jmacz

Well-known member
@bigmessowires here's a picture of the logo/decal. The first picture is from about 10 inches away. The second picture is from 2-3 inches away.

IMG_5330.JPG

IMG_5331.JPG

As you can see, very close up you can see the decal outlines. And depending on how close you cut, it's more or less visible.
 

Daniël

Well-known member
I believe it used a different plastic? Except the spacebar... the space bar does yellow.

Correct, the keycaps use PBT rather than ABS. I don't know if PBT is entirely immune to yellowing, but it sure is far more resistant to it (but that makes sense, given yellowing plastics are known to be caused by oxidizing of the polymers in ABS specifically).

The spacebar was made out of ABS. This isn't uncommon for keyboards, and there are other vintage keyboards outside of Apple's where the casing and spacebar will yellow, but the caps won't. From what I understand, it was both too costly and too complicated to make the spacebar out of PBT, as certain properties of PBT make it more susceptible to shrinkage during the molding process. This could cause spacebars to come out warped and deformed, so they just went with ABS for those.

There do exist keyboards and keycap sets with PBT spacebars, but I have heard that it's not extremely uncommon for the keycap sets to come with warped SBs, if they slipped past QC. Presumably the price of mitigating molding issues and proper QC to make sure no funky SBs got through, didn't weigh up against just using ABS instead.
 

zefrenchtoon

Well-known member
Wow !!
Your work is very impressive !! 🤩

Can you share us a picture comparing your NOS AEKII with you IIci please ? (to "see" the difference between your paint and the original Apple case colour)
As you, the more I read about retrobrighting, the more I'm thinking about paint for my old Macs. :unsure:
 

jmacz

Well-known member
Wow !!
Your work is very impressive !! 🤩

Can you share us a picture comparing your NOS AEKII with you IIci please ? (to "see" the difference between your paint and the original Apple case colour)
As you, the more I read about retrobrighting, the more I'm thinking about paint for my old Macs. :unsure:

The very first post/picture in this thread of my Quadra 700 + monitor + keyboard has my NOS untouched AEK II. Both the Quadra 700 and monitor have case repairs and were repainted. As you can see from that picture, the original keyboard is a little brighter.
 

zefrenchtoon

Well-known member
The very first post/picture in this thread of my Quadra 700 + monitor + keyboard has my NOS untouched AEK II. Both the Quadra 700 and monitor have case repairs and were repainted. As you can see from that picture, the original keyboard is a little brighter.
Ok! Got it, thanks.
I did not pay attention to this because I thought that it was an effect from your room's lights. 😲
 

jmacz

Well-known member
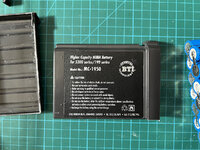
Finally rebuilt the battery in my PowerBook 5300c (documented here)

Wish I had better pictures but user error (deleted on accident... ugh).

IMG_5360.JPG

Working on a PowerBook 540c battery but the EMM board is not working right so debugging that now.
 

jmacz

Well-known member
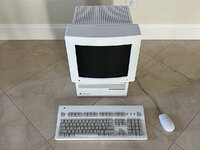
My final battery bombed IIci restored setup.. I'm sure it won't be to everyone's liking, but not selling it, it's a keeper, so had fun going medic white with it.

IMG_5461.JPG

Might end up going white with the keycaps as well (HHKB style blank keycaps - no symbols). It's got 32MB of RAM, a Spectrum 24/III inside, and a DayStar 50MHz 68030 PowerCache.
 

3lectr1cPPC

Well-known member
I love the white!

A painting project I want to do at some point is to make a custom JLPGA PowerBook 170. I don’t think that it would be very difficult to make one.
 

LaPorta

Well-known member
View attachment 61883

As you can see, very close up you can see the decal outlines. And depending on how close you cut, it's more or less visible.

If you use a product called MicroSol, the lines will utterly vanish and it will fully integrate into the case. Just brush it on in two or three applications over the decal. Wonderful stuff, and will not harm plastic:


jmacz

Well-known member
If you use a product called MicroSol, the lines will utterly vanish and it will fully integrate into the case. Just brush it on in two or three applications over the decal. Wonderful stuff, and will not harm plastic:


Oh wow... hmm, thanks for that tip! Going to give that a try!
 

bigmessowires

Well-known member
I really like the painted cases you've done, at least in photos. It's a nice way to cover up 30 years of dents and scrapes.
 

jmacz

Well-known member
Spent some time today replacing the ATX PSU inside my converted IIci PSU with an SFX PSU instead. Reason was the older ATX PSU that I previously used has group regulation of the power rails which was causing an issue on loaded machines. I swapped it for a newer SFX size PSU that has DC-DC support allowing for more tighter regulation of the 5V line.

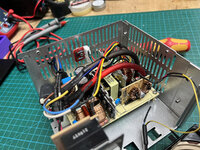
Here's the new SFX PSU sitting inside the IIci PSU enclosure.
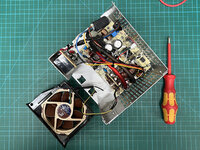
IMG_5965.JPG

The holes for the standoffs obviously didn't line up with the old PSU and so I had to drill two new holes into the enclosure. The third hole was reusable. I went with the same Noctua fan I had previously. This time around I tied all the 5V lines and all the ground lines together and used larger gauge wires for it. Looks kinda cool. :)

IMG_5966.JPG

You can see the DC-DC converters in the lower right. Also the little board mounted to the side wall is the inverter circuit. Still using the NPN transistor based inverter for the startup signal.
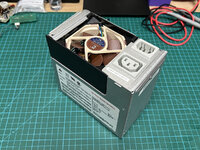
IMG_5967.JPG

All buttoned up and ready for my IIci. Or I can use it on my Quadra 700 as well.

I have three PSUs of this size now. One is this one above. The second is still using the group regulated power supply and I will use that for my lightly loaded IIci. The third is a stock PSU (Delta brand) which is still ok and I don't see any leaking caps so hopefully it lasts a while.
 
Top