My turn at trying to get one of these Laserwriter II printers up and running.
I received a relatively good looking Laserwriter IIf earlier this year (@techstep picked it up for me from an e-cycler). I ended up going back to that e-cycler the following week and picking up a banged up Laserwriter IInt as well figuring I could maybe use the parts from the two to get one working on.
Neither powered up.
I decided to work on the IIf since it appeared to be in better condition. Recapped everything, logic board, PSU, high voltage unit, fan motor assembly, all the sub boards underneath the printer. Everything.
Post the recap, the IIf powered up! BUT after a few minutes, two red lights popped up.
Having read the threads I figured it was something with the fuser. Tested resistance/continuity per the service manual and found the fuser was dead. Took it out and replaced it with the fuser from the IInt.
This time I didn't see the two red lights and after warming up, the printer attempted to print its initial test page. BUT failure.
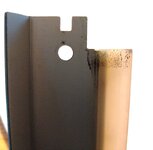
One sheet was picked up (as expected) but the main roller only sucked it in about 1 to 2 inches, not enough to reach the next set of rollers and then it stops there complaining about a paper jam. I found a NOS roller assembly on eBay as well as a transfer pad. Replaced both on the IIf since both the rollers on the IIf and the IInt felt super hard (didn't realize at the time I could try using isopropyl alcohol to recondition it). Once I got the new unit, it felt more grippy than the two I had.
Installed the roller and the new transfer pad. Same problem. Ugh.
Tried manual feeding one sheet in. Same problem.
Eventually tried taking all the paper out and only leaving two sheets in the paper cartridge. This time it worked!
Paper got fed in properly, and I got a really blobby printout. I then put all the sheets back in (to the normal max capacity). Doesn't work. Pull out all but two sheets. Works. Put half the sheets back in. Works. Put in a little more than half the sheets. Doesn't work. Hmm... There are two springs on the paper cartridge but they seem ok? Something's obviously mechanically not right so will have to look at this more later.
Tried to print a few more test prints and on the third, two red lights again. Ugh!
Tested continuity / resistance in various areas as the service manual suggests. All good. Put it back in, still two red lights. What the hell?
Pulled it out, put it back in. It works. Huh?
Figured it must be something with the connection? I used deoxit on the connector. Plugged it back in and it's working. Haven't seen the two red lights again so I'm hoping it holds up.
Test prints all have smearing all over the place.

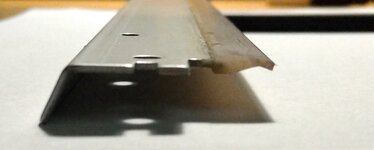
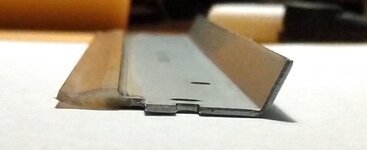
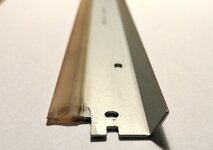
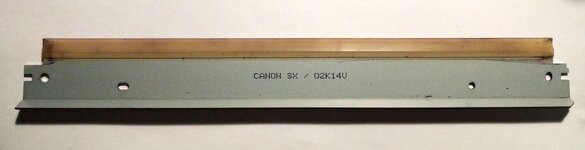
Having seen the other threads, I figured the wiper blade is toast. I pulled the toner cartridge out and took a look at the drum. Toner all over it. ChatGPT told me I could try cleaning it with a soft cloth and some isopropyl alcohol. Sounded bad but decided to try. Gently cleaned all the toner off the drum. Some places it was really caked on. But the IPA loosened it and finally got a clean drum. Tried printing some more and it was a bit better but the blade must be bad as each time, there was a ton of toner left on the drum.
I then swapped in the IInt's toner cartridge. A bit better. I tried printing 5 more times. Each time the image got better.

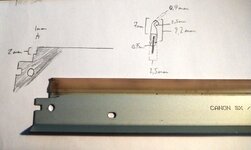
Ended up here with the stock wiper blade on the toner cartridge from the IInt. There's still some horizontal lines... a sharper/darker one in the middle of the page (seen above) and some shaded dark band at the top of the page. The one at the top of the page is always there in the same spot. The one in the middle of the page moves around between prints. So the middle of the page one is probably the drum wiper blade. The top of the page one must be from something pulling the page in. It's not the main roller as that would only leave a mark in the top center. But this shaded area is across almost the entire top so it's something else.
Maybe it's clean enough where I declare victory and move on?
I did try buying a NOS toner cartridge from eBay. It was sealed, unopened. Still had the instructions as well as the replacement pad for the fuser inside. But printing with it resulted in the same result as the first image. Blade's probably toast.
I received a relatively good looking Laserwriter IIf earlier this year (@techstep picked it up for me from an e-cycler). I ended up going back to that e-cycler the following week and picking up a banged up Laserwriter IInt as well figuring I could maybe use the parts from the two to get one working on.
Neither powered up.
I decided to work on the IIf since it appeared to be in better condition. Recapped everything, logic board, PSU, high voltage unit, fan motor assembly, all the sub boards underneath the printer. Everything.
Post the recap, the IIf powered up! BUT after a few minutes, two red lights popped up.
Having read the threads I figured it was something with the fuser. Tested resistance/continuity per the service manual and found the fuser was dead. Took it out and replaced it with the fuser from the IInt.
This time I didn't see the two red lights and after warming up, the printer attempted to print its initial test page. BUT failure.
One sheet was picked up (as expected) but the main roller only sucked it in about 1 to 2 inches, not enough to reach the next set of rollers and then it stops there complaining about a paper jam. I found a NOS roller assembly on eBay as well as a transfer pad. Replaced both on the IIf since both the rollers on the IIf and the IInt felt super hard (didn't realize at the time I could try using isopropyl alcohol to recondition it). Once I got the new unit, it felt more grippy than the two I had.
Installed the roller and the new transfer pad. Same problem. Ugh.
Tried manual feeding one sheet in. Same problem.
Eventually tried taking all the paper out and only leaving two sheets in the paper cartridge. This time it worked!
Paper got fed in properly, and I got a really blobby printout. I then put all the sheets back in (to the normal max capacity). Doesn't work. Pull out all but two sheets. Works. Put half the sheets back in. Works. Put in a little more than half the sheets. Doesn't work. Hmm... There are two springs on the paper cartridge but they seem ok? Something's obviously mechanically not right so will have to look at this more later.
Tried to print a few more test prints and on the third, two red lights again. Ugh!
Tested continuity / resistance in various areas as the service manual suggests. All good. Put it back in, still two red lights. What the hell?
Pulled it out, put it back in. It works. Huh?
Figured it must be something with the connection? I used deoxit on the connector. Plugged it back in and it's working. Haven't seen the two red lights again so I'm hoping it holds up.
Test prints all have smearing all over the place.
Having seen the other threads, I figured the wiper blade is toast. I pulled the toner cartridge out and took a look at the drum. Toner all over it. ChatGPT told me I could try cleaning it with a soft cloth and some isopropyl alcohol. Sounded bad but decided to try. Gently cleaned all the toner off the drum. Some places it was really caked on. But the IPA loosened it and finally got a clean drum. Tried printing some more and it was a bit better but the blade must be bad as each time, there was a ton of toner left on the drum.
I then swapped in the IInt's toner cartridge. A bit better. I tried printing 5 more times. Each time the image got better.
Ended up here with the stock wiper blade on the toner cartridge from the IInt. There's still some horizontal lines... a sharper/darker one in the middle of the page (seen above) and some shaded dark band at the top of the page. The one at the top of the page is always there in the same spot. The one in the middle of the page moves around between prints. So the middle of the page one is probably the drum wiper blade. The top of the page one must be from something pulling the page in. It's not the main roller as that would only leave a mark in the top center. But this shaded area is across almost the entire top so it's something else.
Maybe it's clean enough where I declare victory and move on?
I did try buying a NOS toner cartridge from eBay. It was sealed, unopened. Still had the instructions as well as the replacement pad for the fuser inside. But printing with it resulted in the same result as the first image. Blade's probably toast.

 I am using two Farallon phonenet connectors and a phone line. I test with my AppleTalk enabled ImageWriter II and my IIci (running System 7.1.1) sees it and I can print. If I then move the phonenet connector from the ImageWriter to the LaserWriter IIf, Chooser doesn't see it. This is using the LaserWriter extension that came with System 7.1.1. I tried a newer 7.x version and that did not help. Might try 8.x series extension but I would have thought 7.x would work. I have tried restarting both the LaserWriter and the IIci in different combinations and doesn't help. Something might be wrong on the board unless I'm doing something terribly stupid.