Powerbook 540c Resurrection

croissantking

Well-known member
I just made myself a ‘printer cable’ (crossover cable) with Mini-DIN8 plugs and 3m of nine-wire cable. I was delighted when it worked - my Powerbook G3 Wallstreet (9.2.1) and my Powerbook 100 (7.1) can now see each other, and read each other’s files!

I must admit, I was baffled by how I shared just one folder on each, yet the entire hard drive was available to browse on the other, and even any other connected drives. But that seems familiar, I think I remember similar ‘accidental total access’ across a school Phonenet network, about 30 years ago.
If you connect as a guest then it only makes available the folders you’ve shared.
 

pyranger

Active member
that is totally cool! nice job on the homemade crossover cable. I have been diving into rascsi - I have 2 of them: 1 connected to my 520 and another connected to a Classic II. In addition to emulating multiple scsi devices, the raspberry pi's also emulate a daynaport scsi2ethernet adapter....and wifi, for that matter, which provides network connectivity through the scsi port. And since the raspberry pi's are running linux, they can run netatalk which is an apple file sharing server for linux. This works really well, allowing the macs to share files through the pi's shared folders.
 

MacUp72

Well-known member
I bring this up again for some questions for those who did that RAm transplantation mod..
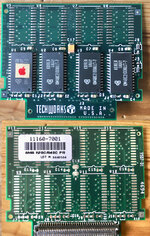
my 540c RAM board looks like this ( its only the basic 8 MB) :

ram.jpg

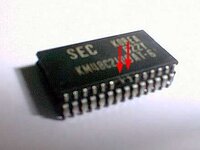
you can solder 16 chips on it, the actual installed now reads 444Y KM48C2100ALLT-7

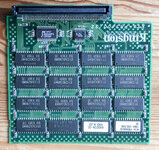
I have two PB 3400c RAM spare that I dont need and can salvage for this, its 32 MB..of course the 3400 is IDE based and a bit newer, that chip reads KM48V2104CS-L6. I also noticed that board has some ICs on it, too ( under the connector)
I wonder if I can use those.

IMG_1119-1.jpg
 

MacUp72

Well-known member
I guess not, the dimensions of the old chips are 18mm x 10mm, height 1mm. The 3400 chips are about 20mm long
 

croissantking

Well-known member
The small difference in package size would not matter (you can see that the 540c RAM card has long pads to accommodate a narrower chip). However, the 3400c RAM card has 3.3V chips, but the 540c needs 5V chips. You can do what I did and find some old 5V desktop EDO/FPM RAM sticks on eBay and harvest the chips from those.

TLDR: It won’t work but you have other options.
 

croissantking

Well-known member
Nice! I haven't replaced the PRAM batts from my 500s, yet, I didn't know where to find them...I searched AppleMacParts, but it looks like I'm yielding the wrong sources still! I've decided my PBs will probably be anchored to my desk anyways, so it might not be worth the trouble looking for these myself? Sounds like yours could be NOS OEM? I'm wondering how old and how long they could last


You really attempted this? I was reading through his steps, and wanted to try it out myself, but never got around to picking up the RAM. I've been trying to find higher capacity RAM chips to try this out; I assume the chips on the RAM board are 2MB a piece, so if I could find 4MB chips, one could have 32MB each side for a total of 64MB.

Edit: congrats on the modification! Good to hear it worked out! I'll need to give it a go myself when I get a chance.

So that's the other thing, if it's even possible to detect higher capacity. I believe someone has tried adding more RAM through the PPC daughterboard, which NewerTech has done before with the NUPowr 183c, but finding one of those, much less with on-board RAM, feels next to impossible these days...my new Holy Grail. Anyways, if you're up for a read, this guy hacked a 183c to incorporate a total of 64MB (including RAM module...I think this daughterboard didn't have RAM? I don't understand from the translation though) and overclocked the 603 to 200MHz (had to build a custom cooling fan on the stiffener though):

http://itoi.jp/pb550-5.html

Translated version:

https://translate.google.com/translate?hl=en&sl=ja&u=http://itoi.jp/pb550-5.html&prev=search

Hacked NUpowr 183c from the website above:

View attachment 16571

View attachment 16572
I was looking at this link again today. The writer (Itoi) doesn't actually explain how he created his custom RAM module, but I was able to find a photo of it elsewhere on his site:

pb-18.jpg

OK, so you can't really tell much from the photo. But reading further I understood that Itoi followed a guide written by Toyoki of PHENiX, and that original guide for creating a 64MB module is here: https://web.archive.org/web/2002021....org/phenix/laboratory/memory_64mb/index.html
Use Google to translate into English.

Basically, he is breaking out the unused RAS lines on the CPU card's PBX IC and sending three of them over the unused pins 28, 29 and 30 of the memory card connector to get to 56MB. He says that a fourth wire, to get to 64MB, needs to be run separately. He is stacking modules and then running the extra RAS lines where needed.

02b.jpg

If we wanted to do this with a 040 CPU card, we would need to know which pins of the Pratt IC are for those extra RAS lines. AFAIK there isn't any documentation or schematic publicly available, but we can easily trace at least the two lines which go to the onboard 4MB of RAM, and with this info get a 48MB RAM card working.
 
Last edited:
Top