Last year, I acquired a rather special SE/30. There was an eBay auction for local collection only in London, and there were 3 Macs for sale, what looked like a 128K, a Plus and an SE/30. I was the lucky winner, and I collected the Macs and took them home. You can see my original thread about collecting those Macs here. I thought I would start a new thread to document the journey of the "POS Mac" so that I can keep all posts regarding its restoration and rebuild in one place, undistracted from my other purchases.
Things only got more interesting from there. I discovered that the 128K was infact a 128K upgraded to Plus, with 4MB RAM, but the SE/30 turned out to be something even more exciting.
The seller didn't know anything about the machines, they belonged to his partner's father who I assumed had passed away, and they were clearing his house of stuff (including an Amiga 2000 which I was very tempted to buy but I didn't...) Suffice to say, I only paid £110 for the three machines, I think this is what we would call "a steal" !
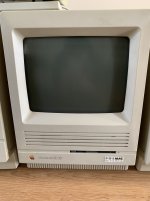
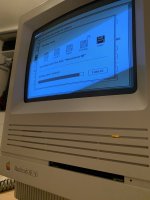
Here's what it looked like to begin with...note the CRT burn-in that is a telltale sign that this Mac had a lot of use.
At this point, I just thought this was an ordinary SE/30 with an Ethernet card, end of story. But, the story does not end there. More on that later (I have to keep you reading, somehow, don't I?)...Even though the thread title is probably a huge give away... :sealed:
Ahem, anyway...
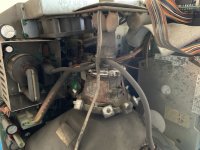
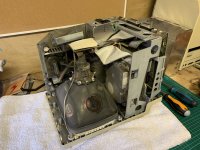
To start with, this is by far the dirtiest Mac I've ever worked on. Everything inside was caked in dirt, not dust, but actual thick black dirt. I can only assume it was used very heavily, and perhaps as industrial equipment in a factory or something. Here's a photo to prove I'm not making this up... :sadmac:
I still haven't found out what "POS Mac" really means. Sure, it's a "Point of Sale Macintosh" but it may not have been a POS machine in the sense of what we consider POS to be today.
So, where to begin... the Mac was sold as powering up but with no video. Indeed, this is what I experienced when I got it home. I initially suspected broken solder joints on the analog board, but it turned out that the Video Board (the one that sits on the neck of the CRT) just needed re-seating. Once that was sorted, video was back.
The next problem was with the original Fujitsu 3.5" SCSI drive which spins up but the machine doesn't see it, it can't read it. This drive would hold the clues of what POS Mac means!! However, I still haven't figured out a way to get it working. I can't see a stepper motor to oil, it's not like the earlier Rodime drive.
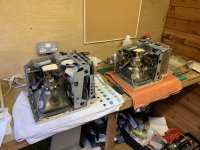
I moved POS Mac to my workshop, along with my other (working) SE/30, and started swapping parts to see what I could get working. It's at this point I did a more complete dissassembly, and that's when I discovered that this Mac has a socketed logic board (meaning the CPU is not soldered, it has a socket for the CPU) - and in that socket is a Daystar PowerCache 030 card, which has a 68030 processor running at 40 MHz. This makes the SE/30 perform in a similar way to the Macintosh IIfx. 8-o
POS Mac also has an Asante Ethernet card and the MacCon+ 30i card which has its own FPU socket. There is no FPU in there but I could add one in future, I don't know how many applications would really need two FPUs but the thought of it makes me tickle (in a good way). :rambo:
I swapped the hard drive from the working other SE/30 to the POS Mac, and it was able to boot from it fine. That's when I found that 32MB of RAM was installed as well.
Thankfully, there was no PRAM battery leakage and apart from dust, the logic board actually looked pretty clean already.
From there, I diassembled the troublesome floppy drive, cleaned it, relubricated it, so that now works reliably.
I swapped the CRT from another Mac, one that didn't have burn in.
I also bought a FloppyEmu and a ROM-inator II, both have been very valuable purchases and I would recommend them to anyone working with an SE/30. The ROM-inator II gives you a boot ROM, and makes the SE/30 32-bit clean. As I'm sure many of you already know, the FloppyEmu makes it easy to move stuff from a newer computer onto your older Mac.
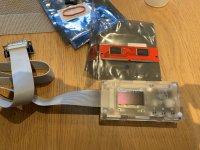
I then started to think about recapping, as I was worried about electrolytic leakage damaging the SE/30 logic board, and I also wanted to fix the lack of sound. I removed all the capacitors using the 'twist and push' method, which left me with solder pads in very good condition. The board was cleaned a couple of times with isopropyl alcohol.
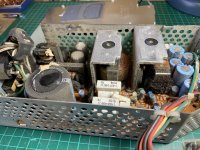
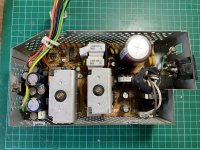
I also disassembled the SONY CR-44 power supply, which was also caked in dirt inside, although not as bad as I was expecting. Using JDW's useful YouTube guide, I recapped the power supply. I haven't got the fancy testing equipment he has, but I followed the general rule of buying high temperature rated caps (105 C) and sticking to good quality brands (Nichicon, Rubycon, Panasonic) and so far this strategy hasn't failed me. After recapping I did a power on with no load (logic board and analog board not connected, just a power cable), and nothing blew up so I assumed this was a good recap.
The power supply after first opening it:
In the midst of all this, I did make a silly decision. To start with, having removed all electrolytic capacitors from the power supply, logic board and analog board, I was left with nothing to test parts with in isolation as I recapped them. Normally, this would've been fine - as I had another SE/30 with a known good PSU, logic and analog board to test with. But guess what? I was over zealous and did the same thing there, decapping all of those boards at the same time. So when I recapped anything, I would have to have everything recapped before I could test anything and if I introduced any problems I wouldn't know which part was at fault without extra diagnosis.
Luck struck again and I found an SE/30 parts machine on eBay for a decent price, with a Retrobrighted case too, with a working analog board and power supply but no logic board (see more on that here). So I am currently using the analog board from there until I finish recapping the other ones. It also provided me with a much better, non yellowed case to use for my rebuild.
Power supply after recap:
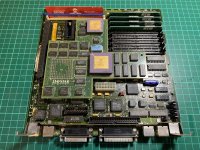
Unfortunately I forgot to take a photo of the original state of the logic board, but here it is re-capped with the Daystar card fitted (also reduced to 16mb RAM here as the ROM-inator II didnt like the second bank of RAM for some reason, something else to investigate later).
Some photos of the logic board re-cap in progress...
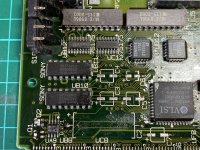
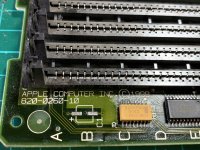
I had particular trouble removing the old solder from the through-holes for the axial electrolytic capacitors, because of the ground plane which sucks up all the heat. I ended up buying a desoldering station just to deal with this, and it was the only thing that worked.
I eventually got fed up of having to re-seat the ROM-inator II every time the Mac wouldn't boot (it's not tight enough in the ROM socket, which sometimes causes the Mac to not boot) so I have now hot glued it in, no problems since.
After recapping the logic board, sound was back.
Speaking of hot glue, now my favourite friend... I also used this as a temporary solution to mounting the SCSI2SD:
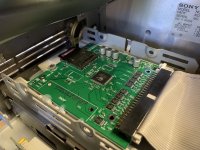
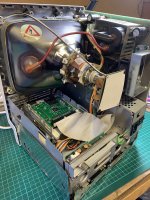
This is what the machine looks like as of now, with one of my spare (not yet recapped) analog boards, hooked up to the recapped SONY CR-44 PSU, and SCSI2SD fitted:
Things left to do...
- Find a better PRAM battery solution. I don't want to put a PRAM battery in this, but I also don't want to solder a CR2032 holder in there either.
- I need to fit the programmer's switch.
- I need to switch the front bezel for one that doesn't have a crack on the corner. Thankfully I have a couple to choose from, but I will need to retrobright first so that any bezel I choose matches the back case.
- I would like to print a custom 'Powered by Daystar' sticker and put it on the front bezel.
- I would like to increase the RAM a bit more.
- Replace the fan because it's noisy.
- Find a video card that can support a 15" VGA LCD, as I would like to drive a colour monitor from it.
- Get it networked / connecting to FTP servers.
- Finish recapping the analog board and swap the analog board for the recapped one.
- Maybe get the original Fujitsu drive working...some day.
- Find a better/more permanent way to mount the SCSI2SD.
Thoughts/feedback/suggestions welcome. This is one of the first vintage Macs I've ever fully refurbished to this extent, there wasn't much that didn't need doing on this machine, and I am happy with where I've got it to, even though there's always room for improvement.
Thanks for reading!
Things only got more interesting from there. I discovered that the 128K was infact a 128K upgraded to Plus, with 4MB RAM, but the SE/30 turned out to be something even more exciting.
The seller didn't know anything about the machines, they belonged to his partner's father who I assumed had passed away, and they were clearing his house of stuff (including an Amiga 2000 which I was very tempted to buy but I didn't...) Suffice to say, I only paid £110 for the three machines, I think this is what we would call "a steal" !
Here's what it looked like to begin with...note the CRT burn-in that is a telltale sign that this Mac had a lot of use.

At this point, I just thought this was an ordinary SE/30 with an Ethernet card, end of story. But, the story does not end there. More on that later (I have to keep you reading, somehow, don't I?)...Even though the thread title is probably a huge give away... :sealed:
Ahem, anyway...
To start with, this is by far the dirtiest Mac I've ever worked on. Everything inside was caked in dirt, not dust, but actual thick black dirt. I can only assume it was used very heavily, and perhaps as industrial equipment in a factory or something. Here's a photo to prove I'm not making this up... :sadmac:


I still haven't found out what "POS Mac" really means. Sure, it's a "Point of Sale Macintosh" but it may not have been a POS machine in the sense of what we consider POS to be today.
So, where to begin... the Mac was sold as powering up but with no video. Indeed, this is what I experienced when I got it home. I initially suspected broken solder joints on the analog board, but it turned out that the Video Board (the one that sits on the neck of the CRT) just needed re-seating. Once that was sorted, video was back.
The next problem was with the original Fujitsu 3.5" SCSI drive which spins up but the machine doesn't see it, it can't read it. This drive would hold the clues of what POS Mac means!! However, I still haven't figured out a way to get it working. I can't see a stepper motor to oil, it's not like the earlier Rodime drive.
I moved POS Mac to my workshop, along with my other (working) SE/30, and started swapping parts to see what I could get working. It's at this point I did a more complete dissassembly, and that's when I discovered that this Mac has a socketed logic board (meaning the CPU is not soldered, it has a socket for the CPU) - and in that socket is a Daystar PowerCache 030 card, which has a 68030 processor running at 40 MHz. This makes the SE/30 perform in a similar way to the Macintosh IIfx. 8-o
POS Mac also has an Asante Ethernet card and the MacCon+ 30i card which has its own FPU socket. There is no FPU in there but I could add one in future, I don't know how many applications would really need two FPUs but the thought of it makes me tickle (in a good way). :rambo:

I swapped the hard drive from the working other SE/30 to the POS Mac, and it was able to boot from it fine. That's when I found that 32MB of RAM was installed as well.
Thankfully, there was no PRAM battery leakage and apart from dust, the logic board actually looked pretty clean already.
From there, I diassembled the troublesome floppy drive, cleaned it, relubricated it, so that now works reliably.
I swapped the CRT from another Mac, one that didn't have burn in.
I also bought a FloppyEmu and a ROM-inator II, both have been very valuable purchases and I would recommend them to anyone working with an SE/30. The ROM-inator II gives you a boot ROM, and makes the SE/30 32-bit clean. As I'm sure many of you already know, the FloppyEmu makes it easy to move stuff from a newer computer onto your older Mac.

I then started to think about recapping, as I was worried about electrolytic leakage damaging the SE/30 logic board, and I also wanted to fix the lack of sound. I removed all the capacitors using the 'twist and push' method, which left me with solder pads in very good condition. The board was cleaned a couple of times with isopropyl alcohol.
I also disassembled the SONY CR-44 power supply, which was also caked in dirt inside, although not as bad as I was expecting. Using JDW's useful YouTube guide, I recapped the power supply. I haven't got the fancy testing equipment he has, but I followed the general rule of buying high temperature rated caps (105 C) and sticking to good quality brands (Nichicon, Rubycon, Panasonic) and so far this strategy hasn't failed me. After recapping I did a power on with no load (logic board and analog board not connected, just a power cable), and nothing blew up so I assumed this was a good recap.
The power supply after first opening it:

In the midst of all this, I did make a silly decision. To start with, having removed all electrolytic capacitors from the power supply, logic board and analog board, I was left with nothing to test parts with in isolation as I recapped them. Normally, this would've been fine - as I had another SE/30 with a known good PSU, logic and analog board to test with. But guess what? I was over zealous and did the same thing there, decapping all of those boards at the same time. So when I recapped anything, I would have to have everything recapped before I could test anything and if I introduced any problems I wouldn't know which part was at fault without extra diagnosis.
Luck struck again and I found an SE/30 parts machine on eBay for a decent price, with a Retrobrighted case too, with a working analog board and power supply but no logic board (see more on that here). So I am currently using the analog board from there until I finish recapping the other ones. It also provided me with a much better, non yellowed case to use for my rebuild.
Power supply after recap:

Unfortunately I forgot to take a photo of the original state of the logic board, but here it is re-capped with the Daystar card fitted (also reduced to 16mb RAM here as the ROM-inator II didnt like the second bank of RAM for some reason, something else to investigate later).

Some photos of the logic board re-cap in progress...


I had particular trouble removing the old solder from the through-holes for the axial electrolytic capacitors, because of the ground plane which sucks up all the heat. I ended up buying a desoldering station just to deal with this, and it was the only thing that worked.
I eventually got fed up of having to re-seat the ROM-inator II every time the Mac wouldn't boot (it's not tight enough in the ROM socket, which sometimes causes the Mac to not boot) so I have now hot glued it in, no problems since.
After recapping the logic board, sound was back.
Speaking of hot glue, now my favourite friend... I also used this as a temporary solution to mounting the SCSI2SD:

This is what the machine looks like as of now, with one of my spare (not yet recapped) analog boards, hooked up to the recapped SONY CR-44 PSU, and SCSI2SD fitted:


Things left to do...
- Find a better PRAM battery solution. I don't want to put a PRAM battery in this, but I also don't want to solder a CR2032 holder in there either.
- I need to fit the programmer's switch.
- I need to switch the front bezel for one that doesn't have a crack on the corner. Thankfully I have a couple to choose from, but I will need to retrobright first so that any bezel I choose matches the back case.
- I would like to print a custom 'Powered by Daystar' sticker and put it on the front bezel.
- I would like to increase the RAM a bit more.
- Replace the fan because it's noisy.
- Find a video card that can support a 15" VGA LCD, as I would like to drive a colour monitor from it.
- Get it networked / connecting to FTP servers.
- Finish recapping the analog board and swap the analog board for the recapped one.
- Maybe get the original Fujitsu drive working...some day.
- Find a better/more permanent way to mount the SCSI2SD.
Thoughts/feedback/suggestions welcome. This is one of the first vintage Macs I've ever fully refurbished to this extent, there wasn't much that didn't need doing on this machine, and I am happy with where I've got it to, even though there's always room for improvement.
Thanks for reading!
Last edited by a moderator:
