• Updated 2023-07-12: Hello, Guest! Welcome back, and be sure to check out this follow-up post about our outage a week or so ago.

Retr0Bright Questions

TechEdison

Well-known member
This coming summer, I will be doing a Retr0Bright treatment on my Macintosh Classic and Plus, including keyboard/mouse. I've got a few questions on methods, so I can end up with the best possible results.

-Should I remove the little apple emblem on the front? If so, how do I re-attach it when finished.

-Is the original color really nearly white, because after looking at an even slightly yellowed case, it doesn't look right... Looks too "bright"

-What's the best method for cleaning/whitening/Retr0Bright-ing the Plus's keyboard and the ADB keyboard/mouse for the classic. Should the keys be removed? What's the best way to do this.

-Removing internals... Insulated screwdriver+alligator clips to discharge the CRTs, and then disassemble it, correct?

-The plus has a 20SC hard drive, which definitely needs Retr0Bright. Briefly looking it over, it doesn't look straightforward to disassemble, am I missing something?

I think those are all the questions I have right now. If there's any other tips or information, I'd love to know that too. As I slowly build a collection, my plan is to have each item look, function, and feel brand new.

 
Last edited by a moderator:

Jon183

Well-known member
The emblem should have a little hole on the other side, maybe use a needle to pop it out through that hole. I usually just push it back in with no glue, had none fall off yet.

Im not a big fan of the creme developer method, never got a totally smooth result, using a key cap puller I removed all the keys from my keyboard ii and put them in a zip lock bag with 6% peroxide I believe, rotated it every hour for a day and it came out perfect. If you are using creme developer make sure the plastic wrap 100% covers the item and is very tight and wont expose the creme, smooth all bubbles that appear after an hour or so. Could end up with a yellow and white pattern if not done right or a white stain if done for too long.

My plan was like yours but I dont retrobrite things that are slightly yellowed, only scrub and wash them, only things that are ultra discoloured get treated now, too painful and results arent certain enough. Also dont brick the crt like I did by breaking the "nipple" at the back of crt by just brushing it, be cautious around it.

The compact Macintosh computers are my favorite to work on, I have recapped 3 so far and hope to own a SE/30 one day.

 
Last edited by a moderator:

TechEdison

Well-known member
Thanks for all the info!

Very interesting about the emblem. Didn't know it was assembled that way :)

I believe I will try not using the developer method on the keys, since it will still be just as easy. Using the developer on the case is much easier though. I have read many horror stories and seen sad pictures (on this forum and elsewhere) where the treatment process failed, and my number one priority is to avoid that.

I'll check out the first video, as I don't want to ruin the CRT (obviously), though I've seen the rest. Big fan of The 8-Bit Guy and his work, and I've gotten lots of inspiration from him.


luckybob

Well-known member
As someone who has retrobtite-ed a plus, my advice is to use a cheap brush and the developer cream.  I used a THIN coat and reapplied every five minutes, turning the case 90 degrees each time.  It took about 45 minutes and it came out PERFECT.  This was also a hot summer day at high altitude.  I suspect it might be a factor.    

You can always use more cream, but once you go too far...  


jack

Well-known member
As someone who has retrobtite-ed a plus, my advice is to use a cheap brush and the developer cream.

IIRC, you told me you did not use cling wrap? If you were not the person who told me this, I would still reccomend staying away and keep reapplying like you did.

Submersion is also a safe method, but hard to do a whole compat bucket using it...

Also, don't forget that retr0bright is a tradeoff. Don't attempt if it's not too bad, the risk is too high. And it's easy to get the plastic too bright. If you have another platinum (or maybe beige for the plus) colored compat that is not too yellowed, use it for reference color. Or you can look under a sticker, etc.


luckybob

Well-known member
correct, I did not use cling wrap.  The plus I had was the color of a beige mac.  The battery compartment and under the apple logo were clear indicators of the original color.  


TechEdison

Well-known member
luckybob: My plan is like yours; no plastic wrap and keep applying. By reading some failure stories, it seems the common point is the plastic wrap with an uneven coating.


KnobsNSwitches

Well-known member
I did my first retrobrighting this summer. I used the creme and covered in plastic. I think part of 8 bit guy's success has to do w/ texas sun; as someone in the great north woods even in the heat of summer I had trouble getting even results. It looks better than the yellow to me, but definitely a marble'd type finish.


luckybob

Well-known member
I think also the frequent turning helped me get an even job.  I used a lazy Susan for cakes.  There are lots of nooks and crannies in the vent holes.  I hear people say HOURS on the cream, but I was done in less than one.  I have a theory as to why, and I won't spoil it for now.  Lets just say I'm waiting on some "supplies" from china that would otherwise need heath and safety forms for.


AlpineRaven

Well-known member
Ive been doing that under Australian sun - its very strong UV and you have to apply the creame every 10 minutes to get good results but at the end of the day, the indoor UV light is the best and never ever had any problems - its the Sun you do get problems (streaking) and also you could over-retrobrighten under the sun but UV doesnt happen.

Cheers

AP


TechEdison

Well-known member
AlpineRaven: Do you have a suggestion/source for an indoor UV lamp? I can't seem to find one that would fit the purpose that isn't outrageously expensive.


Jon183

Well-known member
I have been doing most of my retrobright outside, most attempts were during a heatwave and I got streaking with the plastic wrap nearly every time, those annoying bubbles form and need patting down all the time, maybe ill try regular coating with a brush and no cling wrap.

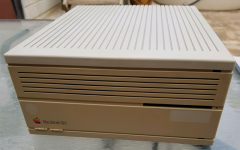
One interesting thing I noticed with my IIci, I cleaned the top of the case with a cleaner called jif cream, after thoroughly cleaning it and washing away the soapy water, I left it out to dry, put it back together and it became whiter.

$_20.PNG


chu-oh

Well-known member
Ive been doing that under Australian sun - its very strong UV and you have to apply the creame every 10 minutes to get good results but at the end of the day, the indoor UV light is the best and never ever had any problems - its the Sun you do get problems (streaking) and also you could over-retrobrighten under the sun but UV doesnt happen.

Cheers

AP
@AP 

Great advice, I'm in Melbs too, I tried doing the bottom of my plus keyboard in the sun and it was streaky af. I used gladwrap and only applied the creme once.

Few questions:

What lamp UV did you get, a bulb or a florescent lamp type? There's $10 bulbs at Bunnings but I'm not sure if these will do.  

Does temperature matter with the indoors/UV method?

What formula did you use? I found "Hi Lift 40 - 12%" creme at Chemist Warehouse that seems to work well. Seems to be the same as the Salon stuff that 8bit Guy Recommends, but I'm unsure.  

 
Last edited by a moderator:

Jon183

Well-known member
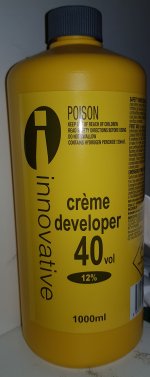
Could go to priceline, they sell a 1L 40vol 12% bottle for $12 I believe. Could go to a beauty supply store, one not too far from me charges $4 for 1L but I dont know how they work, dont know if they sell to general public.

20180107_115952.jpg

 
Last edited by a moderator:

AlpineRaven

Well-known member
@AP 

Great advice, I'm in Melbs too, I tried doing the bottom of my plus keyboard in the sun and it was streaky af. I used gladwrap and only applied the creme once.

Few questions:

What lamp UV did you get, a bulb or a florescent lamp type? There's $10 bulbs at Bunnings but I'm not sure if these will do.  

Does temperature matter with the indoors/UV method?

What formula did you use? I found "Hi Lift 40 - 12%" creme at Chemist Warehouse that seems to work well. Seems to be the same as the Salon stuff that 8bit Guy Recommends, but I'm unsure.  
The UV lamp is phillips normal UV - I bought it from Masters before they closed down. The globe is form Bunnings. Temp doesnt matter.
I used Colour Royale Creme Peroxide 40 from Hairhouse warehouse.

Cheers

AP


chu-oh

Well-known member
The UV lamp is phillips normal UV - I bought it from Masters before they closed down.


Was it fluro type or just a bulb? Sorry for 100s of questions, all the resources on this stuff is scattered over forums and youtube videos - it's good to get info from someone in the same geographic location as me.  


Corey986

Active member
I found the best results actually were to complete remove all the plastic parts,and emblems.  Use liquid mask on any paper decals that I couldn’t remove with a hair dryer for reattachment later and simply take a giant plastic Rubbermaid tub (not see though) and fill it with a gallon of 40 liquid peroxide developer and the rest with water and seal the top.  You can also add some oxyclean to the mix.   Also make sure everything is submerged.  Agitate every few hours and after a day flip the stuff around to make sure it’s even.   After 2 days everything comes out nice and de-yellowed.  No UV or sun required. 

Rinse with clean water, dry and reattach any paper decals with either double sided tape or contact cement.  And reassemble the unit.  

Comes out awesome.  

 
Last edited by a moderator:

AlpineRaven

Well-known member
Was it fluro type or just a bulb? Sorry for 100s of questions, all the resources on this stuff is scattered over forums and youtube videos - it's good to get info from someone in the same geographic location as me.  
Both it was - Tube and Bulb
Cheers

AP

 
Top