• Updated 2023-07-12: Hello, Guest! Welcome back, and be sure to check out this follow-up post about our outage a week or so ago.

Restoring a Macintosh II

Corgi

Well-known member
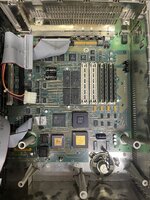
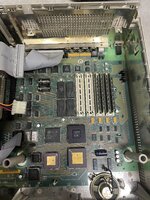
So I've been given (for free!) a II with the symptom of "does not power on". Looking, thankfully it has not bombed yet – and yes, the very first thing I did to it after taking these photos was to snip those Vartas off. C7 and C10 don't look so bad, but the legs on UC7, UG8 are a bit bad. Then I looked a bit closer and noticed C3/C4 look downright horrible, and C18 appears to have completely eaten its negative terminal trace. So I guess my first question is: can this board even be salvaged? This will be my very first recap, and I figure since it already doesn't power on I can't make it too much worse (and I need to learn on something). I'll probably still go through with it just for the experience and to have a real recap under my belt. Just wondering if the end result should be 'a board that looks slightly better' or 'a Macintosh II happily running 6.0.4'.

tempImageKBl03b.jpgtempImageOPgMSY.jpg
 

Phipli

Well-known member
C3 and C4 will have killed the soft power circuit. There is a way to hotwire these machines by applying voltage from a battery to one of the power connector pins. I forget the specifics, but this might help :


This will let you know if it is only the softpower that is broken, although I'd cast an eye over it and beep out any other obvious damage first.

I'm sure it will be fixable :)
 

LaPorta

Well-known member
That will be a relatively easy fix. Check for continuity between the endpoints of the traces that appear eaten away. They can look quite bad and still be good. If they are bad, you just have to use some wires to bypass the affected area. This was four years ago, but you can see how I bypassed a bad trace on mine:


The thread will at least give you a starting point to work from, and give you an idea about a bypassing job.
 

AwkwardPotato

Well-known member
Salvageable for sure! Speaking from personal experience though: even if you have a fair bit of experience with SMD soldering, if you need a practice Mac I'd look for an LC-series machine instead, just because they have less "going on" on the motherboard -> less things to go wrong. That said, the II is pretty durable and even if you can't get it running first try, as long as the board is cleaned of any cap goo, you can put it away and come back to it later.
 

joshc

Well-known member
This will be my very first recap, and I figure since it already doesn't power on I can't make it too much worse
Yes and no. Do you already have SMD soldering experience? If not, I’d recommend practising on something less special than a Mac II. bad technique/mistakes can definitely make a non-working board worse if pads are lifted or traces damaged.

These are easy to work on and the Mac II startup circuit schematic is available along with a detailed explanation on Doug Brown’s site.
 

Corgi

Well-known member
even if you have a fair bit of experience with SMD soldering, if you need a practice Mac I'd look for an LC-series machine instead, just because they have less "going on" on the motherboard -> less things to go wrong. That said, the II is pretty durable and even if you can't get it running first try, as long as the board is cleaned of any cap goo, you can put it away and come back to it later.

Do you already have SMD soldering experience? If not, I’d recommend practising on something less special than a Mac II. bad technique/mistakes can definitely make a non-working board worse if pads are lifted or traces damaged.

Besides small tinkering, I have zero experience with SMD. I have a dead LC II but I don't even know where to start on it and I didn't see obvious capacitor issues on it the last time I pulled it out of storage. I could start with recapping it for the experience, I suppose, but I'm under the impression that one is not be likely to come back to life (so I wouldn't know if I did anything wrong or not).
 

joshc

Well-known member
Besides small tinkering, I have zero experience with SMD. I have a dead LC II but I don't even know where to start on it and I didn't see obvious capacitor issues on it the last time I pulled it out of storage. I could start with recapping it for the experience, I suppose, but I'm under the impression that one is not be likely to come back to life (so I wouldn't know if I did anything wrong or not).
LC II are also easy, but have PSU issues as well. Logicboard and PSU both need to be recapped to expect a working machine. They don't tend to have other issues, except maybe a dodgy Egret or sound chip.

I would really recommend praciting some SMD soldering on some junk boards - routers and other things like that are good candidates for practicing with and can be found cheaply on eBay, or just buy some SMD soldering kits from eBay which come with SMD components and blank PCBs you can practice with.

I learned most of my technique from Branchus Creations videos on YouTube, check out his 'Learn to solder' series:

For recapping a Mac logic board, you need to be confident in removing old caps, cleaning the solder pads properly, and soldering the new capacitors without further damaging the board. SMD is not the easiest type of soldering to do, hence why I'm suggesting practicing on a non-Mac thing first, and taking the time to learn it.
 

Corgi

Well-known member
LC II are also easy, but have PSU issues as well. Logicboard and PSU both need to be recapped to expect a working machine. They don't tend to have other issues, except maybe a dodgy Egret or sound chip.

Good to know, thanks!

I would really recommend praciting some SMD soldering on some junk boards - routers and other things like that are good candidates for practicing with and can be found cheaply on eBay, or just buy some SMD soldering kits from eBay which come with SMD components and blank PCBs you can practice with.

I have two battery-bombed Compaq 486 boards somewhere. I could definitely practice on those without losses. One of the port headers fell off of one from all the corrosion…

I learned most of my technique from Branchus Creations videos on YouTube, check out his 'Learn to solder' series:

Thanks for the link! I'll definitely check it out.

For recapping a Mac logic board, you need to be confident in removing old caps, cleaning the solder pads properly, and soldering the new capacitors without further damaging the board. SMD is not the easiest type of soldering to do, hence why I'm suggesting practicing on a non-Mac thing first, and taking the time to learn it.

I'm pretty confident in doing through-hole soldering, but SMD is different indeed. I suppose I was putting the cart before the horse because I was itching to get started repairing the Mac. It would be better for me to hone my skills first so the repairs go successfully :)
 

Phipli

Well-known member
Good to know, thanks!


I have two battery-bombed Compaq 486 boards somewhere. I could definitely practice on those without losses. One of the port headers fell off of one from all the corrosion…


Thanks for the link! I'll definitely check it out.


I'm pretty confident in doing through-hole soldering, but SMD is different indeed. I suppose I was putting the cart before the horse because I was itching to get started repairing the Mac. It would be better for me to hone my skills first so the repairs go successfully :)
When talking about practicing, it doesn't need to be something you already own or ever want to work again - I think people more have in mind something like a VCR from a skip.
 

tecneeq

Well-known member
In my experience it's paramount to get schematics, so you can check every single capacitor leg connects to the chip it's supposed to connect to, using a multimeter.
Then you go from there. Sometimes a capacitor pad or trace is just gone, then you need to get creative, lay down small wires to connect to the right spots.
It's most certainly possible to repair a board, you will figure it out by just doing it.
 

AwkwardPotato

Well-known member
I could start with recapping it for the experience, I suppose, but I'm under the impression that one is not be likely to come back to life (so I wouldn't know if I did anything wrong or not).
As far as the capacitor replacement goes, there's not very much that can go wrong. If the board looks nice and clean visually, the capacitors are installed with correct polarity, the solder joints on the capacitors aren't cold (in other words, shiny, and with a smooth fillet between the leg of the capacitor and the pad on the board, rather than being a blob-shaped joint), you've done it correctly.

Probably making it out to be more complicated than it is, what I really mean to say is that any errors in recapping are usually apparent visually, without having to do any major problem-solving.

The pain-in-the-neck part is troubleshooting any damage caused by the original capacitors leaking, and that process will be mostly unique to any given board you work on. Sometimes there are patterns (e.g. the Mac II series often has problems around one of a few chips in the startup circuit, whereas the Mac LC series will get faint sound or be totally lifeless from EGRET problems), but other times you'll be stuck for hours just checking continuity from one end of traces to the other. Personally that's the point where I'll either save it for a rainy day or write it off as being "too far gone."

A lot of this stuff is difficult to put down in writing, at least for me. But like tecneeq said, it's the kind of thing you'll figure out by doing. Go for it! :) And if you do get the Mac II working again, as a bonus, it is a very fun machine to play around with.
 

AwkwardPotato

Well-known member
Also, a couple notes with regards to tools, since there's a lot of conflicting information floating around online: contrary to what some guides imply, the latest and greatest soldering and test equipment are not a requirement for working on these 30+ year old machines. If you're happy with your current soldering iron for through-hole work, it's most likely sufficient for surface-mount components of the size found in 68k systems.

Biggest topic of contention with this stuff seems to be whether or not a hot air station is required for desoldering the old caps. Many people, myself included, have had perfect success removing the old caps by rocking the caps back and forth, until metal fatigue breaks the cap leads between the aluminum can and plastic base. So long as you're not pulling upwards on the cap, and the rocking action is perpendicular to the pads on the board, the chances of the pads lifting is fairly low. A hot air station *isn't* a requirement, although it is technically the "more correct" tool for the job. Beware that using hot air can cause the caps to puff up and explode. Worst case scenario, improper/inexperienced use of the hot air gun can render a board near-unrepairable due to scorching/warping/layer delamination due to trapped moisture in the board.

As far as cleaning the board goes, an ultrasonic cleaner is also not a strict requirement. Dish soap + a toothbrush followed by a rinse in distilled water is more than enough for most boards. It's a different story entirely for the people running board recapping services, who are dealing with multiple boards per week, and where time is of the essence.

Only other thing I can think of is, look also towards the broader electronics hobbyist community for soldering and repair tricks, outside the old Mac or vintage computing circles. Many great wealths of information out there too :)
 

Juror22

Well-known member
was to snip those Vartas off
...did you test them? I had pair in one of my II's, one was still holding a full charge and the the other was at half charge. You still can't use them, but it was cool that they had lasted that long.
Many people, myself included, have had perfect success removing the old caps by rocking the caps back and forth, until metal fatigue breaks the cap leads between the aluminum can and plastic base.
Use needle nose pliers or something similar to do this and practice on one of those PC boards that you mentioned.
 

joshc

Well-known member
As far as the capacitor replacement goes, there's not very much that can go wrong.
I know what you mean but I think this is a little misleading, because with the wrong technique, there is indeed a few things that can go wrong - rippped solder pads/traces are two examples. If misusing hot air, chips can be fried or the PCB layers can lift. Slipping with a soldering iron is another classic mistake, or dropping a tool on the board (that's how I knocked out a memory trace on a IIci once). I've done all of these things, so that's why it is worth practicing on something else first.
 

AwkwardPotato

Well-known member
Agreed and my apologies. Maybe instead of "not very much can go wrong" I should say: if something does go wrong, most of the time there will be a visual indicator (except, like you said, if a component gets fried due to hot air misuse). And so if a practice machine (like the LC II discussed earlier, or something else) doesn't come back to life after recapping, and everything on it looks fine, it may be because of something other than soldering error, and the same techniques used on it would work fine to get the Mac II working again.
 
Last edited:
Top