uncle_chopstick
New member
The subject of reassembling the Macintosh 800K disk drive has already been well investigated by a number of other enthusiasts. In particular, there are a number of good videos on Youtube and a number of good written articles on other websites in relation to this subject.
Macintosh 800k Floppy Drive Recap & Lube
Sony 800k & 1.4MB Floppy Drive Cleaning and Lubrication
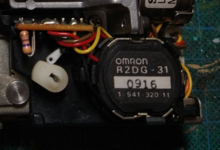
However, one aspect about which I was unable to locate a great deal of information was the reinstallation of the R2DG-31 variant of the Omron ejection motor for this drive. There are at least two other variants of ejection motor for this drive, the other ones I am aware of being the Omron R2DG-38 and R2DG-41.
The R2DG-31 variant has a few differences from the 38 and 41 which gave me some trouble when I tried to reassemble mine. I would like to report the solutions I used in case it is of assistance to others with the same variant. I was initially obliged to disassemble my disk drive because of a broken gear in the ejection motor. This has been reported numerous times by others and appears to be a very common issue. I ordered some 3D printed replacements from eBay. In the month or so since they have been installed my drive has seen heavy use and they appear to be holding up well so far.
Apple Macintosh 800K 1.44MB Replacement Floppy Drive Eject Gear MFD-75W MFD-51W
The first difference is that the R2DG-31 is secured underneath with screws rather than the plastic tabs. This makes the disassembly and reassembly process a fair bit easier as no glue is required to reattach the metal baseplate.
The second difference concerns the procedure for realigning the cam on the largest cogwheel in the gearbox. This cam contacts an actuator which is used to indicate that the pin on the large cogwheel has completed one full revolution, and that a disk has consequently been ejected. The design of this actuator is rather different from the other two variants I mentioned earlier. As far as I can ascertain, the cam depresses the actuator as the cogwheel travels around, and when the cam releases the actuator, the motor is switched off. I found that this actuator should not be reinstalled in the depressed position, as the drive will not act upon the signal sent from the logic board to eject a disk when it is in this state.
To reassemble the motor, replace all of the cogwheels in the gearbox except the final one. This will allow the large cogwheel to be freely rotated while the cam is being attached and allow the technician to establish the correct position of the pin and the cam. This has been mentioned numerous times elsewhere.
There is a white plastic cam which clips on to the axle attached to the largest cogwheel after it has been reinserted into the motor body. The correct orientation for this cam is with the square cutout on top. It is possible to install it upside-down, but this is best avoided. Do not clip it back on just yet: there are still two possible ways for it to be reattached to the cogwheel. The correct position is as follows.
The largest cogwheel has a metal pin attached to the underside of it which actuates the disk ejection mechanism. On the other types of ejection motor, this pin is set directly to a 12 o'clock position when holding it lengthways. However, the pin is positioned differently when reassembling the R2DG-31. When viewed from underneath, it must be rotated 45 degrees clockwise, when viewed from underneath, in order for the cam to release the actuator. Once this has been achieved, rotate the large cogwheel a little further in an clockwise direction so that the cam does not foul the actuator when being clipped on again. About 3 o'clock is good, with the correct position of the pin indicated by the red dot in the image below:

The cam can now be clipped on, remembering that the square indentation faces upwards. Unfortunately I missed the opportunity for a picture of the correct position, but the bulk of the cam should be positioned to the left of the actuator, a little further anti-clockwise than it is in the image below:

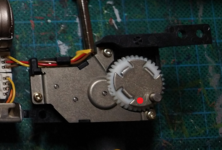
Once the cam has been clipped on, the cogwheel is only intended to move in a clockwise direction (when viewing from underneath). Turn it around 270 degrees and the pin should be back at 12 o'clock, but with the cam still depressing the actuator. This is still not the correct position, however, as the actuator must not be depressed when the drive is reinstalled. To correct this, continue to rotate the cogwheel as before until the cam releases the actuator, but do not turn it further than required to do this. The pin should be rotated about 45 degrees from the 12 o'clock position when viewed from below, as seen in the image below:

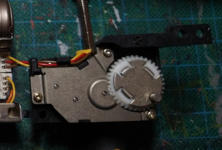
The correct position of the cam is shown in the image below:

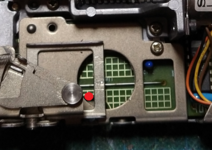
Once the pin and cam are positioned correctly, replace the final cogwheel in the gearbox, screw the plate into position and test that the ejection motor fits back into the assembly correctly. The pin underneath the motor spins within a circular cutout in a metal plate underneath it. The ejection actuator plate from the disk drive slides over this cutout and itself has a square cutout. When the drive is in the ejected position, one side of the square plate will sit over the circular cutout underneath so that only a small area of it is open. The pin must fit into the 'corner' where they intersect, as seen marked by the red dot in the image below:

Once the motor has been re-positioned the remainder of the reassembly process is the same as for the other types of 800K drive.
Macintosh 800k Floppy Drive Recap & Lube
Sony 800k & 1.4MB Floppy Drive Cleaning and Lubrication
However, one aspect about which I was unable to locate a great deal of information was the reinstallation of the R2DG-31 variant of the Omron ejection motor for this drive. There are at least two other variants of ejection motor for this drive, the other ones I am aware of being the Omron R2DG-38 and R2DG-41.
The R2DG-31 variant has a few differences from the 38 and 41 which gave me some trouble when I tried to reassemble mine. I would like to report the solutions I used in case it is of assistance to others with the same variant. I was initially obliged to disassemble my disk drive because of a broken gear in the ejection motor. This has been reported numerous times by others and appears to be a very common issue. I ordered some 3D printed replacements from eBay. In the month or so since they have been installed my drive has seen heavy use and they appear to be holding up well so far.
Apple Macintosh 800K 1.44MB Replacement Floppy Drive Eject Gear MFD-75W MFD-51W
The first difference is that the R2DG-31 is secured underneath with screws rather than the plastic tabs. This makes the disassembly and reassembly process a fair bit easier as no glue is required to reattach the metal baseplate.
The second difference concerns the procedure for realigning the cam on the largest cogwheel in the gearbox. This cam contacts an actuator which is used to indicate that the pin on the large cogwheel has completed one full revolution, and that a disk has consequently been ejected. The design of this actuator is rather different from the other two variants I mentioned earlier. As far as I can ascertain, the cam depresses the actuator as the cogwheel travels around, and when the cam releases the actuator, the motor is switched off. I found that this actuator should not be reinstalled in the depressed position, as the drive will not act upon the signal sent from the logic board to eject a disk when it is in this state.
To reassemble the motor, replace all of the cogwheels in the gearbox except the final one. This will allow the large cogwheel to be freely rotated while the cam is being attached and allow the technician to establish the correct position of the pin and the cam. This has been mentioned numerous times elsewhere.
There is a white plastic cam which clips on to the axle attached to the largest cogwheel after it has been reinserted into the motor body. The correct orientation for this cam is with the square cutout on top. It is possible to install it upside-down, but this is best avoided. Do not clip it back on just yet: there are still two possible ways for it to be reattached to the cogwheel. The correct position is as follows.
The largest cogwheel has a metal pin attached to the underside of it which actuates the disk ejection mechanism. On the other types of ejection motor, this pin is set directly to a 12 o'clock position when holding it lengthways. However, the pin is positioned differently when reassembling the R2DG-31. When viewed from underneath, it must be rotated 45 degrees clockwise, when viewed from underneath, in order for the cam to release the actuator. Once this has been achieved, rotate the large cogwheel a little further in an clockwise direction so that the cam does not foul the actuator when being clipped on again. About 3 o'clock is good, with the correct position of the pin indicated by the red dot in the image below:

The cam can now be clipped on, remembering that the square indentation faces upwards. Unfortunately I missed the opportunity for a picture of the correct position, but the bulk of the cam should be positioned to the left of the actuator, a little further anti-clockwise than it is in the image below:

Once the cam has been clipped on, the cogwheel is only intended to move in a clockwise direction (when viewing from underneath). Turn it around 270 degrees and the pin should be back at 12 o'clock, but with the cam still depressing the actuator. This is still not the correct position, however, as the actuator must not be depressed when the drive is reinstalled. To correct this, continue to rotate the cogwheel as before until the cam releases the actuator, but do not turn it further than required to do this. The pin should be rotated about 45 degrees from the 12 o'clock position when viewed from below, as seen in the image below:

The correct position of the cam is shown in the image below:

Once the pin and cam are positioned correctly, replace the final cogwheel in the gearbox, screw the plate into position and test that the ejection motor fits back into the assembly correctly. The pin underneath the motor spins within a circular cutout in a metal plate underneath it. The ejection actuator plate from the disk drive slides over this cutout and itself has a square cutout. When the drive is in the ejected position, one side of the square plate will sit over the circular cutout underneath so that only a small area of it is open. The pin must fit into the 'corner' where they intersect, as seen marked by the red dot in the image below:

Once the motor has been re-positioned the remainder of the reassembly process is the same as for the other types of 800K drive.
