elemenoh
Well-known member
Recreating this post since it was lost to recent site troubles.
Like many of you, I've experienced screw bosses on 100 series portables crumble when even a small amount of torque is applied in either direction. @ThisDoesNotCompute posted a great video going over the replacement of the display bosses, but I haven't seen anything similar to those for the main enclosure that the boards and drives attach to.
I recently took apart a couple of PowerBook 180c's and took a crack at fixing the problem.
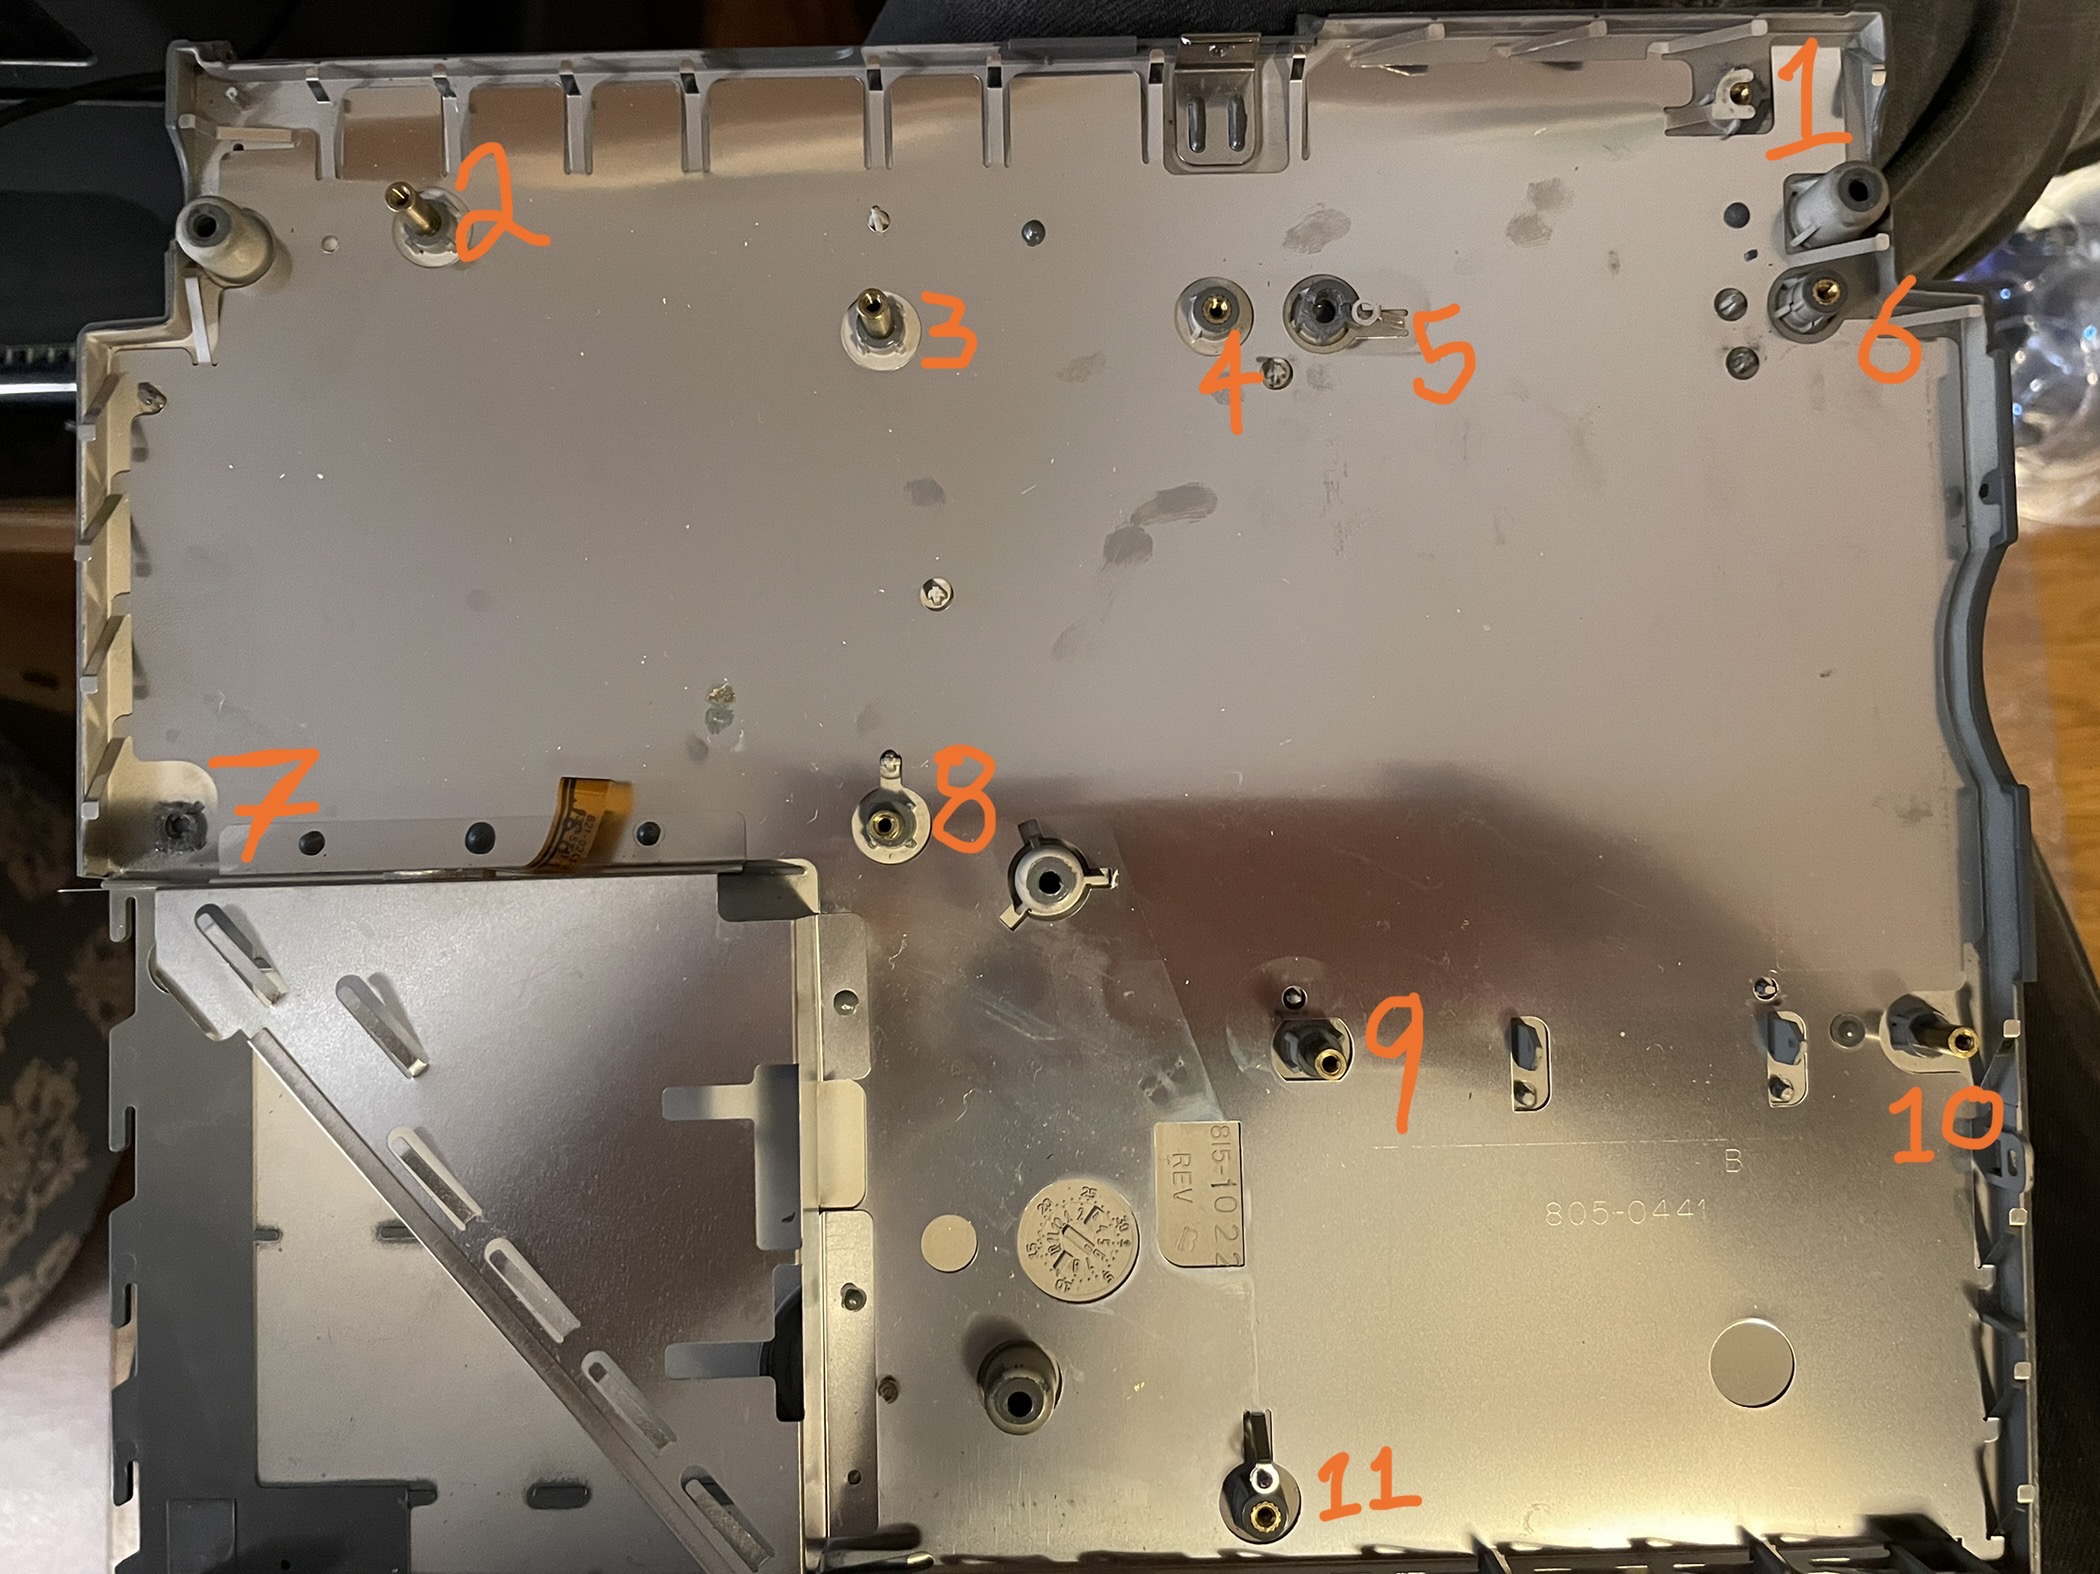
Here is a map of the 180c lower enclosure bosses.
1,2,3,4,7,8,10: 3.5mm H; 9mm Dia (ribs); 7mm Dia (tube); 4.5mm (insert)
5*,6,9,11*: 6mm H; 9mm Dia (ribs); 7mm Dia (tube); 4.5mm (insert)
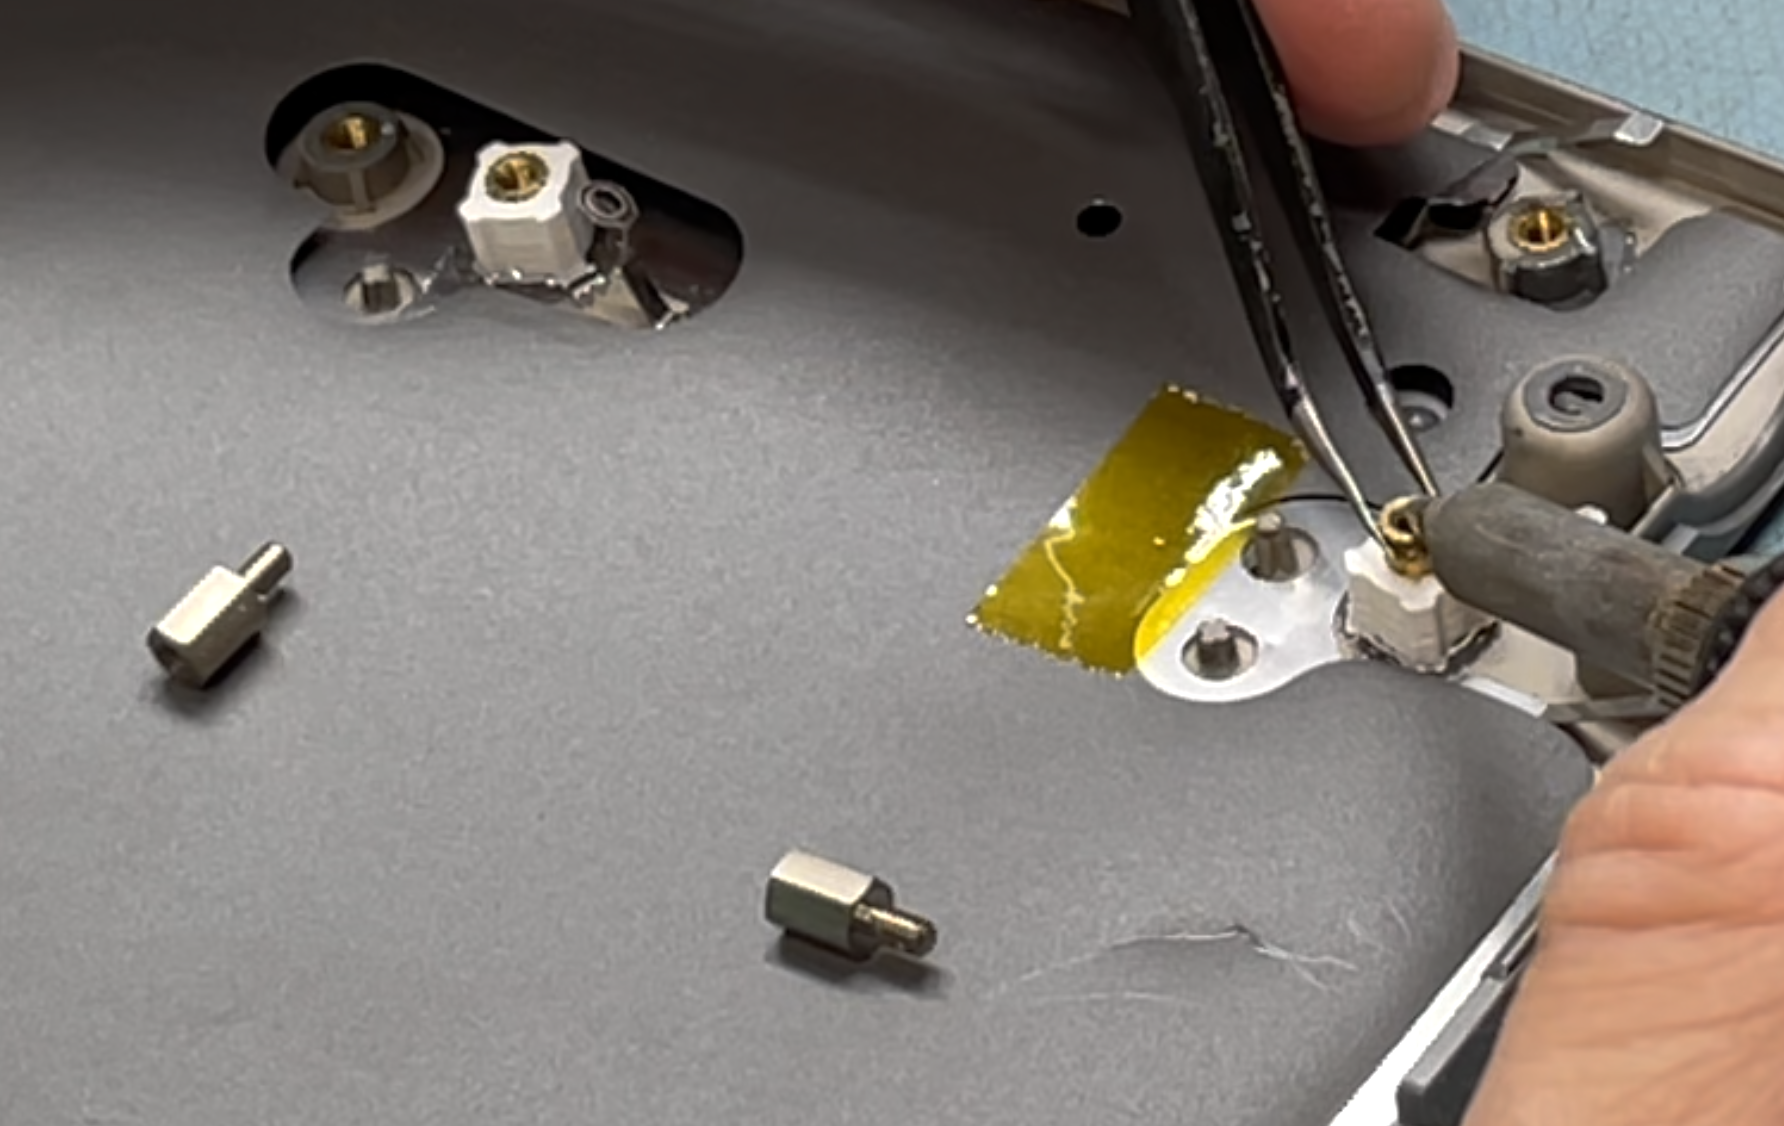
* these have little nubs that connect to the shield. For grounding?
I have found two methods to print and mount them.
For either method, flush cut the old boss out and mount the new one with epoxy. Avoid 1minute epoxy. It's just not enough time to get everything setup correctly.
Option 1) Print on FDM (filament) with a slightly narrower hole for the insert, mount with epoxy, then push the insert down with a soldering iron. This melts the surrounding plastic creating a very strong hold.
Option 2) Print on SLA (resin) with a very slightly larger hole for the insert, mount both the boss and the insert with epoxy. Use a very tiny amount of epoxy on the insert and avoid getting it in the threads. Resin just sort of cracks/crumbles when heated, so the soldering iron method won't work here.
Both options worked well and were very strong. The second option is a bit fussier but the parts are a lot sturdier.
Both options are attached here as STL files. The SLA option includes the type with the little nub. I'm not sure what purpose that nub serves. Perhaps some grounding points for the drive shield that sits above?
At some point I'll check and see if these sizes cover other models in the 1xx series, but I think they'll work for most. If any of you give these a try, please let us know how it works out for you.
Also, the replacement hinge part for the 145 does not fit the 180C exactly. It sits a little off kilter. It needs a ~1mm shelf north of the bosses to help it sit flush. I ended up using the parts for the 145 at an angle and then mounted the inserts parallel to the enclosure. That worked pretty well, but it'll be nice to design a part that fits this model exactly. I'll do that if I get some extra time in the future.
FDM Bosses
SLA Bosses
Like many of you, I've experienced screw bosses on 100 series portables crumble when even a small amount of torque is applied in either direction. @ThisDoesNotCompute posted a great video going over the replacement of the display bosses, but I haven't seen anything similar to those for the main enclosure that the boards and drives attach to.
I recently took apart a couple of PowerBook 180c's and took a crack at fixing the problem.
Here is a map of the 180c lower enclosure bosses.
1,2,3,4,7,8,10: 3.5mm H; 9mm Dia (ribs); 7mm Dia (tube); 4.5mm (insert)
5*,6,9,11*: 6mm H; 9mm Dia (ribs); 7mm Dia (tube); 4.5mm (insert)
* these have little nubs that connect to the shield. For grounding?
I have found two methods to print and mount them.
For either method, flush cut the old boss out and mount the new one with epoxy. Avoid 1minute epoxy. It's just not enough time to get everything setup correctly.
Option 1) Print on FDM (filament) with a slightly narrower hole for the insert, mount with epoxy, then push the insert down with a soldering iron. This melts the surrounding plastic creating a very strong hold.
Option 2) Print on SLA (resin) with a very slightly larger hole for the insert, mount both the boss and the insert with epoxy. Use a very tiny amount of epoxy on the insert and avoid getting it in the threads. Resin just sort of cracks/crumbles when heated, so the soldering iron method won't work here.
Both options worked well and were very strong. The second option is a bit fussier but the parts are a lot sturdier.
Both options are attached here as STL files. The SLA option includes the type with the little nub. I'm not sure what purpose that nub serves. Perhaps some grounding points for the drive shield that sits above?
At some point I'll check and see if these sizes cover other models in the 1xx series, but I think they'll work for most. If any of you give these a try, please let us know how it works out for you.
Also, the replacement hinge part for the 145 does not fit the 180C exactly. It sits a little off kilter. It needs a ~1mm shelf north of the bosses to help it sit flush. I ended up using the parts for the 145 at an angle and then mounted the inserts parallel to the enclosure. That worked pretty well, but it'll be nice to design a part that fits this model exactly. I'll do that if I get some extra time in the future.
FDM Bosses
SLA Bosses