3lectr1cPPC
Well-known member
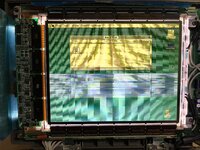
As I posted about in my conquests thread, I bought a nice PowerBook 180c from the recent VCF East Swap Meet. It worked fine, but the display hadn't been recapped, which is a big issue on these. There were a couple of obvious signs this 180c was in desperate need. First, if you left it on for a few minutes you would smell a strong rotten fish smell. Second, the display had some passive-matrix like artifacting, even though it's an active matrix display. Caps are a bit of an urgent issue on the 180cs, because they are dangerously close to the ribbons that display data use. If cap juice gets inside them, the ribbons will be ruined and the display will have dead pixels.
So, I went and attempted me second-ever surface mount capacitor replacement on this LCD Panel!
Here's the before image that I used to reference orientation and values:

Looks good, right? Just a bit of dullness on a few pads, but nothing bad at all.
Time to get the old caps off. There are plenty of perfectly good ways of removing them, although plenty of people will argue over which is the "best" way. I personally use the twist method of removing them. It's always worked just fine for me, and I've only ever broken a single pad using it (which was the first leaking cap I removed using the method - I had practiced before on a dead GPU but that was my first real attempt. Never damaged one since). I twist parallel to the contacts. I've found that both directions work fine, but twisting parallel gets them off faster and cleaner. The small one next to the raised board was the trickiest to get off because of the low clearance, but I got it off nonetheless.

Just look at what’s lurking underneath!

Alright, all removed, and just look at that gunk! Let's get it cleaned.

Much better! Next step, cleaning the pads and removing the remaining bits of the cap legs.

Done! I started with the trickiest cap to install - the small one by the raised board. I bought ceramics for the small caps, and tantalums for the larger ones. The size makes it tricky to install - tweezers are required! It took a minute, but I got it installed.

Here are all of the 10v ceramics installed.

And now, the rest of the caps.

And, we're done! The last couple of tantalum caps were pretty tricky - solder kept getting caught between the board and the metal shield.
Just one last cleaning and we’ll be finished.

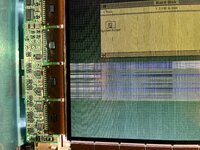
But does it work after its surgery?

Luckily, it does! All of the passive matrix-like artifacting is gone. It looks fabulous now! I'm super pleased with the result. I know my soldering isn't the nicest, but if it works it works! Plus, (and I know, I know...) I still don't have any flux. I've been planning on getting some for a few months, but I've always managed without it so far... Maybe next time")
Now that I'm done, I have a couple of questions.
First, I still smell a faint fishy smell after its been on for a few minutes. I'm pretty confident on why - I'll bet cap juice has gotten through VIAs and is on the other side of the board. Just one issue - how to I get the metal shield off to clean it? I've seen it done on this thread, but I can't see a clear way myself. While the display does work as is, I don't want it corroding anything over the coming years.
Second, how necessary is recapping the display inverter board (the one inside the display housing) on these? Mine has 2 through-hole electrolytics. I'll get around to it either way at some point, but if it isn't urgent I want to be able to put it off until my next big mouser order.
That's all! I'm super happy with how this project turned out, and I really love this system. It's the best of the 100 series!
Thanks,
3lectr1c
So, I went and attempted me second-ever surface mount capacitor replacement on this LCD Panel!
Here's the before image that I used to reference orientation and values:
Looks good, right? Just a bit of dullness on a few pads, but nothing bad at all.
Time to get the old caps off. There are plenty of perfectly good ways of removing them, although plenty of people will argue over which is the "best" way. I personally use the twist method of removing them. It's always worked just fine for me, and I've only ever broken a single pad using it (which was the first leaking cap I removed using the method - I had practiced before on a dead GPU but that was my first real attempt. Never damaged one since). I twist parallel to the contacts. I've found that both directions work fine, but twisting parallel gets them off faster and cleaner. The small one next to the raised board was the trickiest to get off because of the low clearance, but I got it off nonetheless.
Just look at what’s lurking underneath!
Alright, all removed, and just look at that gunk! Let's get it cleaned.
Much better! Next step, cleaning the pads and removing the remaining bits of the cap legs.
Done! I started with the trickiest cap to install - the small one by the raised board. I bought ceramics for the small caps, and tantalums for the larger ones. The size makes it tricky to install - tweezers are required! It took a minute, but I got it installed.
Here are all of the 10v ceramics installed.
And now, the rest of the caps.
And, we're done! The last couple of tantalum caps were pretty tricky - solder kept getting caught between the board and the metal shield.
Just one last cleaning and we’ll be finished.
But does it work after its surgery?
Luckily, it does! All of the passive matrix-like artifacting is gone. It looks fabulous now! I'm super pleased with the result. I know my soldering isn't the nicest, but if it works it works! Plus, (and I know, I know...) I still don't have any flux. I've been planning on getting some for a few months, but I've always managed without it so far... Maybe next time
Now that I'm done, I have a couple of questions.
First, I still smell a faint fishy smell after its been on for a few minutes. I'm pretty confident on why - I'll bet cap juice has gotten through VIAs and is on the other side of the board. Just one issue - how to I get the metal shield off to clean it? I've seen it done on this thread, but I can't see a clear way myself. While the display does work as is, I don't want it corroding anything over the coming years.
Second, how necessary is recapping the display inverter board (the one inside the display housing) on these? Mine has 2 through-hole electrolytics. I'll get around to it either way at some point, but if it isn't urgent I want to be able to put it off until my next big mouser order.
That's all! I'm super happy with how this project turned out, and I really love this system. It's the best of the 100 series!
Thanks,
3lectr1c