AEChadwick
Well-known member
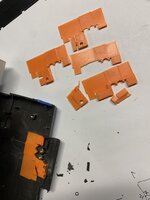
this is my pass at a shim to reinforce the 1400’s Display Housing / Hinge.
I am not an engineer, just a hobbyist; please feel free to remix & re-share.
the complex lower profile is to fit around existing structure, using those pieces as a guide to pop into the exact right place. there’s even tiny slots underneath that sleeve over the tiny ribs in the lid--purely to line things up. (I filled every slot with glue.) the complex upper shape is to slip into the lid with as little interruption but as much support as possible (especially above the hinge-attachment point). The 1400’s screen-to-lid space is a tighter fit than the 500 or the 180.
I used a lot of Weld-On 16, and filled some tiny gaps with CA + baking soda. The tiny gaps were in the round part directly under the clutch; it defied my ability to model it cleanly (see prior, not an engineer, just an artist with ambition).
this is made to print flat, with support on the build plate (it's mostly flat, it's just that lower part that needs a little support)
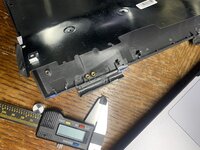
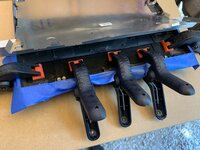
at first, i tried to work around the damage--like, just reinforce the lid while providing new purchase for the clutch. eventually, i realized the best course was a monolithic replacement. i removed everything that held the clutch bracket. I re-placed the threaded inserts by heating-and-pushing.
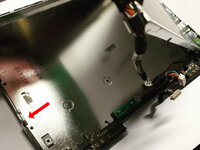
extra: in the process of removing the screen bezel (back and forth, several times, to test fit), i snapped some of the large-but-thin screen clips. I made tiny tabs to replace them. these are super minimal and required annoyingly careful placement, but ultimately worked great. again, feel free to remix.
i will upload to the rest of the internet later, but this was made while reading the 68KMLA, and belongs here first!

I am not an engineer, just a hobbyist; please feel free to remix & re-share.
the complex lower profile is to fit around existing structure, using those pieces as a guide to pop into the exact right place. there’s even tiny slots underneath that sleeve over the tiny ribs in the lid--purely to line things up. (I filled every slot with glue.) the complex upper shape is to slip into the lid with as little interruption but as much support as possible (especially above the hinge-attachment point). The 1400’s screen-to-lid space is a tighter fit than the 500 or the 180.
I used a lot of Weld-On 16, and filled some tiny gaps with CA + baking soda. The tiny gaps were in the round part directly under the clutch; it defied my ability to model it cleanly (see prior, not an engineer, just an artist with ambition).
this is made to print flat, with support on the build plate (it's mostly flat, it's just that lower part that needs a little support)
at first, i tried to work around the damage--like, just reinforce the lid while providing new purchase for the clutch. eventually, i realized the best course was a monolithic replacement. i removed everything that held the clutch bracket. I re-placed the threaded inserts by heating-and-pushing.
extra: in the process of removing the screen bezel (back and forth, several times, to test fit), i snapped some of the large-but-thin screen clips. I made tiny tabs to replace them. these are super minimal and required annoyingly careful placement, but ultimately worked great. again, feel free to remix.
i will upload to the rest of the internet later, but this was made while reading the 68KMLA, and belongs here first!