• Updated 2023-07-12: Hello, Guest! Welcome back, and be sure to check out this follow-up post about our outage a week or so ago.

MicroQuadra 630

AlpineRaven

Well-known member
I'd invest an ATA to mSATA adapter - worth the money. (you'll need an adapter from 40pin to 44pin, 44 pin to mSATA) very reliable, I've run/tested in Performa and it works well - noticeable faster than normal Hard Drive.
Cheers

AP


Floofies

Maker of Logos
I managed to get an industrial CompactFlash card working just fine; that's a sweet spot, cost wise, for me. I'm not gonna blow cash on mSATA when the PATA interface on this machine may as well be run by a hamster wheel!

Case prototype is coming together... sit tight while I build my first wooden box. I never attended a woodworking class so this ought to be a spectacular ugly frankenstein.


Trash80toHP_Mini

NIGHT STALKER
Sweet, prototyping is the bombe.

Try doing your layout in something like Illustrator and print templates in sections for the parts.

Try spraymenting or rubber cementing the printouts to corrugated cardboard to cut/test fit.

Then move on to the woodworking after trying a few different approaches.

edit: used to do a lot of mock-ups in foamcore too, it's a lot cleaner to work with and is about the same 1/4" nominal as the wood you might end up using. Pins and hot glue are your friends. [;)] ]'>

 
Last edited by a moderator:

Floofies

Maker of Logos
Google Sketchup and a few CAD tools have failed me for some reason. I feel dumb.

I started to cut some aluminum angles to make a card cage for the Video Out and Coaxial Video in cards, but then I realized I might be able to just chop the existing one out of the case! I looked at it, and it looks like I can hacksaw it apart to use in the new case. New design is coming together slowly... If I can sketch something up showing basic component placement, that would be nice.


Trash80toHP_Mini

NIGHT STALKER
No reason to feel dumb, we've all got our strengths and weaknesses. I wish I could do what you've done on the electronics side of things. But the graphics end I've got down pat. Lay out what you'd like to do in a very rough sketch or in a pile-o-parts pic and I'll see what I might be able to do to help out.

edit: silly question: why are you bothering with the NTSC in box?

 
Last edited by a moderator:

Floofies

Maker of Logos
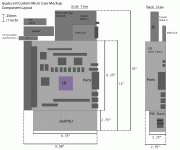
Okay, here's the "stupid simple" layout I threw together in Illustrator. You may notice the PSU has switched sides... this is because I wanted it on the bottom of the case to make it more bottom-heavy. Because of this, the LB must get flipped around as well, to keep the power cables accessible. This diagram shows all of the components in the exact orientation they will sit in. I haven't added spots for the Floppy or CD Audio-in ports yet.

Q630_Custom_Case_Layout.gif

These aren't the dimensions of the case, just the components. Obviously there will have to be a "rat's nest" compartment in the front to house the cable mess.

As for the coaxial video-in, I just think it's neat :p

I have the full Apple Video System so may as well cram it in there, as it only adds a little less than an inch to the height of the case.

 
Last edited by a moderator:

Trash80toHP_Mini

NIGHT STALKER
Fair enough, I've never used the coax box, but it did get heavy use in my son's room when the 630 was new. I ran coax and four pair copper from the cable box/VCR and computer setup in our bedroom into his. A Radio Shack IR repeater let him control either one remotely from his room. So I guess it has some sentimental value for me after all.

Neat setup. At first glance that coax box and the additional height it imposes on the assy gave me the willies. It makes your box really tall and thin in its aspect ratio, adding 4" (more like 3.25" IIRC?) of "knock over lever." The only thing I can think of if you want to keep it in your spec would be to let it define the width of the assembly instead of the height. lay it flat underneath the PSU and you can spread the rest of the top section across the front and back edges of a 4" shorter and what should be less than a half inch wider box? If tall and thin with a centered CF slot is your thing, I'll bet you can squeeze the coax box in above the mobo to reduce the box height/knockover force amplification of your MicroQuadra case without adding any width.

Make some cardboard case prototypes and paper internals boxes to play with the mobo and blocks in 3D.

edit: just thought of this, you're not wedded to positioning that box on the backplane, you can place it anywhere you want to and crimp a custom male to female panel mount F-Connector coax cable anywhere you've got a convenient space for drilling a hole for the connection breakout. [;)] ]'>

 
Last edited by a moderator:

Floofies

Maker of Logos
Yeah, stacking all the little odds and ends on top of the LB, instead of to the side of it, may work out better. The case with that configuration is only as wide as the LB backplate, so with those components moved it would only be slightly wider, and shorter. I'll definitely consider that idea, too, since the Video Card cage is already set up in that configuration.


Floofies

Maker of Logos
Since it now looks like the components can be stacked the way you suggested, that makes the stock case more appealing to just modify, instead of crafting a new case from scratch. I eyeballed it and I think I should be able to re-use the stock case! The dimensions are good except for the depth, so all I have to do is hack off the front section where the drive bays used to be. When I add some painted panels to it after I'm done, it should look more or less similar to my original idea.


Trash80toHP_Mini

NIGHT STALKER
Now you're talkin! [;)] ]'> You're recycling the case by re-use in achieving the same goals BMOW accomplished with his Orange Monster.


Trash80toHP_Mini

NIGHT STALKER
Yay! When the time comes to prune the front of the case back a bit, think about getting a pro quality set of avsnips (WISS or equivalent) for the job. Standard yellow straight cut snips aren't of much use on anything but flat sheet metal, but red & green curve cutting snips are great for doing "straight" cuts on case parts working from any which way.

Do your rough cuts about 3/16 of an inch (or a bit more) from the finish cut line so you'll curl off that wave deformed strip of scrap and have very little distortion from doing the finish cut.

630 cans are marginal for tin snips, but doable. The short jaw bulldog avsnips are handy for hogging out spaces from which to start your rough in cuts.


IlikeTech

Well-known member
Floofies, do you still have that crazy resistor mess on the inverter? Can you try a 1k pull down on the /PFW line and nothing on the PS_ON line.


Floofies

Maker of Logos
Take a look at page 4 to see the full schematic for the adapter, it's just two resistors. My own implementation of it happens to be a nasty bodge-ridden mess, lol.

I'm pretty sure a 1KΩ resistor would prevent the Mac from powering up at all, pulling /PFW too low. I know this since I went pretty low past 5KΩ and had that as a result. Do you have a hypothesis you would like me to test for?

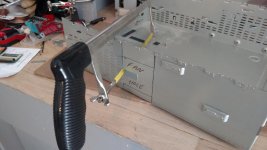
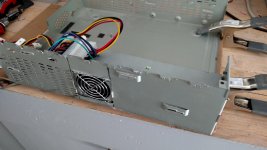
In other news, I'm steadily hacking away at the stock case... Lots and lots of hacksawing. So far I have a PSU fan hole, and I'm starting to cut out the backplate to allow for more airflow into the PSU as well. After that, I'll be trimming down the drive tray since it also functions as the support for the wiring harness, then I'll lop off the entire front of the case. At this point the case and I have made multiple agonizing blood pacts, strengthening our spiritual bond to each other... thanks to my totally-smart-and-not-moronic "let's just not use any gloves" approach when I started cutting. :p

 
Last edited by a moderator:

Floofies

Maker of Logos
IMG_20170924_170318805.jpg

Linus loves blunt objects mashed into his face. It's a cat thing. As you can see I went with the Wiss snips, and they work quite well.

The project is kind of slowing down again, due to other things occupying my time. It will be done soon, I'm just trying to think of case designs that will actually look good.


Trash80toHP_Mini

NIGHT STALKER
Sweet, cat & snips. Cat's named for the Peanuts Pianist character or Torvalds?

Did you get the full set with curve snips? Any more blood bonding since you retired the hacksaw?

If you need to make any bends for tabs, get a seamer a/o folding bar. Don't recall having used my 12" bar on "630 gauge" sheet metal, but if you want to do some bends or seam the front edge, let me know and I'll look for a guinea pig.

https://www.amazon.com/wiss-sheet-metal-tools/s?ie=UTF8&page=1&rh=i%3Aaps%2Ck%3Awiss%20sheet%20metal%20tools

WOW! The sheet metal tool I miss the most would be the 48"/16 gauge/4 in. box & pan brake. So glad I searched Amazon for that link.

It might be time to sell off some goodies from the toy chest for adding a light duty toy to the work bench! SWEET price w/ free shipping!


Floofies

Maker of Logos
He's named after Linus Torvalds!

I went with the straight cuts only.

This is going to  be a very rough looking chassis by the time I'm done with it, surely.

 
Top