• Updated 2023-07-12: Hello, Guest! Welcome back, and be sure to check out this follow-up post about our outage a week or so ago.

How to Repair a G5 Quad Dual Pump LCS

360alaska

Well-known member
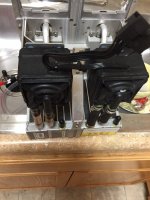
After 10 years, it seems like these are starting to fail at an alarming rate! So far, I’ve seen 3 bad dual pump cooling units with each one failing due to a clogged water block. In this article I intend to cover testing, flushing and filling.

What you’ll need:

8 hose clamps (about ½ inch)
Distilled water
Dielectric grease
White Vinegar
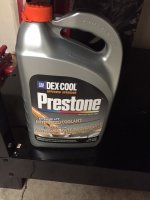
Prestone Dex-Cool concentrate (Orangish-Red in color)
Size 27 Orings (Viton preferred but not required)
Artic silver thermal grease
About 3ft of 3/8 Clear Vinyl tubing (Non-Braided recommended)

Tools:
12 VDC power source
Apple service Diagnostics 2.6.3 (2.5.8 will not work on PCIe models)
Automotive hand vacuum pump
Funnel
Mini Screwdriver set
Razor Blade
Scissors
Some way of connecting your faucet to the 3/8th hose (see what I used)
Temperature Controlled Heat gun or Hot air station

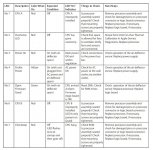
Most of the time when the LCS fails a Quad G5 will turn on but will not boot. You’ll likely see red lights turn on inside the computer (Usually overtemp & checkstop) and your fans will start spinning like crazy! Since your computer won’t boot you really don’t know which cpu is overheating! The easiest way to figure is out is to bench test it.
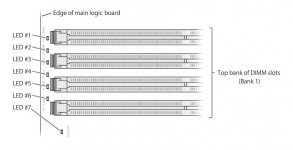
Capture.JPG

table.JPG

A Brief Guide on the Removal of the LCS

A. Remove your Graphics Card.
B. Remove the plastic rivet under the graphics card and slide off the G5 cover (toward the front of the tower).
C. Disconnect and remove your rear fans.
D. Remove your front fans.
E. Remove the air deflector (on the radiator).
F. Disconnect the electrical connector to the Pumps.
G. Remove/loosen the screws on the LCS system and remove it from the computer.
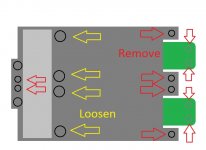
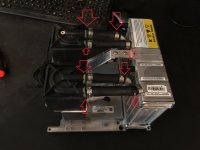
QuadLCS.jpg

H. Remove the screws on the CPU’s and set them aside.

NOTE: Be sure to mark which CPU was the top and which CPU was the bottom. If you swap them your fans will run full blast until you run a thermal calibration.

For more info see this youtube video:


360alaska

Well-known member
Testing

A. Place the LCS Assembly on a work surface oriented as if it were still in the computer.

B. Apply 12VDC to pins 1, 2, 5 & 6. (The pins are numbered).
C. Apply ground to pins 7 & 8 (You should hear the pumps come on).
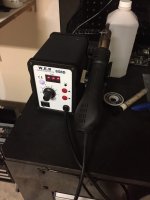
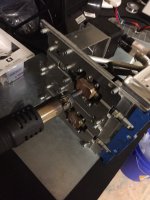
D. Set your seat gun for 200F and target the center of the water block for 15 seconds.

IMG_0282.JPGIMG_0283.JPG
E. Remove the heat gun and place your finger on the water block, if coolant is flowing properly it should be cold or mildly warm but not hot.
F. Do this a few more times to ensure consistent operation
G. Repeat steps D-F on the other water block

I call this the “Finger Test.” I know it’s not completely scientific but it’s a good indicator as to whether the system is working or not.

Also: Another good indicator of a clogged waterblock is a buzzing pump.

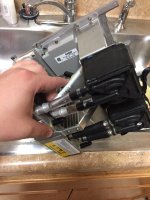
Draining the System

Note: For this procedure, only the 4 upper hoses need to be removed.

A. Remove the “Cooligy” cover by removing the two screws that secure it.
B. Remove the crimped on hose clamps by prying against the crimp or cutting the band.
C. Chisel off the epoxy by placing a small screwdriver on it and lightly tapping.
D. Place the unit in a sink.
E. Cut each hose sideways from the pump to the radiator and turn the unit upside down to let it drain.
F. Remove pieces of clear heat shrink from the pump ports and radiator ports.
G. Remove both pumps by unscrewing the screws securing the mount and set the pumps aside.

IMG_028z.JPG

Note: Be careful not to damage or lose the flow restrictors that are attached to the metal “Z” Tube.


360alaska

Well-known member
Flushing (with White Vinegar)

A. Place the LCS on its side.
B. Attach a 1ft tube to input port.
C. Mix a 50/50 solution of vinegar and hot tap water.
D. Pour the solution down the input port using a funnel.
E. Connect the end of the 1 foot tube to the output port.
F. Let stand until cool.
G. Turn the LCS upside down so the solution falls into the tube and then turn the LCS onto its side to send the solution the other way.
H. Apply heat to the water block with a heat gun or hot air tool.
I. Allow The LCS to cool.
J. Repeat steps C-I 2-3 times.
K. Disconnect the 1ft tube from the either port and attach another hose.
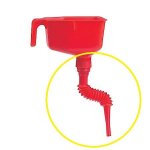
L. Connect the input port hose to your faucet via adapter and turn on the faucet (I used a flex tube bought at Advance Auto Parts.)

9180011_ftl_10710wr_pri_larg.jpg
M. Turn off the faucet and repeat step K with the faucet connected to the output port.
N. Repeat steps K & L 2-3 times or until clear water can be seen.
O. Using a funnel, pour in 100% distilled water into the input port until it flows out the output port.

Refilling

Because all of the filling ports are crimped off (and have epoxy covering them) I have come up with a reliable alternate method of filling the system:

A. Go ahead and reattach the cooling pump assembly with the 6 screws.
B. Measure and cut a 3 inch piece of Vinyl tubing and attach it to the "Z” Tube. (Make sure you still have the restrictor!)
C. Slide two loose hose clamps over the Vinyl tubing and connect the tube to the pump.
D. Place a hose clamp on each side and tighten them down (The part with the screw should be down if you want to put your “G5” cover back on.)
E. Cut a 4.5 inch piece and attach it to the radiator fitting.
F. Place 1 foot piece of tubing on the pumps outlet port
G. Place the LCS in your sink with the radiator facing down.

IMG_0285.JPG
H. Fill a spare container with 75% distilled water and 25% Dex-Cool and stir

IMG_0284.JPG
I. Fill the system with the coolant you just made using the 4.5 inch hose connected to the radiator using a funnel, continue to pour coolant into the funnel until you see the coolant begin to flow out of the pumps output port. (The smaller hose should be completely full of coolant at this point. Also, if the coolant doesn’t flow on its own then use the hand vacuum pump on the pump’s output port.)
J. Place two hose clamps on the 4.5 inch hose.
K. Now, place your finger over the pump’s output port and fill the 4.5 inch hose up to the top.
L. Connect the hose to the pump and bench check the system
M. If the bench check passes then tighten the clamps

Bleeding

Bleeding isn’t always necessary, you may notice a small bubble in each tube after the filling procedure and that’s alright. But, if you have multiple bubbles or large bubbles or if the pump makes a grinding noise for longer than 30 seconds you need to bleed it.   

A. Place The at 45 degree angle as pictured and either disconnect the 4.5 inch hose from the pump side or cut the hose with a razor and place a new hose on the radiator.

IMG_0287.JPG
B. Now, place your finger over the pump’s output port and fill the 4.5 inch hose up to the top.
C. Connect the hose to the pump and bench check the system.
D. If the bench check passes then tighten the clamps.

 
Last edited by a moderator:

360alaska

Well-known member
Changing O-rings

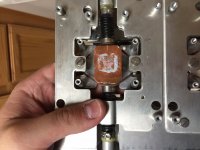
Under the “Cooligy cover” you’ll find two size 27 orings that keep the CPU clamp aligned for assembly purposes. Even if they’re broken you can certainly reattach the CPUs but since I have some I might as well replace them. Here are some pictures on how that’s routed. Once changed you can go ahead and put the cover back on.

IMG_0288.JPGIMG_0289.JPG


BadGoldEagle

Well-known member
Thanks for the guide 360. That's awesome. It's really useful. Never flushed a LCS before but if I have to, I'll definitely be using your guide.

I too have a Dual Pump G5 Quad. Correct me if I'm wrong but can the Dual Pump system fail the same way other PM G5 LCS do?

I mean, can this happen with the Dual Pump Delta system? (picture from Single Pump Delta IIRC)

cpu_g510.jpg.35a1181d10a58778d651544760c79ff9.jpg


The O-rings on the Dual Pump LCS aren't actually used as seals, right?

Haven't plugged the PM since I bought it, so fingers crossed, it'll post.


Compgeke

Well-known member
For the most part any G5 with a liquid system should have seals/o-rings and coolant replaced just as basic maintenance. The coolant used wasn't kind on the system (Delphi made dexcool iirc, the same kind of garbage used in GM vehicles).

I'd go ahead and replace the lines and seals, flush and replace with any basic coolant. It being dexcool won't matter, Nissan blue, the gaming computer specific stuff, etc will all work.


kby

New member
The quads do not have traditional O-rings in the transfer blocks; perhaps this is why they are not usually prone to leaking issues as the other G5 LCS systems. The single-pump systems have something more like a special molded flat gasket and some special softer gaskets that are also custom.

The dual pump systems appear to have sealed transfer blocks; the only place they could leak (sns actual phyical damage to the block) would be where the hoses connect.

I use a variant on the above technique to rebuild both systems. In terms of testing, I usually use a hair dryer rather than a heat gun. I also find it useful to use a digital thermometer probe (which I have for my DVM) in the appropriate radiator section.

With the system off, I use the hair dryer to warm up the block in question until it is quite hot to the touch. The temperature on the radiotor should not rise significantly (try to blow the warm air away from the radiator). Once it is sufficietly warm, I then continue to

heat the block while turning on the system. You should shortly see the temperature begin to rise fairly quickly as the coolant circulates (maybe about 05 degrees C per second or so). After a few seconds if you remove the hair drier and feel the block,

it should not be hot to the touch and pretty much at ambient or lower temp. I don't wait per se after removing th heat, but I do go at a somewhat measured pace. If the temps rise in the radiator fast enough and the block is cool, the cooling system should at least be adequate to start up the machine.

In terms of refilling, if you do not need/want to remove the hoses, I have found you can fill with a 50mL catheter tip syrring through the output port of the pump (take the pump apart). You wind up with the pump lid filled with coolant; you then put the middle section (with the impeller and the o-ring—don't forget the o-ring). This is clearly not perfect but seems to work adequately. This is more of an issue with the dual pump systems as they have many hoses glued on. I am not sure if they have filters like the single pump system, but I have managed to successfully clear them by using first aq solution of baking soda, then carefully syringing in hot vinegar. Even though you have to mostly push fluid in by the center (top) part of the pump lid (the pump outlet), pull back on the syringe to pull the liquid the other way. Be sure to wear eye protection and protect from spills—the effervesence can be pretty intense. The chemicals aren't particularly dangerous, but the vineaar is hot aqnd might burn thermally or damage eyes. I suggest doing this in a bathtub or sink, or at least near one. I then leave the system to soak for about 10 minutes with hot vinegar, then rince with distilled water and refill. I use the PC coolants; Dexcool I think is ethylene glycol based which is more toxic than I'd like (in case of leak/pets/etc.) and there is no need for its properties. The CPUs will shut down at or around the boiling point of water and no one is running their system in sub-zero weaqther (at least in most cases!).

Finally, I find that the best way to power the unit for testing is to use the G5 itself. Just connect the cable but don't install the CPU. If checking for leaks (as in after refilling), be sure it can't leak into the powered logic board or anywhere else dangerous, but the cable is long enough that this isn't a major issue. This ensures the pins are connected correctly and (for example) the tach output doesn't accidentally get shorted to Vcc.


360alaska

Well-known member
Following up on this reply:

Dexcool is an OAT coolant (organic acid technology) and it SHOULD NOT EVER BE MIXED WITH GREEN COOLANT!

The SIngle pump G5 Quad LCS takes Normal Green Coolant

The Dual Pump G5 LCS takes Dex-Cool

 
Last edited by a moderator:

beachycove

Well-known member
Following up on this reply:

Dexcool is an OAT coolant (organic acid technology) and it SHOULD NOT EVER BE MIXED WITH GREEN COOLANT!

The SIngle pump G5 Quad LCS takes Normal Green Coolant

The Dual Pump G5 LCS takes Dex-Cool
Can you explain? I have twice put "normal green coolant" in my Quad G5, on servicing the unit. Ought I to be using something that goes in a car instead, and if so, why?


beachycove

Well-known member
Ah. I have a green liquid in mind that came from some computer supplies place, and thought it was specific to use as a CPU coolant.

Presumably the Dex-Cool is meant to be long-lasting in the sealed unit, but since the unit is no longer sealed, and since it is likely that the coolant will be replaced by us collectors from time to time long after the originally intended service life of the machine, the reason for using it no longer applies.

In other words, the green stuff should work fine so long as it is not kept in the thing for another ten years?


360alaska

Well-known member
Your missing the point, the point I was trying to make is that the Dexcool and the glycol based cannot be mixed. It will gel and the lcd will be ruined!


maceffects

Well-known member
Yes Dexcool is very sensative and it will certainly gel up if mixed with traditional ethylene glycol coolant (green). Actually, many things can cause this coolant to change state. I can't tell you how many cars I've witnessed have major issues related to Dexcool and/or improper mixing.

 
Last edited by a moderator:

BadGoldEagle

Well-known member
I'm gonna tackle this repair either today or tomorrow. I won't be able to finish it off because I can't seem to find dex-cool anywhere. I'll have to import it over from Germany. Compared to the states, it's not easy to find GM products in Europe. Only Opel stocks Dex-cool and since Peugeot bought them out a couple of months ago, I think it'll be even harder to find the stuff in the coming months...

I still have a couple of questions before I start... I have de-ionised water at home, can I use that instead of distilled water? De-ionised water is supposed to be even purer, right?  And would you reckon 2 litres (or about half a US gallon) of Dex-cool is enough?

Thanks!!

 
Last edited by a moderator:

360alaska

Well-known member
1. I'm not sure about de-ionized water vs distilled, you can usually get distilled at the market and you'll need it to mix with the dex-cool.

2. Half a gallon is enough, I'd do 70% water and 30% dexcool.


BadGoldEagle

Well-known member
Thanks! I'll get the distilled water and the dexcool.

I still ended up using de-ionised water to clean the system. It was full of those little red dots.

IMG_4153.jpg

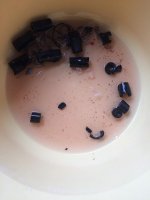
This is what came out when I removed the hoses. A lot more of the red thingies came out afterwards. I was surprised how little fluid was in the system too... This is about all of it. No wonder it didn't work...


BadGoldEagle

Well-known member
Small update. I tried to refill the system and I think that might very well be the trickiest part of the repair. I ended up leaving A LOT of air bubbles inside the loop... I didn't bench test the system but I know it'll fail. You definitely need the small pump. I tried to initiate the flow myself by sucking air out of the hose. Don't try that. Dex-cool tastes really bad.  :O  

I bought a pump for 15 bucks and some more distilled water.

Next time I'll immerge part of the system in the mix so there won't be any air at all.

61BMcQPlTKL._SL1000_.jpg.2e30de1c4e0cbaa0eccb7ed46f4699d0.jpg


Last edited by a moderator:

beachycove

Well-known member
My experience with this might be useful. First, I put clear hoses in mine so as to be able to check on the condition of the coolant. Second, I put a T junction with a small tube extension and a plug in at the highest point, so the system is no longer closed. This was so as to be able to vent the air as it collects, and add more coolant instead. Third (I have done this twice now), I have gotten a lot of bubbles for the first hour or so, but with this method, all air can soon be vented and things settle down nicely.

Now, I will add that out of frustration at the trouble the system has given me over the years, the second time I did it, I also removed all the filters and the micro-channel plastic disks that sit near the heatsink, so as to allow the coolant to flow freely. In what I have seen, the result works as well as the stock cooling, and given the propensity of the stock system to plug up, in my judgment this arrangement is miles better. I tend to run my Quad on reduced performance, which is fine for my needs, and find that even on 100% usage over lengthy periods, such as building software from macports, my CPU temperatures do not exceed ~50ºC. Mostly the temps range from 43-48ºC even in fairly intensive ordinary use – though this is in a cool room.


mePy2

Member
Hello everyone. Thank you 360alaska for writing this and documenting the process carefully. I think I have to do the same job to my Quad too. I’m in the testing phase. I’m getting #2 and #7 LEDs on too and fans are crazy, very very loud and scary. The Mac starts, then blocks.

I‘ll update you. Although I’m not going to do it soon. (time, space and money issues!!)

PS:
I’m trying to keep everything updated here: https://mepypower.blogspot.com I think I will steal some informations (as much as I can honestly) from this thread so to keep things organized and in one single place. If you want to contribute to it (writing posts G5 related) just tell me and I’ll invite you in as “writer”(?)/author.

Best,
mePy2

 
Top