• Updated 2023-07-12: Hello, Guest! Welcome back, and be sure to check out this follow-up post about our outage a week or so ago.

Homemade Mini Case for LC, P475, Q605

bigmessowires

Well-known member
Here are the prototype design files that I sent to Ponoko for laser cutting. It's mostly the same as the design in my first post, but with some air vents added. This design hasn't yet been proven to work, and there's a chance I measured something wrong somewhere. So I wouldn't recommend anybody cut their own acrylic from these unless they just want to experiment. I'll post a "finished" design later for people who want a proven, it-just-works case.

The tab and slot connections assume 3.0 mm thick acrylic with a +/- 10% thickness tolerance, so the slots are 3.3mm wide.

The technique with the captured nuts is called T-slots, and it's pretty common for laser-cut enclosures. I've never done it before, so I'm interested to see how well it works in practice.
 

The design files are vector drawings made in Inkscape, an open source drawing software. They are plain .svg files, so you could probably edit them in other software too, but I like Inkscape and it's cross-platform.

There are two files. Sheet 1 is the case bottom and sides, and sheet 2 is the case top and shelf. I chose nuclear orange acrylic for the bottom and sides, and clear for the top window, but Ponoko can do it in any color you want. They even have gold sparkle acrylic!

LC-case-v1.zip


Attachments

  • LC-case-v1.zip
    128.9 KB · Views: 58

MJ313

Well-known member
MissileCommandMiniTower!

As a second model in your lineup (if the market demands) it looks as though you could also easily flip the PSU onto its back, and locate it above the VRAM... then fatten up the height, reduce the width, and finally flip the whole box on its side for nice little tower (avec ou sans feets). This would take up more cubic then the flat box, but there would be ample room for a speaker and fan.  It would be a neat little micro Q700 type of thing.
 

Trash80toHP_Mini

NIGHT STALKER
The technique with the captured nuts is called T-slots, and it's pretty common for laser-cut enclosures. I've never done it before, so I'm interested to see how well it works in practice.
Ahhh! T-Slots I know, but for shop equipment jig placement on drill presses and mills and for various things like table saw crosscut gauges. Do they have actual small T-Nuts for the application or do they just use garden variety hex-nuts?

I've has an InkScape shortcut on my desktop for at least five years, exported EPS, but AI* couldn't parse it. Fired up 9 and imported it.

I really like like that MissileCommandMiniTower moniker, mj. So I won't be adding filler to make the bottom edge straight as planned. I had next to zero time to whomp that PDF up before heading off to work. Post some MC artwork you like and I'll see what I can do! The fins/ends are spraymented onto more corrugated, hopefully I'll have more playtime tonight. Only got the three sides and shelf done last night.

I'll be socking the top/bot panels right up to the top/bot of the PSU, thinning the profile and experimenting with a convection cooling tower version just for shiggles and gits.

How thick is that SCSI2SD assembly? We're quite a pair, you without a NIC, me without the SCSI2SD and trying to bodge different versions of this together anyway!

 
Last edited by a moderator:

bigmessowires

Well-known member
As a second model in your lineup (if the market demands) it looks as though you could also easily flip the PSU onto its back, and locate it above the VRAM... then fatten up the height, reduce the width, and finally flip the whole box on its side for nice little tower ...  It would be a neat little micro Q700 type of thing.
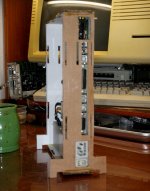
Hmm yeah, with another shelf on the opposite side of the case? I think I see what you mean.

How thick is that SCSI2SD assembly? We're quite a pair, you without a NIC, me without the SCSI2SD and trying to bodge different versions of this together anyway!
The thickest part of my SCSI2SD v3.0 is where the 50-pin SCSI cable plugs in. I measured it 18mm including the solder bumps on the opposite side of the PCB. I'm not sure if versions 5.0 or 6.0 are thicker.


Trash80toHP_Mini

NIGHT STALKER
It would be a neat little micro Q700 type of thing.
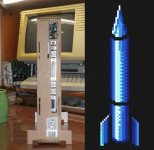
Definitely neat. That's one of the form factors I've been looking at for the 630/6400 version, but I'm waiting for Floofies to get everything on the MicroATX PSU front nailed down and documented before jumping in  .  .  .  maybe.

Corrogated Missle Command parts are done and awaiting the hot glue gun. [:D] ]'>


Trash80toHP_Mini

NIGHT STALKER
Looks to me like you're good to go!

BMOW605-5.jpg

BMOW605-6.jpg

Just for mj:

MJ605-00.jpg

Adding the roof and ridge vent makes it taller, but fits a retro-gaming front bezel graphic nicely.

May also induce a bit of Bernoulli/Venturi/Whatever convection enhancement.

Tower's got some nice heft to it and the Feets make it very solid. Thinning it to the widthe of the height of the PSU as shown in pic 2 and adding stabilization fins ought to make it rock solid!

edit:  just realized it's possible to work the slots/tabs into the pixel pattern for a bit of camouflage or just have  the graphic printed on vinyl co cover them. Disk access indicator LED at apex or pattern for rocket exhaust?

 
Last edited by a moderator:

Trash80toHP_Mini

NIGHT STALKER
Nice! Your cardboard version looks good. I hope the acrylic model works as well, once I get the parts cut.
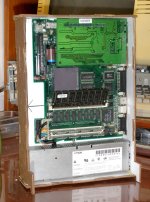
Thanks!  [:)] ]'>  It should look good, it's cut from your plans! [;)] ]'>  I did have a little trouble getting the PSU into battery, but it got there. Shouldn't be a problem putting the acrylic version together, my corrugated is a bit thick by comparison and it was all hot glued together before the installation. Your case will be flexible until you slip that end cap on.

Modded the (lunchtime rush job) PDF and printed out the <MJMCMT< at work for playtime on my day off tomorrow. Maybe I'll haul the bandsaw out of the kitchen pantry for some real plexi playtime!


Trash80toHP_Mini

NIGHT STALKER
You all got me grinding gears now thinking about this Sawtooth G4 logic board I have.
Interesting notion. Thoughts of  a dedicated Q630/40 Patriot Command Arcade MiniTower have been haunting me. Used to play that every Wednesday Family Game Night on the Q630.

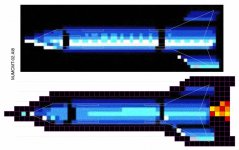
Evil Brick Company™ templates they are. 3D Front Bezel Simply Irresistible is it.

MJMCMT-02A.jpg

In plastic blocks 3D rendering challenge LegoFU Master and Paduan Lerner for is it: MJMCMT-02.PDF

1/2 Scale template is it. [:D] ]'>


Attachments

  • MJMCMT-02.PDF
    592 KB · Views: 39

Cory5412

Daring Pioneer of the Future
Staff member
This looks really neat.

One thought here is that at stock 475 speeds, you probably don't need an awful lot of ventilation. As a young child, I was entertained by the idea of an LC475 re-housed into a cardboard box, so I pretty much literally dropped its board into the box some corn dogs came in (they had been wrapped in plastic, so there was no grease) cut holes for the ports and for the power supply, and let it go.

As with this design, I omitted a floppy diskette drive, and I used some LEGO to let the hard disk rest on top of the motherboard.

I don't think I left it running for more than a few hours at a time, but that would probably have been enough to cause problems, if it was going to.

Remember: the PowerBook 520/540 and 190 have the same or almost the same chips and those systems don't have any ventilation or fans.

All of that said, I don't think it would hurt much to have a fan in there smewhere. There was a small fan in the LC series design that brought in cool air from under the machine and pretty much spread it to the sides. A fan on top pulling air out the top should be sufficient. Also possible, a blower style fan (like the ones you see available as dedicated PCI cards) above the ports where your LCPDS and SCSI2SD aren't likely to be. Then, a few slats/louvres either on the front or perhaps on the top/bottom to pull air through.

But, I don't know if I would bother until it proves to be a problem, especially since/if you're not putting a conventional hard disk (or worse: a big/fast one) in there.


Cory5412

Daring Pioneer of the Future
Staff member
To be honest, it probably doesn't matter. the 475 in particular appears not to have a heatsink at all. The whole point is that somehow, the extremely minimal amount of heat a computer like this makes has a way to escape.

From a durability and longevity standpoint, I don't think there's a problem here unless you put a temperature prob in and it's over about 90 degrees celsius.

It will be different (but not that much) if you manage to overclock a 40MHz to 45+ on a 475/605 board inside this case, but without doing that, I actually think vents on the top is probably enough to keep the system cool enough to be stable, long term.


Cory5412

Daring Pioneer of the Future
Staff member
Wikipedia says:

Heat was always a problem throughout the 68040's life. While it delivered over four times the per-clock performance of the 68020 and 68030, the chip's complexity and power requirements came from a large die and large caches. This affected the scaling of the processor and it was never able to run with a clock rate exceeding 40 MHz. A 50 MHz variant was planned, but canceled. Overclocking enthusiasts reported success reaching 50 MHz using a 100 MHz oscillator instead of an 80 MHz part and the then novel technique of adding oversized heat sinks with fans.
 But they only say it in the context of overclocking. At stock speeds, they obviously ran okay in confined spaces with little to no airflow.


Trash80toHP_Mini

NIGHT STALKER
You're missing the point, outside the fanless Compacts with melted vent gratings over the A/B (I have one like that) Apple's case designs had fairly adequate airflow. The CPU is only a part of the system cooling budget, the PSU is a far bigger piece of that pie and it NEEDS to be cooled. That little fan on the floor of the LC is not a bad design choice at all, it does a lot more than you're giving it credit for, don't underestimate its importance.

 
Top