• Updated 2023-07-12: Hello, Guest! Welcome back, and be sure to check out this follow-up post about our outage a week or so ago.

Help with cleaning SE/30 board after recap

feeef

Well-known member
I recently got two SE/30s. One had a battery bombed motherboard which had pretty bad corrosion and is out of repair in my opinion. The other motherboard was not touched by corrosion but was showing the Simasimac issue.

I am not an expert at soldering but I did a couple of successful recapping on LCs so I decided I would recap the second motherboard.

While soldering C7, I put too much flux and had some of it going under the ASC chip. I tried to remove with some 95% ethyl alcohol (as I don't have IPA) and a toothbrush. I also made sure that there was no short between pins.

When I tested the board, there was no more Simasimac pattern but the chime was pitched up and it hanged on the grey screen. I though it was due to the mess I made with the ASC chip, so I tried to clean with more alcohol, even by blowing some compressed air around that area to try removing as much residue as possible, but the more I cleaned, the worse the chime was until there is no chime anymore and the mac still remains on its sharp and consistent grey screen.

Maybe there is another issue with that board but I would like to clean that chip first in order to make sure that it is not the cause if the problem.

I don't have an ultrasonic cleaner so I was wondering what was there was another way to clean up my board.

Here is a picture of that particular area after recapping.

index.php


Thanks for your help!
 

falen6

Well-known member
you should clean the entire board , both sides.
I have done many of these machines and my usual procedure is

A sink of warm water , toothbrush and washing up liquid.
I place the whole board in the water and clean every part of it with the washing up liquid and a tooth brush ..GENTLY going over it with the tooth brush and lots and lots of suds. Then rinse with water over and over. Then I go outside , hold the board by its metal plat on the rear and spin it as fast as i can - sounds dumb but this gets 90% of the water off the board very fast. The i dry the board with a small cloth.

You want to get as much of the water off the board - you dont want it drying on the board.

people leave the board overnight to dry in a warm place before testing - i use a hair dryer to spped up the process.

On 2 seperate times after i failed recap I found tiny 'solder balls' that managed to lodge themselves between pins - dont know how they got there during the recap but after i removed them the board came to life,


so 1: clean the entire board
2 - look for any stray solder blobs

I always used acetone to clean up around solder work - strong stuff and it shifts anything but you have to be careful with it - it melts plastics and will remove sticker writing on the board
 

feeef

Well-known member
Thank you for the help @falen6 ! I will try that cleaning method. I usually keep Acetone away from plastics so I will
avoid that in a first step.

I have had a tiny solder ball shifting between the legs of the ASC chip while I was cleaning the C7 pad with some de-soldering wick. I don't think I fully removed it but I had it soldered on the back of one of the legs. I tested and there was not short between the legs.

I could also remove the chip off the board, clean it up and re-solder but even though I have the gear to do that, my soldering skills are still pretty limited so I will first try cleaning the motherboard.
 

chiptripper

Well-known member
The method mentioned by @falen6 is good advice, basically what I do too. Alcohol will displace water so I used that after the scrub to speed up the drying process, and de-ionized water is best.

If the issue persists after a good scrubbing, it’s unlikely that flux residue is the prob. Might be RAM (test in banks of four), ROM (might not be making good pin contact), or muxes and related address lines (UA8 to UG8, scrub really well and inspect carefully).
 

feeef

Well-known member
Thank you for the tips @chiptripper . I cleaned the board with water first (left it for one hour), then dried the board with not too heavy compress air, then put it into IPA for another hour and finally let it fully dry during the night so I think that the board was clean.

Unfortunately I still have the issue. Very distorted chime and hang on grey screen. I don't think it's the RAM because even without it, the sad mac chime is distorted. It sizzles a lot. I tried with a known working speaker so I know it's not the speaker. I also tried with another ROM and got the exact same result.

I have also redone my recap in case there would be an issue with that but that didn't help.

I cannot see any damaged lines in the area you suggested. Do you think it can be a broken chip? If so, I don't really know how to debug further.

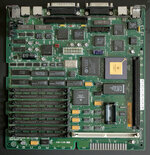
Here is a picture of my entire board.

IMG_5937_CR2_edited.jpg
 

falen6

Well-known member
did you try reseating all the chips that are in chip holders ?
that video rom chip looks off - looks like its twisted - take them out carefully , check the pins and put them back carefully

did you go over the board with a tooth brush and clean it ? - i can see dirt all over it still. You need to wash every part of that board - not just soak it - you need to use the tooth brush and washing up liquid ( or something ) and carefully scrub every part of it ( the board should be covered in suds as you are doing this ) - if you do that the board should look like new - yours still has dirt/dust everywhere

throw up a picture of the other side of the board as well
 
Last edited:

zigzagjoe

Well-known member
Thank you for the tips @chiptripper . I cleaned the board with water first (left it for one hour), then dried the board with not too heavy compress air, then put it into IPA for another hour and finally let it fully dry during the night so I think that the board was clean.

Unfortunately I still have the issue. Very distorted chime and hang on grey screen. I don't think it's the RAM because even without it, the sad mac chime is distorted. It sizzles a lot. I tried with a known working speaker so I know it's not the speaker. I also tried with another ROM and got the exact same result.

I have also redone my recap in case there would be an issue with that but that didn't help.

I cannot see any damaged lines in the area you suggested. Do you think it can be a broken chip? If so, I don't really know how to debug further.

Here is a picture of my entire board.

View attachment 57583
Does the chime sound weird in headphones too? It could be you have multiple issues going on - analog issues in the speaker amp or other parts of the audio circuity - that might not be necessarily related to the no boot.

On the grey screen, do you get rounded corners or do they stay sharp?
 

chiptripper

Well-known member
Your recap looks good to me.

I agree with @zigzagjoe’s separate issues suggestion. For sound, start buzzing out traces from UB10 and UB11.

It’s possible that the ROM is good, but just not making good pin contact. Some people use a rubber band to make sure it’s tight.

For RAM, test in banks of four until you can 100% rule out a bad stick.

Guessing this is a mux chip though. UE8 causes issues more than others, in my experience. Buzz out the traces, reflow the pads, replace if necessary. Good thread here on this problem.
 

feeef

Well-known member
@falen6 I reseated the video ROM. It was not off at all, the lens distortion gave that impression. Regarding cleaning, I did use a toothbrush and the board looks cleaner in real than it is in the picture. The image came out a bit washed out. I will redo a cleaning anyway. That won't hurt. However seeing no improvement at all with this, I guess the issue comes from somewhere else.

@zigzagjoe yes, the chime is bad even in the headphones. However, if I press the reset button, it sounds clearer but still pitched up. Regarding the grey screen, I never get the rounded corners.

@chiptripper I will try holding the ROM in a tighter way and see if I get any improvements. UB10, UB11 and UE8 were close enough to the leaking capacitors to have had trouble indeed. I can clean and reflow the chips but my electronic debugging skills are still limited (I am learning though!). Do you how to check if the component is defective? Or somewhere I can learn? I wish to learn.

Thank you all so much for your help anyway! I greatly appreciate it!

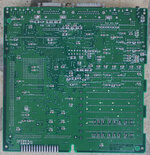
Here is a picture of the back of the board:

IMG_5938_CR2_edited.jpg
 

chiptripper

Well-known member
Believe you’d need a logic probe or oscilloscope to directly test those chips.

Indirectly, though, you can check each data line by referencing a schematic. Basically, you make sure there’s good continuity and little resistance between point A and point B.

What often happens is cap damage can cause solder (both in vias and on the surface) to degrade and become resistive. Sometimes the copper in traces and vias itself becomes compromised. Sometimes a trace is completely cut but it’s not visibly obvious.

This method won’t tell you if the chips themselves are dead, but it can help rule out these other causes.
 

feeef

Well-known member
I checked continuity between the SCSI and SWIM chips because I read in this forum that it can be a reason for hang on grey screen. I followed this schematics.
SCSI pin 26 and SWIM pin 9 (D2) give me no continuity. I can retrieve the pins in the back of the board, which give me continuity this time but the pin in the back of the SWIM don't make continuity with the SWIM's pin itself.

I also don't have continuity between those 2 components for A0 to A3. Again, I don't know where to follow the traces there to find any broken area. It seems to be inside the board. I guess the inside of the board would be less prone to break? Should I just re-flow the chip?

Sorry if I am asking dumb questions here. I am new to this level of hardware debugging and the issues with this board may be too complex for a beginner? I was hoping that a recap and cleaning would do the trick. I will try to do more cleaning of this particular area though.
 

feeef

Well-known member
I cleaned the board another time with more soap and spending more time with the toothbrush, going into each corner and insisting in the ares of the capacitors. Dried it once with compressed air (not too powerful) and I then put it back into IPA for an hour, dried it again over night.

Unfortunately, the problem remains. Sometimes the chime is quite louder but still distorted. Pressing reset can make it clearer but pitched up. The screen remains flat grey.

I think those issues are out of my skills and I will either try to find someone to help or try to find another unit. I was lucky enough for this one not to be bombed but not lucky enough for it to work with a simple recap.
 
Top