• Updated 2023-07-12: Hello, Guest! Welcome back, and be sure to check out this follow-up post about our outage a week or so ago.

Got my SE/30 - next steps ?

alexdyjes

Member
The sockets are not easy to replace without the correct tools / knowledge to remove them without damaging surrounding traces.
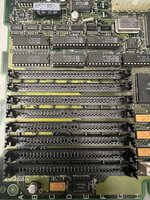
Solid warning, but it is good to know that the option exists. I swapped new sockets into mine. If someone is having their board professionally reworked they can have this done at the same time.
 

LaPorta

Well-known member
Also...if you have soft hands, and decent fingernails, you can just bend them until they slide by the chip and no further. I still haven't broken any by being very ginger. You just cant bend them like it isnt an issue.
 

smrieck511

Well-known member
I watched a guy on YouTube gently pushing the SIMMs forward (toward the serial ports)... looked like it didn't involve pulling the tabs outward very much or at all. Is that all thats needed?

sorry for my ignorance on this one and thanks.
 

imactheknife

Well-known member
Was going to grab that, but always scares me that someone can jam an se board into an se/30 case and you can’t tell if thats been done unless you can boot it up to desktop possibly. Glad you got a true se/30!
 

smrieck511

Well-known member
Got all the 256k simms out and thankfully did not break any of the clips.
 

Attachments

  • 148AF069-32A4-4773-99F8-F6DC2BA8E14A.jpeg
    148AF069-32A4-4773-99F8-F6DC2BA8E14A.jpeg
    1.9 MB · Views: 30

smrieck511

Well-known member
Sorry for all the questions but the fact that it boots to the disc with a ? would indicate that it is seeing the SCSI drive even though the drive is malfunctioning mechanically ... in other words, it would not do this if there were nothing attached to the scsi cable, correct? (there is no disc in the floppy Drive).

just trying to verify that the scsi bus and chips are OK on the board. I have no reason to believe they are not.
 

joshc

Well-known member
Sorry for all the questions but the fact that it boots to the disc with a ? would indicate that it is seeing the SCSI drive even though the drive is malfunctioning mechanically ... in other words, it would not do this if there were nothing attached to the scsi cable, correct? (there is no disc in the floppy Drive).

just trying to verify that the scsi bus and chips are OK on the board. I have no reason to believe they are not.
No, flashing floppy icon happens when no compatible blessed system folder is found on any bootable device - so that will happen even if no drives are attached. It's a good sign though, it shows the machine is ready to boot an OS.

But yeah, the SCSI bus is most likely OK at this point. What are your plans for a replacement drive?
 

smrieck511

Well-known member
ah ok thanks. The next step is to figure out what SCSI to SD would be best. I'll probably put in 32 or 64 MB of RAM I can't imagine ever needing 128. I also cleaned and worked on the floppy drive and I think that is working correctly at this point.

The case really cleaned up well, and at some point, I will retrobright all of that, and the keyboard and mouse.

I put it back together and cranked the brightness on the monitor to see how much life the CRT had left and it was really bright and clear so I was happy about that.
 

joshc

Well-known member
The next step is to figure out what SCSI to SD would be best.
Have a look at ZuluSCSI.

The case really cleaned up well, and at some point, I will retrobright all of that, and the keyboard and mouse.
Just bear in mind that retrobright is not permanent it will yellow again. Also the retrobright process often weakens the plastic and if done incorrectly it can leave permanent stains.
 

smrieck511

Well-known member
yeah, I don't know much about SCSI to SD options but it sounds like Zulu is the way to go. Thanks for all your help.
 

LaPorta

Well-known member
Yes, if the SCSI system was not reporting correctly, the machine would get stuck at a gray screen with a mouse pointer only…there would be no flashing disk ever appearing. You should be ok.
 

Juror22

Well-known member
Just bear in mind that retrobright is not permanent it will yellow again. Also the retrobright process often weakens the plastic and if done incorrectly it can leave permanent stains.
Some good warnings, but the issues can be mitigated by not trying to rush things and also by paying attention to those that have done it correctly before.
In this thread, PotatoFi has some excellent advice concerning post-retorbrite dressing that may prevent re-yellowing (I'm using it on my items now, but it may take a few years to confirm PotatoFi's findings). The entire thread is actually a pretty good review of all things related to a restoration.
 

smrieck511

Well-known member
Some good warnings, but the issues can be mitigated by not trying to rush things and also by paying attention to those that have done it correctly before.
In this thread, PotatoFi has some excellent advice concerning post-retorbrite dressing that may prevent re-yellowing (I'm using it on my items now, but it may take a few years to confirm PotatoFi's findings). The entire thread is actually a pretty good review of all things related to a restoration.
thanks!
 

smrieck511

Well-known member
did the twist method to remove the caps. Went gently and patiently. Thankfully did not lift any pads. There was a little electrolyte under C12, but the others appeared to be clean.

cleaned everything out andretrobrited. I had everything back together this morning and it booted with a low volume chime, mouse, cursor, and a blinking?... so that is the way I bought it. Thankfully, I didn't mess anything up it seems.
 

smrieck511

Well-known member
did the twist method to remove the caps. Went gently and patiently. Thankfully did not lift any pads. There was a little electrolyte under C12, but the others appeared to be clean.

cleaned everything out and retrobrited. I had everything back together this morning and it booted with a low volume chime, mouse, cursor, and a blinking?... so that is the way I bought it. Thankfully, I didn't mess anything up it seems.... next up, RAM upgrade, hopefully I can get it to boot from the floppy and then assess what I wanna do with SCSI to SD options.
 

smrieck511

Well-known member
I recapped with tantalum polymers, added 128mb of ram (no broken clips), retrobrited, fully cleaned the floppy drive and internals and reflowed the solder points on the analog board...

And it boots with sound! Nice steady picture. Really grateful for this forum. Thank you!

next steps, put in Rominator II which will be here tomorrow, test the floppy drive (i have new eject gears if needed) and figure out what my options are with SCSI to SD (because I am completely confused on how that all works).

Thanks again!!
 
Last edited:
Top