• Updated 2023-07-12: Hello, Guest! Welcome back, and be sure to check out this follow-up post about our outage a week or so ago.

Apple Adjustable Keyboard

8tto

Active member
Hi, I’m trying to get my Adjustable Keyboard to work.

Apart from the usual flakey keys, the separate Nummeric pad isn’t working. I’ve only found one set old instal disks for the keyboard on Macintosh Garden, but it will not install on my system.

I’m running a Colour Classic Takky (6500 MB) with System 8.6. The keyboard is recognised in System Profiler and the mouse connected through the Nummeric Pad is working. The adjustable keyboard should work on any ADB Mac, shouldn’t it?

Should the correct drivers be included in system 8.6?

Does anyone know a use for the Record button?

Kind regards from Norway


Cory5412

Daring Pioneer of the Future
Staff member
To my recollection, these shouldn't need the install software.

The button at the top with a triangle on it (if that's what you mean by Record) is the power key, it should turn the machine on and when it's running, it will offer to shut down the machine.

Just to make sure, which all keys aren't working? Is it mostly the F-keys that don't do anything, or is it the whole numpad?

The F-keys, which on these are smaller circular buttons, if I remember correctly, don't do much by default on the other Apple keyboards either. At least in 9,  you could tie them to aliases or applescripts to launch applications, some programs might use them, but the most of the reason F-keys are on Mac keyboards  at all is for terminal emulation, mainframe connectivity, and PC emulation. Same for the editing cluster (pgup/pgdn/home/end/insert/forward-delete) as well, although slightly more stuff on Classic MacOS can use those.


8tto

Active member
I must admit I didn’t try the small F-keys on the numeric keypad, only the the ordinary keys.

Neither the numbers nor the arrow-keys worked.

So I wondered if there was something I had to do to enable the numeric keypad.

Most of the keys on the ordinary keyboard worked as good as one could expect on an old keyboard- also the on/off (play) button and the small volume-buttons.

The “record”-button is the small button with a microphone symbol in the lower right corner of the keyboard.

Right now I have dismantled the keyboard and am trying to figure out how to open and rinse the keyswitches on the main keyboard  :) .


8tto

Active member
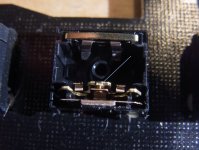
First picture is the keyswitch without key caps, shaft, spring and the top-lid of the keyswitch. The blue line marks the actual switch. On the opposite side is the “click-gismo”.

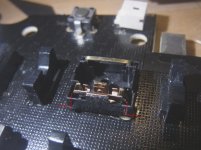
Next picture is another angel without the tactile spring. Red lines mark the tiny dents that keep the top-lid in place.

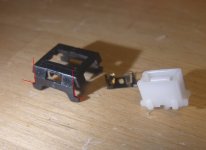
Third picture is the shaft, the tactile spring and the top lid. Red lines marks the hooks that engage with the bottom-part. I used a pointy medical blade to bend the hooks away from the dents on the bottom part. Pictures made with macro and the lens one cm away - it’s tiny and not easy to see the parts on the black plastic.

I think the whole keyswitch operates the opposite way I thought: the two small “teeth” on the white shaft keeps the switch open while the key is not engaged. By bending the tiny lips on both sides of the switch carefully, I was able to manipulate the engagement-point during the key-travel. Hope it works and makes some of the keys more responsive and eliminate unwanted repeats.

i8tto

 
Last edited by a moderator:

cruff

Well-known member
While I don't have a keyboard of this type to try to help out, I wanted to give you kudos for your excellent macro photos! Well lit and nicely focused.


Cory5412

Daring Pioneer of the Future
Staff member
yay!

Also, I looked at a picture of the Apple Adjustable Keyboard online and I had forgotten entirely about the volume buttons.

That's either a mute key or an activation for something like PlainTalk, which was Apple's speech recognition and command software in the mid '90s. I don't have the manual on hand, I'll see if I can find a copy.


8tto

Active member
Thanks! And Happy New Year!

It looks like it’s the thicker, brass part of the switch that needs to be bent towards the copper leaf to make the contact better. The keyboards were pretty clean inside, but after some dusting - and maybe the disassembly/assembly - the numeric keypad works.

I have to work with a lot of the keys still, tough.

8BF0B560-A40B-42C8-8EE5-C32283ED08E1.jpeg


8tto

Active member
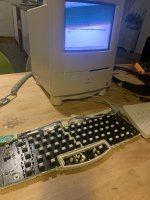
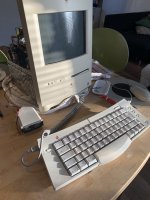
Finished! The keys are usable and a lot better than they where. But still not the best keyboard :) .

I also tried my first retrobrightning: diluted hydroperoxyd in a large kettle, trying to “cook” the parts at 80* C for 4 hours. It’s a lot better than it was, but it’s still more beige/yellow than platinum.

In the upper right corner there is a spot from a sticker that shows a more gray colour.

In the background my Takky halfway through a recap.
 

C1BB8F9D-27D8-435B-8449-BBA9E370D257.jpeg


kerobaros

Well-known member
Looking pretty good! Let us know how the keyboard ages. 

Also, ooooh a Takky. Did you do the harness wiring and everything yourself, or buy it from someone? I have a Mystic and a 5500 that I'd like to one day put together, but it's a daunting task. 


8tto

Active member
Let us know how the keyboard ages. 
I will!

The Takky is homemade some twenty years ago. I might have been lucky, but only followed the detailed instructions to do it. I also hacked the chassis to make room for a CS ethernett-card and the TV/video-card. I regret the later now. Analog TV is not that hot in 2020 :)  Also did the VGA mod, but the screen was not that good even before the conversion and thats why I`m working on a recap of the analog board now. 

 
Top